background image

ET-2714 Thermocouple Calibrator

ET-1714 Thermocouple Calibrator

Users Manual

Hangzhou Zhongchuang Electron Co., Ltd.

Summary of Contents for ET-1714

Page 1: ...ET 2714 Thermocouple Calibrator ET 1714 Thermocouple Calibrator Users Manual Hangzhou Zhongchuang Electron Co Ltd...

Page 2: ...7 3 Function Usage 9 3 1 DC V Measurement 9 3 2 DC mV Measurement 9 3 3 DC mV Source 9 4 Using Thermocouple TC 10 5 Simulating Thermocouples TC 12 6 Advanced Application 13 6 1 Setting 0 and 100 outpu...

Page 3: ...10 Warning 19...
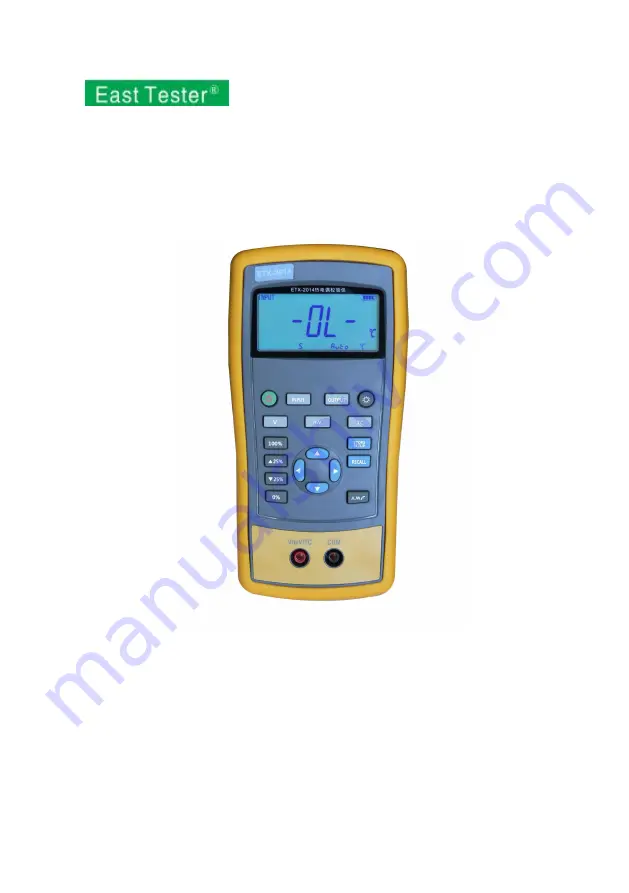
Page 4: ...rovides cold junction compensation Manual stepping automatic stepping 0 100 phase step and slope output Support for PC communication 1 2 Summary of Source and Measure Functions Function Measure Source...

Page 5: ...and charging connector Connect the power adaptor to charge batteries or connect the calibrator to the computer COM terminal Measurement and output public terminal V mV and TC terminal Power supply DC...

Page 6: ...easurement mode Selects output mode Turns backlight on or off Turns Contrast Adjust mode on when powering up Selects thermo couple mode Saves calibrator settings Retrieves a previous calibrator setup...

Page 7: ...es and holds to store the source value as the 0 value Decrements output according to 25 of span Increments output according to 25 of span Sets output by 100 of span Press and hold to store the source...

Page 8: ...n of the calibrator as shown in Figure 2 1 1 Figure 2 1 1 2 Press for more than 2 seconds to turn on the calibrator The calibrator checks itself including check on internal circuit and LCD during whic...

Page 9: ...horizontal line position the number automatic carry but the position of the line have no change press or to select a digit to change 7 Press until the buzzer work to enter 0mV as 0 value 8 Likewise p...

Page 10: ...and simultaneously To enable the mode press and simultaneously To adjust the time duration press and simultaneously the screen will display as shown in Figure 2 2 1 then press and or to adjust the tim...

Page 11: ...adjust the brightness of backlight 3 Press to save brightness level will appear and then the calibrator will enter into the work mode Without pressing key for 5 seconds the calibrator will exit from...

Page 12: ...t the lines after all functions are selected The connection mode and interface are shown in Figure 3 1 1 Figure 3 1 1 3 2 DC mV Measurement Press to re select the DC mV function the display unit is mV...

Page 13: ...n Orange Pink Nickel silicon magne sium 200 1300 J Iron White Black Constantan 200 1200 K Chrome nickel Yellow Green Alumel 200 1370 T Copper Blue Brown Constantan 200 400 B Platinum 30 rhodium Grey P...

Page 14: ...ait one minute or more for the connector temperature to stabilize after you plug the miniplug into the TC input output 2 Press to select Measure mode 3 Press for TC display as shown in Figure 4 2 If d...

Page 15: ...ow Proceed as follows to simulate a thermocouple 1 Connect thermocouple to the TC input output plughole of calibrator as shown in Figure 5 1 2 If necessary press to select mode 3 Press to select therm...

Page 16: ...ermocouple R type 0 1500 Thermocouple S type 0 1500 Thermocouple B model 600 1800 Thermocouple N model 0 0 1000 0 The default set values may not meet your requirements so which can be reset Then you c...

Page 17: ...waveforms 0 100 0 40 second smooth ramp 0 100 0 15 second smooth ramp 0 100 0 Stair step ramp in 25 steps pausing 5 seconds at each step Exit the slop output function please press any key 6 3 Factory...

Page 18: ...When the battery indicator is pointed at the remaining electric quantity is less than 20 Charge is necessary for normal operation of the calibrator The LCD backlight will start operation and the will...

Page 19: ...ts ETX 1814 ETX 2014 30V 0V 31V 0 001V 0 05 2 0 02 2 100mV 15mV 80mV 0 001mV 0 05 20 0 02 20 80mV 125mV 0 01mV 0 05 2 0 02 2 10 18 28 55 temperature coefficient 0 005 FS Input resistance 1M 8 2 DC mV...

Page 20: ...0 400 0 1 1 8 1 2 1 2 0 8 E 200 0 0 950 0 1 1 5 1 0 0 9 0 7 R 20 0 0 500 500 1750 0 1 4 2 5 2 2 5 1 8 1 4 S 20 0 0 500 500 1750 0 1 4 2 5 2 2 5 1 8 1 5 B 600 800 800 1000 1000 1800 0 1 3 5 2 5 2 2 2...

Page 21: ...also includes the following items hard spot test leads one set alligator clip one set one 12V 1A power adaptor ETX 2014 ETX 1814 users manual Figure 9 1 1 9 2 Optional Accessories 6 R03 model recharg...

Page 22: ...he metal contact when the detector is used Fingers should be behind the finger protecting device Connect the common line and then electric test line As for wire removal electric test line should be fi...

Page 23: ...gchuang Electron Co Ltd Phone 0086 571 56770221 Fax 0086 571 56861355 Website Http www east tester com E mail sales east tester com Zip Code 310015 Address No 3 Kangle Road Gongshu District Hangzhou Z...

Reviews: