


562323
05-A1
Installation Manual of Tank Trim
Installation Manual of Tank Trim
Please show the manual to final customer.
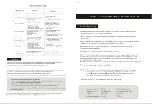
General Drawing
General Drawing
1. Installation of fill valve
Take off the tamper proof,and
adjust the beight by screwing the
upper and lower tube.Then fix the
tamper proof.
Pull the adjusting rod,and raise
or lower the flxed ring to the
desired water level.
Unscrew the locknut and
washer.Position the fill valve into
the tank,then screw the washer
and locknut.
Fixed ring
Tamper proof
Lower tube
Upper tube
Adjustin
Inner float
Outer float
Refill nipple
Triangle washer
Washer
Locknut
Installation
Do not use an in-tank type bowl cleaner in your toilet. In-tank cleaners containing chlorine(calcium
hypochlorite)
can seriously damage fittings in the tank. We shall not be responsible for any tank fitting damage caused
by the
use of cleaners containing chlorine(calcium hypochlorite).
We will not be liable for damages due to improper handling or installation, abuse, or alteration of the
product. We disclaims any responsibility for incidental or consequential damages.
WARNING:
Screw the flush valve tight, and
make sure the fixture block and seal
washer attach on the tank wall. Put
the flapper on the flush valve .
Adjust the angle of the flush valve,
make sure the flapper is easy to
open, and the chain is not blocked.
Screw the flush valve tight, and
make sure the fixture block and seal
washer attach on the tank wall. Put
the flapper on the flush valve .
2.The installation of flush valve
Connect Water supply Tube
Refill tube
Flush valve
Fill water valve
Fill water washer
Plastic filter
3.Installation of push button
Loose the nut clockwise take away
the nut and the washer from the rod.
Washer
Nut
Connect Rod
Install the rod into the tank handle
hole.
Enter the nut on the handle and tighten.
Attention: If the product is different from the drawing , Please take the object as right.


