background image

30

Operation

KEYBOARD BASICS

The unit sounds a tone when you press any key. This tells you the unit
has accepted a command. Numbers in the following photos correspond
to key explanations in the following pages.:


Cuda 128 and Cuda 168EX Sonars, front view, each

showing screen and keyboard.

1. PWR/CLEAR (power and clear)

This key appears in the manual text simply as 

PWR

. Press this key to

turn the unit on and off. It also clears menu selections and the menus
from the screen. To clear a menu from the screen, press 

PWR

 one time.

NOTE:

You must hold the 

PWR

 key down for a countdown of five in order to

turn the unit off.

2. MENU UP (menu up)
3. MENU DOWN (menu down)

These keys appear in the manual text as 

MENU UP

 or 

MENU DOWN

. Most

of the time, the instructions require you to press either menu key, so

4

2

3

1

1

2

3

4

Summary of Contents for 168

Page 1: ...Pub 988 0143 631 www eaglesonar com Cuda 128 Cuda 128 Portable Cuda 168 Cuda 168EX Fish finding Depth Sounding Sonars Installation and Operation Instructions ...

Page 2: ...it necessary to change or end our policies regulations and special offers at any time We reserve the right to do so without notice All features and specifications subject to change without notice All screens in this manual are simulated For free owner s manuals and other information visit our web site www eaglesonar com Eagle Electronics P O Box 669 Catoosa OK USA 74015 Printed in USA ...

Page 3: ...cer Orientation and Fish Arches 12 Shoot Thru Hull Preparation and Installation 14 Power and Cable Connections 16 Mounting the Sonar Unit In Dash or Bracket 18 In Dash Installation 18 Bracket Installation 21 Portable Sonar Installation 25 Operation 30 Keyboard Basics 30 PWR Clear Power and Clear 30 Menu Up and Menu Down 30 Up and Down Arrows 31 Memory 31 Menus 31 Display Opening Screen 32 Chart Sc...

Page 4: ...h Alarm 45 Depth Alarms 46 Shallow Alarm 46 Deep Alarm 46 Display Adjustments 47 Backlights 47 Display Contrast 47 Depth Units of Measure 48 Preset Unit Reset All Options 48 System Info 48 Simulator 48 Digital Data Size for Depth and Temperature 49 Troubleshooting 50 Warranty and Service Information 57 ...

Page 5: ...n optimum performance of your Eagle sonar Improper installation can cause problems down the road especially if the transducer is badly mounted After you ve read the installation instructions install the unit and accessories Then read the rest of the manual The more you know about your sonar the better it will work for you Take advantage of the Simulator feature It allows you to practice operating ...

Page 6: ...s A Skimmer transducer comes packed with your sonar unit Its 20 cone angle offers a wide fish detection area of up to 60º with high sensitivity settings Operates at boat speeds up to 70 mph 61 kts Transmitter 800 watts peak to peak 100 watts RMS Sonar sounding depth capability 600 feet 180 meters Actual capability depends on transducer configuration and installation bottom composition and water co...

Page 7: ...order if you prefer but we recommend this installation sequence Caution You should read over this entire installation section before drilling any holes in your vessel 1 Determine the approximate location for the sonar unit so you can plan how and where to route the cables for the transducer and power This will help you make sure you have enough cable length for the desired configuration 2 Determin...

Page 8: ...ing the installation Determine which of the installation methods is right for your boat Remember the transducer installation is the most critical part of a sonar installation Recommended Tools and supplies If you prefer the option of routing the cable through the transom you will need a 5 8 drill bit The following installation types also call for these recommended tools and required supplies suppl...

Page 9: ...lly have large outboard motors capable of propelling the boat at speeds faster than 35 mph Typically a good location on aluminum boats is between the ribs closest to the engine 2 The transducer should be installed with its face pointing straight down if possible 3 If the transducer is mounted on the transom make sure it doesn t interfere with the trailer or hauling of the boat Also don t mount it ...

Page 10: ...from bangs and bumps Align transducer centerline with hull bottom However there are times when you may need to adjust the transducer slightly higher or lower The slots in the mounting brackets allow you CAUTION Clamp the transducer cable to transom near the transducer This will help prevent the transducer from entering the boat if it is knocked off at high speed Good location Good location Poor an...

Page 11: ...t can t be knocked off when docking or loading on the trailer However the shoot thru hull installation does have its drawbacks First some loss of sensitivity does occur even on the best hulls This varies from hull to hull even from different installations on the same hull This is caused by differences in hull lay up and construction Second the transducer angle cannot be adjusted for the best fish ...

Page 12: ...king at the transducer from the side check to see if it will adjust so that its face is parallel to the ground If it does then the A position is correct for your hull If the transducer s face isn t parallel with the ground remove the transducer and ratchets from the bracket Place the ratchets into the holes in the bracket with the letter B aligned with the dot stamped in the bracket Reassemble the...

Page 13: ...ing mounting holes Hold the transducer and bracket assembly against the transom The transducer should be roughly parallel to the ground The transducer s centerline should be in line with the bottom of the hull Don t let the bracket extend below the hull Mark the center of each slot for the mounting screw pilot holes You will drill one hole in the center of each slot Drill the holes using the 29 bi...

Page 14: ...ew shown at left and seen from above at right Attach the transducer to the transom Slide the transducer up or down until it s aligned properly with the bottom of the hull as shown in the preceding and following figures Tighten the bracket s mounting screws sealing them with the caulking compound Adjust the transducer so that it s parallel to the ground and tighten the nut until it touches the oute...

Page 15: ...nsducer from entering the boat if it is knocked off at high speed If you need to drill a hole in the transom to pass the connector through the required hole size is 5 8 Caution If you drill a hole in the transom for the cable make sure it is located above the waterline After installation be sure to seal the hole with the same marine grade above or below waterline sealant used for the mounting scre...

Page 16: ...osition the transducer to aim straight down when the motor is in the water Tighten the strap securely 3 Route the transducer cable alongside the trolling motor shaft Use plastic ties not included to attach the transducer cable to the trolling motor shaft Make sure there is enough slack in the cable for the motor to turn freely Route the cable to the sonar unit and the transducer is ready for use T...

Page 17: ...o high and needs to be lowered If only the back half of the arch is printed then the nose of the transducer is angled too far down and needs to be raised NOTE Periodically wash the transducer s face with soap and water to remove any oil film Oil and dirt on the face will reduce the sensitivity or may even prevent operation Transducer aimed too far back Transducer aimed too far forward Proper trans...

Page 18: ... The transducer can then be epoxied directly to the outer layer of fiberglass After the epoxy cures the hull is watertight and structurally sound Remember the sonar signal must pass through solid fiberglass Any air bubbles in the fiberglass or the epoxy will reduce or eliminate the sonar signals WARNING Do not remove any material from your inner hull unless you know the hull s composition Careless...

Page 19: ...ncreased greatly to compensate then the transducer should be mounted on the outside of the hull If not then mark the location that shot through the hull the best and follow the instructions on the following pages for a shoot thru hull mounting Shoot thru hull transducer locations for high speed or trolling speed operation Shoot thru hull Installation 1 Make sure the area is clean dry and free of o...

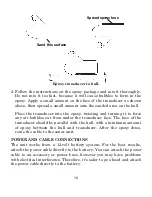
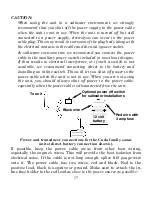
Page 20: ...rom under the transducer face The face of the transducer should be parallel with the hull with a minimum amount of epoxy between the hull and transducer After the epoxy dries route the cable to the sonar unit POWER AND CABLE CONNECTIONS The unit works from a 12 volt battery system For the best results attach the power cable directly to the battery You can attach the power cable to an accessory or ...

Page 21: ...g an inline switch This will let you shut off power to the power cable when the unit is not in use When you are not using the unit you should always shut off power to the power cable especially when the power cable is disconnected from the unit Power and transducer connections for the Cuda family sonar units direct battery connection shown If possible keep the power cable away from other boat wiri...

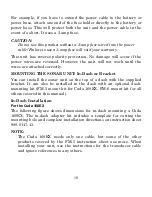
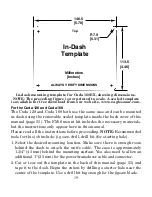
Page 22: ...TING THE SONAR UNIT In Dash or Bracket You can install the sonar unit on the top of a dash with the supplied bracket It can also be installed in the dash with an optional dash mounting kit FM 5 mount kit for Cuda 168EX FM 6 mount kit for all others covered in this manual In Dash Installation For the Cuda 168EX The following figure shows dimensions for in dash mounting a Cuda 168EX The in dash adap...

Page 23: ...all the instructions before proceeding NOTE Recommended tools for this job include jig saw drill drill bit for starting hole 1 Select the desired mounting location Make sure there is enough room behind the dash to attach the unit s cable The case is approximately 1 3 4 45 mm behind the mounting surface You also need to allow an additional 1 25 mm for the power transducer cable and connector 2 Cut ...

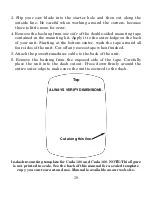
Page 24: ... four sides of the unit Cut off any excess tape when finished 5 Attach the power transducer cable to the back of the unit 6 Remove the backing from the exposed side of the tape Carefully place the unit into the dash cutout Press down firmly around the entire outer edge to make sure the unit is secured to the dash In dash mounting template for Cuda 128 and Cuda 168 NOTE This figure is not printed t...

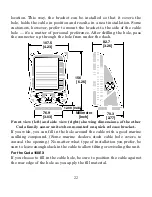
Page 25: ...d a Cuda 128 or 168 Holes in the bracket s base allow wood screw or through bolt mounting You may need to place a piece of plywood on the back side of thin panels to reinforce the panel and secure the mounting hardware Front view left and side view right showing dimensions of Cuda 168EX when mounted on gimbal bracket Drill a 5 8 15 9 mm hole in the dash for the power transducer cable The best loca...

Page 26: ...ns of the other Cuda family sonar units when mounted on quick release bracket If you wish you can fill in the hole around the cable with a good marine caulking compound Some marine dealers stock cable hole covers to conceal the opening No matter what type of installation you prefer be sure to leave enough slack in the cable to allow tilting or swiveling the unit For the Cuda 168EX If you choose to...

Page 27: ...the gimbal knobs then loosely screw the knobs into their sockets Slide the unit into the bracket with the rubber washers to the outside of the bracket arms Tilt the unit to the desired viewing angle and tighten the knobs finger tight For the Cuda 128 and Cuda 168 These units use a quick release mounting bracket When you run the cable through the hole make sure you allow enough slack for tilting th...

Page 28: ...k of the unit should be touching the front of the bracket as you lower it into position As you push down the unit will lock into place with a distinct click To adjust the viewing angle pinch the ratchets with one hand then tilt the unit with your other hand Release the ratchets and the unit locks into the new position To dismount the unit for storage press the ratchets and lift the unit off the br...

Page 29: ...djust viewing angle use one hand to press and release the spring loaded ratchets while you move the unit with the other hand Portable Sonar Installation Like many Eagle products the Cuda sonar family is capable of portable Bracket front Depress ratchets to release ...

Page 30: ...D alkaline batteries or an optional sealed rechargeable battery To use a portable power pack you simply install the batteries and then attach the sonar unit to the power pack s bracket Plug in the power transducer cable and you re ready to fish The PPP 12 has a quick release mounting bracket built into the case The PPP 13 requires you to attach the gimbal bracket to the case and then attach the so...

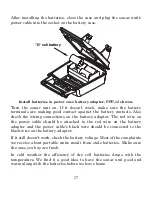
Page 31: ...dapter The red wire on the power cable should be attached to the red wire on the battery adapter and the power cable s black wire should be connected to the black wire on the battery adapter If it still doesn t work check the battery voltage Most of the complaints we receive about portable units result from stale batteries Make sure the ones you buy are fresh In cold weather the efficiency of dry ...

Page 32: ...in the following figure Attach the transducer to the bracket with the supplied hardware Make sure there is one washer on each side of the transducer inside the bracket Slide the other washer over the end of the bolt and thread the nut onto it Screw the suction cup onto the bracket using the supplied screw and flat washer Tie the nylon cord through the hole in the top of the bracket When using this...

Page 33: ...oisten the cup then press it onto the hull as firmly as possible Tie the nylon cord to the boat and route the transducer cable to the sonar unit Your portable sonar is now ready for use Portable transducer installed on boat transom NOTE For optimum operation the portable transducer should be adjusted so that it is parallel to the ground For more information on this see the earlier segment on Trans...

Page 34: ...wer and clear This key appears in the manual text simply as PWR Press this key to turn the unit on and off It also clears menu selections and the menus from the screen To clear a menu from the screen press PWR one time NOTE You must hold the PWR key down for a countdown of five in order to turn the unit off 2 MENU UP menu up 3 MENU DOWN menu down These keys appear in the manual text as MENU UP or ...

Page 35: ...its of Measure Fish Alarm Temp Size Depth Size Fish I D mode Noise Reject mode Display Contrast Shallow and Deep alarms It does not require nor does it use an internal backup battery so you never have to worry about replacement batteries MENUS This unit uses menus to guide you through the various functions and features Menu names and settings appear in the manual text as small capital letters like...

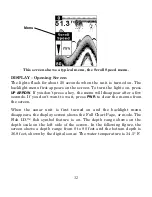
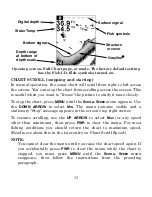
Page 36: ...ew seconds If you don t want to wait press PWR to clear the menus from the screen When the sonar unit is first turned on and the backlight menu disappears the display screen shows the Full Chart Page or mode The Fish I D fish symbol feature is on The depth range shows on the depth scale on the left side of the screen In the following figure the screen shows a depth range from 0 to 80 feet and the ...

Page 37: ...ary Stop message appears in the screen s top right corner To resume scrolling use the UP ARROW to select MAX or any speed other than minimum then press PWR to clear the menu For most fishing conditions you should return the chart to maximum speed Read more about this in the later entry on Chart Scroll Speed NOTE You cannot clear the menu until you raise the chart speed again If you accidentally pr...

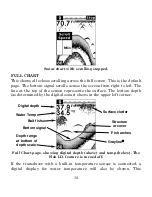
Page 38: ... The bottom depth as determined by the digital sonar shows in the upper left corner Full Chart page showing digital depth above and temp below The Fish I D feature is turned off If the transducer with a built in temperature sensor is connected a digital display for water temperature will also be shown This Grayline Fish arches Bottom signal Digital depth Water Temp Depth range at bottom of depth s...

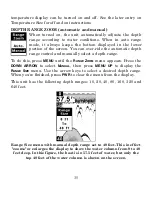
Page 39: ... a depth range To do this press MENU until the RANGE ZOOM menu appears Press the DOWN ARROW to select MANUAL then press MENU UP to display the RANGE SIZE menu Use the arrow keys to select a desired depth range When you re finished press PWR to clear the menu from the display This unit has the following depth ranges 10 20 40 80 160 320 and 640 feet Range Size menu with manual depth range set to 40 ...

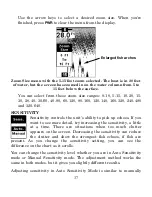
Page 40: ...stead of zero would appear at the top of the depth range scale To turn the zoom feature off press the MENU key until the ZOOM menu appears Press the DOWN ARROW key to select OFF then press PWR to clear the menu The top of the depth range scale returns to zero NOTE Using the Zoom command while in auto depth Range Zoom mode will always enlarge the echoes near the bottom because auto Range always kee...

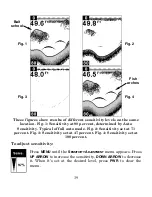
Page 41: ... ability to pick up echoes If you want to see more detail try increasing the sensitivity a little at a time There are situations when too much clutter appears on the screen Decreasing the sensitivity can reduce the clutter and show the strongest fish echoes if fish are present As you change the sensitivity setting you can see the difference on the chart as it scrolls You can change the sensitivity...

Page 42: ...nge the setting with auto turned on the unit will continue to track the bottom and make minor adjustments to the sensitivity level with a bias toward the setting you selected Adjusting sensitivity in Manual Sensitivity Mode is similar to driving a car without cruise control you have complete manual control of the car s speed In your unit manual mode allows you to set sensitivity at 100 percent max...

Page 43: ...de Fig 2 Sensitivity set at 71 percent Fig 3 Sensitivity set at 47 percent Fig 4 Sensitivity set at 100 percent To adjust sensitivity Press MENU until the SENSITIVITY ADJUSTMENT menu appears Press UP ARROW to increase the sensitivity DOWN ARROW to decrease it When it s set at the desired level press PWR to clear the menu Fig 3 Fig 4 Bait school Fish arches Fig 1 Fig 2 ...

Page 44: ...alue This allows you to tell the difference between a hard and soft bottom For example a soft muddy or weedy bottom returns a weaker signal which is shown with a narrow or no gray line A hard bottom returns a strong signal which causes a wide gray line If you have two signals of equal size one with gray and the other without then the target with gray is the stronger signal This helps distinguish w...

Page 45: ...WR to clear the menu FISH I D The Fish I D feature identifies targets that meet certain conditions as fish The microcomputer analyses all echoes and eliminates surface clutter thermoclines and other signals that are undesirable In most instances remaining targets are fish The Fish I D feature displays symbols on the screen in place of the actual fish echoes There are three symbol sizes small mediu...

Page 46: ...imum detail we recommend you turn off Fish I D and begin learning to interpret fish arches You may see Fish I D symbols on the screen when actually there are no fish The reverse is also true Fish I D can actually miss fish that are present Does that mean Fish I D is broken No the feature is simply interpreting sonar returns in a specific way to help take some of the work out of reading the screen ...

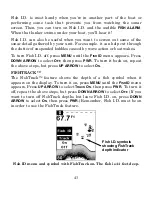
Page 47: ...H ID menu appears Press DOWN ARROW to select OFF then press PWR To turn it back on repeat the above steps but press UP ARROW to select ON FISHTRACK The FishTrack feature shows the depth of a fish symbol when it appears on the display To turn it on press MENU until the FISH ID menu appears Press UP ARROW to select TRACK ON then press PWR To turn it off repeat the above steps but press DOWN ARROW to...

Page 48: ...e instead of a fish arch Reducing the chart speed may result in a shorter line that more closely resembles a regular fish return Adjust scroll speed by pressing MENU until SCROLL SPEED appears Press UP ARROW to increase it and press DOWN ARROW to decrease it Press PWR to clear the menu To return to the original setting repeat the above steps but use the arrow keys to set the speed at MAX before cl...

Page 49: ... may want to turn ASP off This allows you to view all incoming echoes before they are processed by the ASP feature To change the ASP setting press MENU DOWN until NOISE REJECT appears Use the up and down arrow keys to select the desired setting then press PWR to clear the menu ALARMS The sonar unit has three different types of alarms fish shallow and deep Fish Alarm The Fish Alarm sounds a tone wh...

Page 50: ...e the shallow alarm s depth setting or press DOWN ARROW to decrease it The number in the shallow alarm s menu box shows the current shallow alarm setting When the number reaches the desired setting press PWR to clear the menu When the bottom depth goes shallower than the alarm s setting an alarm tone sounds and a message box appears on the screen Press PWR to silence the alarm This turns the alarm...

Page 51: ...MENU repeatedly until the BACK LIGHT menu appears Press UP ARROW to turn the light on or the DOWN ARROW to turn it off DISPLAY CONTRAST The unit s display contrast is adjustable to suit different lighting conditions This will help you see the screen from different angles or at various times of the day The default setting is min minimum percent To adjust the contrast press MENU DOWN until the DISPL...

Page 52: ...me while you press the PWR key Release the keys as the unit powers up The unit will turn on with factory settings restored SYSTEM INFO To show the operating software system information press MENU DOWN until the UNIT INFO menu appears Press PWR to clear the screen SIMULATOR This unit has a built in simulator that shows a simulated bottom signal with fish signals This lets you practice with the unit...

Page 53: ...hanged to medium or large The digital display for both Depth and Temperature can also be turned off or on To change either of these options press MENU DOWN until either the DEPTH SIZE or TEMP SIZE menu appears then use the ARROW keys to select the desired option Press the PWR key to clear the menus ...

Page 54: ...tor It should be at least 11 volts If it isn t the wiring to the unit is defective the battery terminals or wiring on the terminals are corroded or the battery needs charging Unit turns on only in simulator mode There is a problem with the transducer or the transducer cable Check the cable for damage Unit freezes locks up or operates erratically 1 Electrical noise from the boat s motor trolling mo...

Page 55: ...sly It may change the range to limits far greater than the water you are in If this happens place the unit in the manual mode then change the range to a realistic one for example 0 100 feet and increase the sensitivity As you move into shallower water a bottom signal should appear 4 Check the battery voltage If the voltage drops the unit s transmitter power also drops reducing its ability to find ...

Page 56: ... targets allowing the display to show much more detail 4 The boat must be moving at a slow trolling speed to see fish arches If the boat is motionless fish stay in the cone showing on the screen as straight horizontal lines NOISE A major cause of sonar problems is electrical noise This usually appears on the sonar s display as random patterns of dots or lines In severe cases it can completely cove...

Page 57: ...e sonar unit is turned off then start the engine Increase the RPM with the gearshift in neutral If noise appears on the display the problem could be one of three things spark plugs alternator or tachometer wiring Try using resistor spark plugs alternator filters or routing the sonar unit s power cable away from engine wiring Again routing the power cable directly to the battery helps eliminate noi...

Page 58: ...54 Notes If the dash mount template on page 55 has been removed from this manual a free replacement manual containing the template can be downloaded from our web site www eaglesonar com ...

Page 59: ... 6 mount kit Top Cut along this line ALWAYS VERIFY DIMENSIONS Measure the reference cross hair below to confirm that this template is printed to the correct scale The vertical line and the horizontal line should each be 2 inches long 50 8 mm Print only at 100 scale do not fit to page do not enlarge or shrink ...

Page 60: ...56 Notes ...

Page 61: ...OR REPLACEMENT OR REFUND AS JUST DESCRIBED IS THE EXCLUSIVE REMEDY AVAILABLE TO YOU AGAINST US FOR ANY DEFECT MALFUNCTION OR NON CONFORMITY CONCERNING THE PRODUCT OR FOR ANY LOSS OR DAMAGE RESULTING FROM ANY OTHER CAUSE WHATSOEVER WE WILL NOT UNDER ANY CIRCUMSTANCES BE LIABLE TO ANYONE FOR ANY SPECIAL CONSEQUENTIAL INCIDENTAL OR OTHER INDIRECT DAMAGE OF ANY KIND Some states do not allow the exclus...

Page 62: ...change or end our shipping policies regulations and special offers at any time We reserve the right to do so without notice in Canada If you re in Canada and you have technical return or repair questions please contact the Factory Customer Service Department Before any product can be returned you must call customer service to determine if a return is necessary Many times customer service can resol...

Page 63: ...s com 3 Canadian customers can write Lowrance Eagle Canada 919 Matheson Blvd E Mississauga Ontario L4W2R7 or fax 905 629 3118 Shipping Information If it becomes necessary to send a product for repair or replacement you must first receive a return authorization number from Customer Service Products shipped without a return authorization will not be accepted When shipping we recommend you do the fol...

Page 64: ...Visit our web site www eaglesonar com Eagle Pub 988 0143 631 Copyright 2002 All Rights Reserved Printed in USA 111902 Eagle Electronics ...

Reviews: