background image

ENGLISH   4

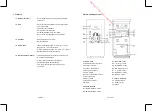
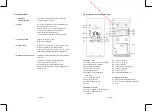
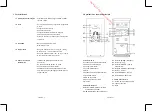
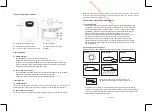
3. Outdoor Thermo Sensor

D1: Transmission Indication LED            
D2: Wall Mount Hole
D3: Channel Select Switch                  

D4: “RESET” button                         
D5: Battery Compartment    
D6: Stand

4. Getting Started:

4.1 Main Unit:

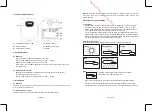
 •  Slide open main unit battery compartment cover [C2]
 •  Insert 3 x AAA batteries observing polarity [ “+” and “ –“ marks]
 •  Replace main unit battery compartment cover [C2]
 •  Use a pin to press the RESET [B9] button on the rear of the main unit, the main unit is  
 

now ready for use

4.2 Outdoor Thermo Sensor

 •  Batteries compartment (D5) of thermo sensor is locating behind the back cover,  
 

unscrews the batteries cover to open.

 •   Insert 2 x AAA batteries observing polarity [ “+” and “–“ marks]

5. Installation

5.1 Main Unit

The main unit can be placed onto any flat surface (C3), or wall mounted by the hanging 

hole (C1) at the back of the unit. 

5.2 Outdoor Thermo sensor

The remote sensor should be securely mounted onto a horizontal surface. 

ENGLISH   5

Note:

Transmissions between receiver and transmitter can reach up to 30m in open area.  

Open Area: there are no interfering obstacles such as buildings, trees, vehicles, high 

voltage lines, etc.

6. Weather Forecast Function

6.1 Operation

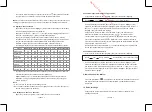
 •  After Batteries inserted, or holding “WEATHER” button (B5) for 3 seconds, weather  


icon flash (A2) on the LCD. Enter the current weather pressing “-” (B4) or “+ “(B7)  


button. Press “WEATHER” (B5) button to confirm the setting. The weather forecast  


may not be accurate if the current weather entered is not correct.

 •  The current weather status should be entered again if the altitude of the Main Unit is  


changed. (Barometric pressure is lower at higher altitude location. Therefore, altitude  


change will affect the weather forecast). The weather station will start the first forecast  


at 6 hours later after the current weather status is entered.

6.2  Weather Conditions

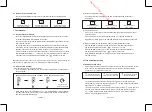
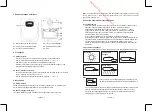
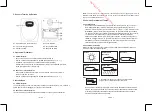
There are totally 5 different weather status animations in the weather forecast. 

Note:

 •  “                              “   is shown if the weather forecast is Rainy and outdoor                                      


                    temperature (any channel) under 0°C. 

•  If there is any inconsistency of weather forecast between Local Weather Station  
 

and this unit, the Local Weather Station's forecast should prevail. We will not hold  


responsible for any trouble that may come up due to wrong forecasting from this unit.

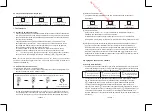
Sunny

Rain

Freezing or Snow

SlightyCloudy

Cloudy

Freezing or Snow

Downloaded from www.vandenborre.be

Summary of Contents for AL803

Page 1: ...Slim Wireless Weather Station with Temperature and Humidity and Radio controlled Clock User Manual D o w n l o a d e d f r o m w w w v a n d e n b o r r e b e...

Page 2: ...Installation 5 1 Main Unit 4 5 2 Outdoor Thermo Sensor 4 6 Weather Forecast Function 6 1 Operation 5 6 2 Weather Conditions 5 6 3 Barometric Trend 6 7 Thermometer 7 1 RF Transmission Procedure 6 7 2 T...

Page 3: ...ttery indicator for Outdoor Thermo Sensor Wall Mount or Table Stand One Wireless Thermo Sensor Included 433MHz RF transmitting frequency 30 meter 100 feet transmission range in an open area ENGLISH 3...

Page 4: ...les high voltage lines etc 6 Weather Forecast Function 6 1 Operation After Batteries inserted or holding WEATHER button B5 for 3 seconds weather icon flash A2 on the LCD Enter the current weather pres...

Page 5: ...three channels alternatively 2 Outdoor Temperature Trend The trend pointer A6 displayed on the LCD indicates the trend of the outdoor temperature 3 Celsius Fahrenheit Press C F button B4 to select In...

Page 6: ...dar setting mode Press B4 or B7 button to adjust the setting and press MODE SET button B6 to confirm each setting The setting sequence is shown as follow Hour Minute Second Year Month Day Time Zone Da...

Page 7: ...ange 20 to 99 Weather Forecast 5 icons sunny slightly cloudy cloudy rainy snow Outdoor Data Transmission distance open area 30m 433MHz Temperature range 20 50 C 4 122 F Mount wall table Main Unit Dime...

Page 8: ...de thermique ext rieure Installation murale ou sur pied de support Sonde thermique sans fil inclue Fr quence de transmission 433 MHz RF Rayon de transmission de 30 m tres 98 pieds en espace ouvert FRE...

Page 9: ...s 6 1 Fonctionnement Apr s avoir ins r les piles ou avoir appuy sur la touche M t o B5 pendant 3 secondes l ic ne de m t o A2 clignote sur l ACL Saisir les conditions m t orologiques actuelles en Appu...

Page 10: ...Temperature Trend The trend pointer A6 displayed on the LCD indicates the trend of the outdoor temperature 3 Celsius Fahrenheit Appuyez sur la touche C F pour s lectionner la temp rature int rieure ex...

Page 11: ...MA TI ON TO FR LO N erlandais NE ZO MA DI WO DO VR ZA Italien IT DO LU MA ME GI VE SA Espagnol ES DO LU MA MI JU VI SA Fran ais FR DI LU MA ME JE VE SA FRENCH 9 8 4 Fonction rappel d alarme Snooze qu...

Page 12: ...l Les produits de nettoyage abrasifs ou corrosifs sont susceptibles de rayer les parties e n plastique et de faire rouiller les circuits lectriques En cas d inconsistance entre les pr visions m t orol...

Page 13: ...xterior Se puede montar en pared o en mesa Sensor t rmico de exterior incluido 433MHz de frecuencia de transmisi n por RF 30 metros 100 pies de rango de transmisi n en espacio abierto SPANISH 3 2 Apar...

Page 14: ...les veh culos l neas de alto voltaje etc 6 Funci n de predicci n meteorol gica 6 1 Funcionamiento Tras introducir las pilas o al mantener pulsado el bot n WEATHER B5 durante 3 segundos el icono de tie...

Page 15: ...terior La flecha de tendencia A6 que se muestra en el LCD indica la tendencia de la temperatura exterior 3 Celsius Fahrenheit Pulse el bot n C F B4 para seleccionar la temperatura exterior interior en...

Page 16: ...n MODE SET B6 para seleccionar ver Hora D a de la semana Hora alarma AL se muestra en el LCD Al ver la hora de la alarma mantenga pulsado el bot n MODE SET B6 durante 3 segundos para configurar la hor...

Page 17: ...limpiadores abrasivos pueden ara ar las piezas de pl stica y corroer los circuitos el ctricos En caso de que se produzca una contradicci n entre la predicci n meteorol gica ofrecida por la emisora loc...

Page 18: ...nsore Senza Fili da Indicatore batteria scarica del Termo Sensore da Esterno Esterno Posizionabile a Parete o su Tavolo Un Sensore Termico Senza Fili incluso Frequenza di Trasmissione RF a 433MHz Port...

Page 19: ...Funzione Previsioni del Tempo 6 1 Funzionamento Dopo l inserimento delle Batterie oppure dopo aver tenuto premuto per 3 secondi il tasto WEATHER B5 l icona del tempo A2 lampeggia sul Display Inserire...

Page 20: ...Celsius Fahrenheit Premere il tasto C F B4 per selezionare la modalit di misurazione della Temperatura Interna Esterna in gradi Celsius o Fahrenheit Se la temperatura non rientra nell intervallo misu...

Page 21: ...to sul Display Mentre si visualizza l Ora Sveglia tenere premuto il tasto MODE SET B6 per 3 secondi per entrare in modalit impostazione Ora della Sveglia Premere il tasto B4 or B7 per regolare l ora d...

Page 22: ...il il dispositivo con prodotti o materiali abrasivi o corrosivi Gli agenti di pulizia abrasivi potrebbero scalfire le parti in plastica e corrodere i circuiti elettronici Nel caso di discordanza tra l...

Page 23: ...dor de pouca bateria para Sensor de Term metro Exterior Suporte de Parede ou Suporte para Mesa Um Sensor de Term metro sem Fios Inclu do 433MHz de frequ ncia de transmiss o RF Varia o de transmiss o d...

Page 24: ...como edif cios rvores ve culos linhas de alta tens o etc 6 Fun o de Previs o Meteorol gica 6 1 Opera o Depois de inserir as pilhas ou manter o bot o WEATHER B5 pressionado durante 3 segundos o cone do...

Page 25: ...s 3 canais alternativamente 2 Tend ncia de Temperatura Exterior O indicador de tend ncia A6 apresentado no LCD indica a tend ncia da temperatura exterior 3 Celsius Fahrenheit Pressione o bot o C F B4...

Page 26: ...LCD Quando estiver a ver as Horas de Alarme mantenha o bot o MODE SET B6 pressionado durante 3 segundos para inserir a defini o de Horas de Alarme Pressione o bot o B4 ou B7 para ajustar as horas de a...

Page 27: ...uste O rel gio perde a sua informa o das horas quando as pilhas s o removidas Evite colocar o rel gio perto de fontes de interfer ncia estruturas de metal tais como computadores ou televis es N o o ex...

Page 28: ...t Schlummerfunktion 9 8 5 Dualzeiteinstellungen 10 9 Batterie Leer Anzeige 10 Hintergrundlicht 11 Vorkehrungen 12 Technische Daten 1 Funktionen 1 1 Wettervorhersage Animationen f r sonnig leicht bew l...

Page 29: ...e D2 Loch f r die Wandbefestigung D3 Schalter f r die Kanalauswahl D4 Taste RESET D5 Batteriefach D6 St nder 4 Erste Schritte 4 1 Hauptger t Schieben Sie die Batteriefachabdeckung C2 der Haupteinheit...

Page 30: ...nt wenn die Wettervorhersage Regen ist und die Au entemperatur beliebiger Kanal unter 0 C ist Wenn es zu Unstimmigkeiten zwischen der Wettervorhersage der rtlichen Wetterstation und diesem Ger t gibt...

Page 31: ...und Raumluftfeuchtigkeit anzuzeigen wird auf der LCD angezeigt Halten Sie die Taste MAX MIN B3 f r drei Sekunden um die aufgenommenen h chsten und niedrigsten Messungen zu l schen 8 Einstellung der Uh...

Page 32: ...gestellt 2 Der Modus der Uhrzeiteinstellung wird automatisch nach 15 Sekunden ohne Anpassungen beendet 8 3 12 24 Stundenauswahl Dr cken Sie auf die Taste 12 24 B7 um den Stundenmodus 12 oder 24 zu w h...

Page 33: ...tfernt von direkter Sonneneinstrahlung und Regen ein Reinigen Sie das Ger t nie mit abschleifende oder tzende Materialien oder Produkten Aggressive Reinigungsmittel k nnen die Plastikteile verkratzen...

Page 34: ...unit 4 4 2 Buitensensor 4 5 Installatie 5 1 Hoofdunit 5 5 2 Buitenthermosensor 5 6 Weersvoorspelling functie 6 1 Bediening 5 6 2 Weersomstandigheden 5 6 6 3 Barometertrend 6 7 Thermometer 7 1 RF Zendp...

Page 35: ...jes voor Zonnig Licht bewolkt Bewolkt Regenachtig en Sneeuw 1 2 Tijd Radiografische tijd met optie voor handmatige tijdinstelling Dubbele tijdinstelling 12 24 uurs instelbaar Dagelijks snooze alarm in...

Page 36: ...woordelijk voor enige problemen die voort kunnen komen uit een verkeerde weersvoorspelling door dit apparaat DUTCH 4 3 Thermosensor buiten D1 Zend indicatie LED D2 Gat voor muurbevestiging D3 Schakela...

Page 37: ...igen signaal van de kanalen wordt dan automatisch weer ontvangen OUT OUT OUT Weergave van alle drie de kanalen om beurten 2 Buitentemperatuur trend De trendwijzer A6 weergegeven op het LCD scherm laat...

Page 38: ...vangst te krijgen Stop het scannen door de knop B4 3 seconden ingedrukt te houden De DST is te zien op het LCD scherm wanneer deze in de Daylight Saving Time Mode staat Daglicht bespaarmodus Let op Kn...

Page 39: ...onnen metalen voorwerpen zoals een PC of TV Niet blootstellen in direct zonlicht en niet plaatsen in zeer warme koude vochtige of natte ruimtes Installeer de buitensensor niet onder water Plaats de se...

Reviews: