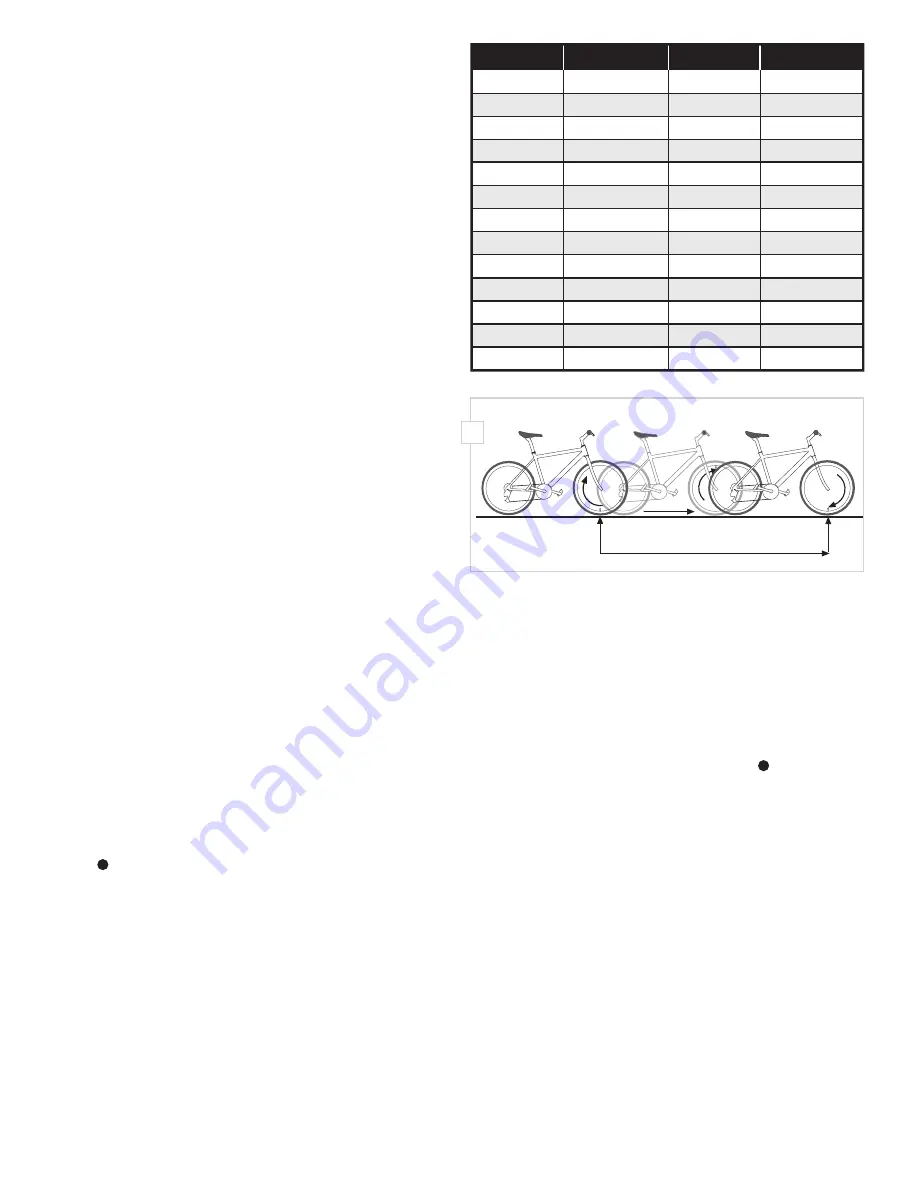
3. Perform roll-out test (most accurate): See Figure 2.
STEP 1
Stand your bicycle upright. With your tire infl ated to its proper pressure,
rotate your front wheel so that the valve is located at the bottom (6
o’clock position). Make a mark on the fl oor to indicate the valve location.
STEP 2
Roll the bicycle forward in a straight line for one complete wheel
revolution, until the valve is again at the bottom (ideally, you should be
on the bike). Make a mark on the fl oor to indicate the valve location.
STEP 3
Measure the distance between the marks in millimeters
(1 inch = 25.4mm). This value is your wheel circumference.
Program the Computer
Before using your F11C, you must program wheel size (see “Determine
Wheel Size,” above), select a speed scale (miles or kilometers), set the
odometer (if desired), input your weight and set the clock. The fi rst step
is to select the speed scale.
Select Miles or Kilometers, Program Wheel Size
& Set the Odometer
The F11C is capable of displaying speed and distance information
in either miles or kilometers. Also, the odometer can be set so
that cumulative mileage can be restored after a battery change or
transferred from another computer.
(SELECT MILES OR KILOMETERS)
STEP 1
Press the RIGHT button to advance to the Odometer display screen
(ODO). In the Odometer display screen (ODO), press and hold the RIGHT
button for three seconds.
STEP 2
“km/h” or “m/h” will appear on the right side of the screen. Press the LEFT button to select miles (m/h) or kilometers (km/h).
STEP 3
Press the RIGHT button to confi rm your selection and advance to the wheel size setting screen.
(PROGRAM WHEEL SIZE)
STEP 4
After the speed scale has been selected, the computer will automatically advance to the fi rst wheel size programming screen (
1
). The digit at the
right of the screen will fl ash. Press the LEFT button to adjust the fl ashing digit according to the wheel circumference value determined above.
Press the RIGHT button to advance to the next fl ashing digit.
STEP 5
Repeat this sequence until the correct wheel size has been entered. Then press the RIGHT button to advance to the second wheel size setting
screen (
2
).
STEP 6
The digit at the right of the screen will fl ash. Press the LEFT button to adjust the fl ashing digit. Press the RIGHT button to advance to the next
fl ashing digit.
STEP 7
Repeat this sequence until the second wheel size has been entered. Then press the RIGHT button to advance to the odometer setting screen.
(SET THE ODOMETER)
STEP 8
After programming wheel size, the computer will automatically advance to the odometer setting screen. (If you don’t want to change the
odometer setting, press the RIGHT button fi ve times to exit the set-up mode.) The digit at the right of the screen will fl ash. Press the LEFT button
to adjust the value. Press the RIGHT button to advance to the next fl ashing digit.
STEP 9
Repeat this sequence until the odometer has been set to the appropriate value. Then press the RIGHT button to exit the set-up mode and return
to the Odometer display screen.
16 x 1.75
20 x 1.75
26 x 0.75
24 x 1.75
24 x 1
1272
1590
1948
1907
1954
26 x 1.0
26 x 1.6
26 x 1.5
26 x 1
1973
2105
2026
2051
26 x 1.75
26 x 2
26 x 2
26 x 1.9
2070
2089
2114
2133
TIRE SIZE
CIRCUMFERENCE
1
/
8
3
/
8
3
/
8
27 x 1
28 x 1.5
28 x 1
28 x 1
28 x 1.75
2199
2224
2268
2265
2205
700 x 18c
700 x 25c
700 x 23c
700 x 20c
2102
2114
2133
2146
700 x 28c
700 x 40c
700 x 37c
700 x 32c
2149
2174
2205
2224
TIRE SIZE
CIRCUMFERENCE
3
/
8
1
/
2
1
/
4
1x
Distance in mm / inch
2


