background image

12

Quick Guide  -  DVR Serie AHD Full HD  -  090000969

Selezionare OK:

Le telecamere a cui sono stati attribuiti i parametri di rete saranno visualizzate automaticamente. 
Per modificarne la posizione o per aggiungere telecamere non appartenenti alla serie SMART Full HD, utilizzare la modalità

manuale

.

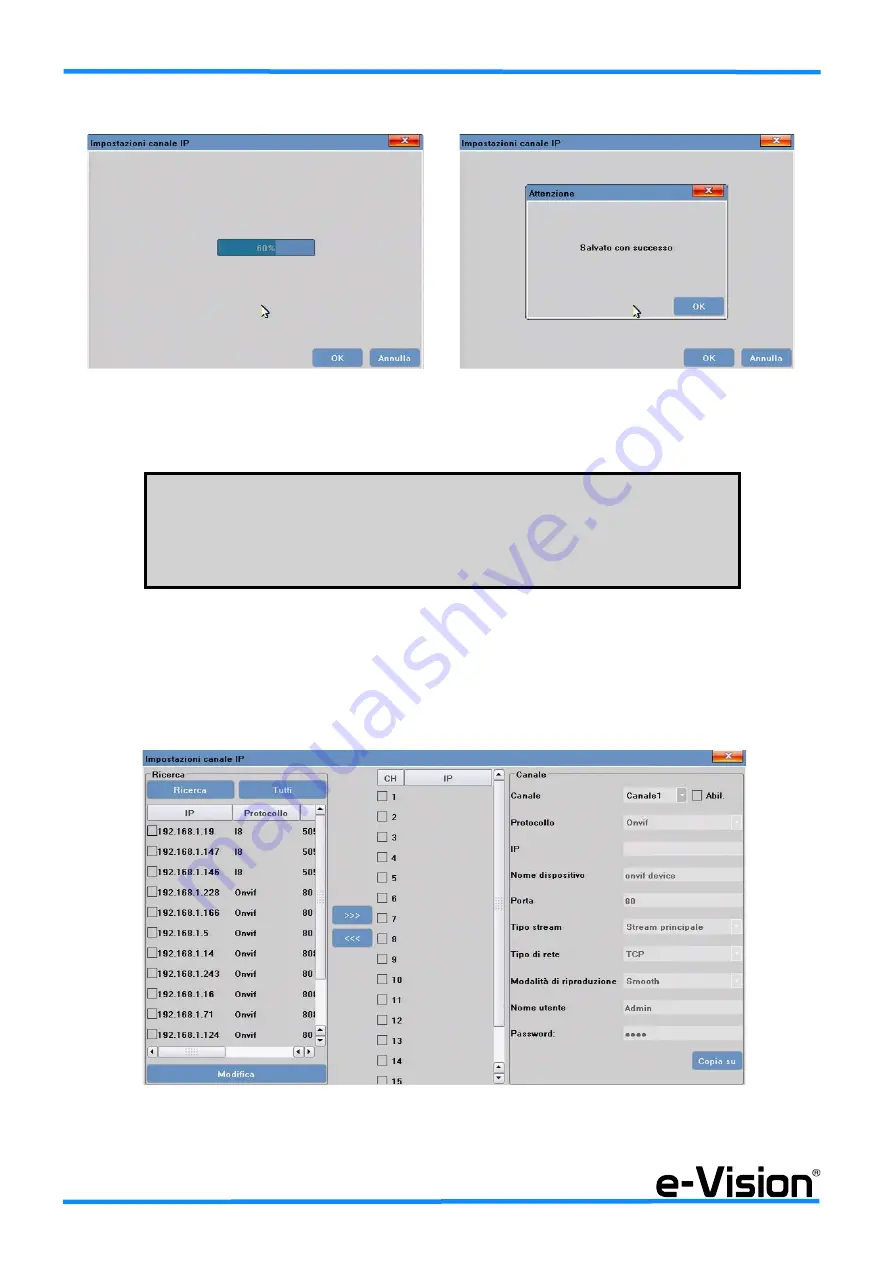
•Modalità manuale

Nel menu 

Impostazioni Canale IP

 selezionare MANUALE:

Per ricercare le telecamere connesse utilizzare l’opzione RICERCA.

!!! ATTENZIONE !!!

TUTTE LE TELECAMERE COMPATIBILI CON LA MODALITA’ DI CONFIGURAZIONE AUTO-

MATICA CONNESSE ALLO SWITCH O ALLA LAN A CUI E’ CONNESSO L’NVR, 

NON MANTERRANNO LE IMPOSTAZIONI DELLA CONFIGURAZIONE MANUALE MA SUBI-

RANNO LA PROCEDURA DI CONFIGURAZIONE AUTOMATICA.

Summary of Contents for AHD Full HD Series

Page 1: ...Guida Rapida Quick Guide Guida Rapida DVR Serie AHD Full HD Quick Guide AHD Full HD Series DVRs 090000969 IT08020000001624...

Page 2: ...e elettrica e quindi sussiste il rischio di folgorazione nel caso in cui si effettuino operazioni di manutenzione al loro interno prima di aver disconnesso l alimentazione primaria e di emergenza Alcu...

Page 3: ...DA REMOTO 17 5 1 Accesso tramite funzione P2P con Goolink 18 5 2 Accesso tramite servizio DDNS e Vision 20 5 3 Accesso al DVR tramite applicazione M EYE 21 CONTENTS 6 GENERALS 23 7 HDD INSTALLATION 23...

Page 4: ...E immesso sul mercato dopo il 13 agosto 2005 con divieto di conferimento all or dinario servizio di raccolta dei rifiuti urbani DISPOSAL INSTRUCTIONS USERS INFORMATION According to Directive 2012 19 E...

Page 5: ...DVR pu essere effettuata sia da postazione PC Client locale via LAN tramite l applicazione in dotazione Video surveillance Client Software sia da remoto tramite PC e il browser Internet Explorer Da s...

Page 6: ...3 STEP 4 STEP 5 Far scivolare il coperchio del dispositivo nel senso indicato dalle frecce Connettere i cavi come indicato nelle immagini sopra Collocare l HDD nell alloggiamento predisposto e fissarl...

Page 7: ...comando 3 1 1 Accesso al menu OSD con il mouse Collegare un mouse USB ad una qualsiasi delle porte USB disponibili del DVR Le funzioni dei tasti del mouse sono quelle illustrate in figura seguente Muo...

Page 8: ...a tendina quando si in modalit di visualizzazione multipla delle telecamere Agire sul tasto destro del mouse per visualizzare il seguente menu Selezionare AVVIA LOGIN per accedere al menu OSD sar vis...

Page 9: ...GIN sar visualizzata la seguente finestra Selezionare la lingua desiderata Italiano o English quindi l opzione OK Selezionare il formato video e la risoluzione desiderati quindi l opzione OK Seleziona...

Page 10: ...postare le telecamere IP in modalit manuale E consigliato premere ANNULLA e consultare il capitolo Impostazione canale IP a pag 11 per ulteriori dettagli A questo punto sar visualizzato il menu princi...

Page 11: ...del DVR 3 2 Impostazione canale IP Menu per l acquisizione e l impostazione delle telecamere IP E possibile acquisire le telecamere manualmente o in modo automatico modalit raccomandata Modalit autom...

Page 12: ...rie SMART Full HD utilizzare la modalit manuale Modalit manuale Nel menu Impostazioni Canale IP selezionare MANUALE Per ricercare le telecamere connesse utilizzare l opzione RICERCA ATTENZIONE TUTTE L...

Page 13: ...per impostare la sincronizzazione manuale Trascina per cambiare la sequenza dei canali Opzione per modificare la sequenza dei canali 3 3 Riproduzione di video NOTA L unit remota continuer a registrar...

Page 14: ...ati AVI o DVR Selezionare BACKUP nel menu visualizzato nella pagina principale tramite tasto destro del mouse Apparir la seguente finestra Nella finestra di salvataggio dati sar possibile selezionare...

Page 15: ...Registro File Configurazione Uscita AREA 2 Elenco telecamere supportate e stream AREA 3 Controlli PTZ AREA 4 Controlli luminosit contrasto e preset AREA 5 Tasti Intercom Voc Acquisizione Schermo Inter...

Page 16: ...econdario e la funzione di registrazione dello stream selezionato Selezionare Stream principale Stream secondario per ottimizzare la visualizzazione in funzione della banda disponibile 4 3 AREA 3 Cont...

Page 17: ...modalit di visualizzazione canali Tasti per selezionare le varie modalit di visualizzazione Nell ordine da sinistra a destra Schermo pieno 4 finestre 9 finestre 16 finestre 5 ACCESSO AL DVR DA REMOTO...

Page 18: ...000969 5 1 Accesso tramite funzione P2P con Goolink Scaricare applicativo dall APPSTORE o GOOGLEPLAY cercando il nome Goolink Avviare l applicazione Selezionare il simbolo nel riquadro per raggiungere...

Page 19: ...nu OSD DISPOSITIVO QR NAME acquisire il codice QR con lo smartphone Sar visualizzata la seguente finestra Inserire nome utente admin e password nessuna Apparir la finestra a destra Selezionare il disp...

Page 20: ...gina 22 Per effettuare una connessione remota al DVR tramite browser IE possibile utilizzare il servizio DDNS e Vision A tale pro posito tutti i dispositivi sono dotati della seguente etichetta I dati...

Page 21: ...a pagina 22 Nel caso si disponga di un IP statico pubblico o si utlizzi un servizio DDNS fornito da un provider pubblico No IP DynDns ecc sar possibile accedere al DVR da smartphone con l applicazion...

Page 22: ...ato del DVR e l IP pubblico dinamico del Router sulla porta desiderata Nella NAT deve es sere sempre utilizzata una porta TCP con numero maggiore della porta 1024 Porte di default 80 da 5050 a 5053 A...

Page 23: ...e centres DVRs can be controlled and managed both from a local PC Client over LAN using the supplied application Videosurveillance Client Software and from a remote PC using IE browser The images of t...

Page 24: ...HD 090000969 STEP 3 STEP 4 STEP 5 Slide the DVR cover as indicated by arrows Wire cables as indicated in the images above Position the HDD in the arranged area and fix it from the outside with the sc...

Page 25: ...ouse or a remote control 8 1 1 OSD menu access with mouse Connect the mouse USB mouse to one of the DVR ports available Mouse keys functions are illustrated below Move the cursor on the screen to disp...

Page 26: ...key used for EXIT command or to display the pop up menu when in multiple screen mode Use mouse RIGHT key to display the follwing menu Select START LOGIN to access OSD menu the following window will be...

Page 27: ...uide 27 Select LOGIN to display the following window Select a language Italian or English then select OK Select a video format and an image resolution option then select OK Select network settings IP...

Page 28: ...ll HD 090000969 Select OK to set IP cameras in manual mode We recommend to select CANCEL and see See IP Channel settings on page 29 for further details The main OSD menu will be displayed Functions Se...

Page 29: ...upplied to be used to control DVR OSD menu 8 2 IP Channel settings Menu to detect and setup IP cameras Cameras can be detected either in automatic mode recommended or in manual mode Automatic mode In...

Page 30: ...ING menu select MANUAL To search the cameras connected use SEARCH option To assign a camera to a channel select the channel and the camera then set parameters of the selected camera userna me password...

Page 31: ...CK in the main OSD menu see previous page using mouse right key The following window will be displayed In DATE SELECT area B videos available for playback that is selectable will be indicated in red c...

Page 32: ...played the following data can be selected the number s of camera s to which save data A start and end time B the backup folder C the file type D Once you have setup all the options please select START...

Page 33: ...central area then a camera from the list on the left AREA 1 Main menu functions Preview Playback Log File Configuration Exit AREA 2 Playback stream management AREA 3 PTZ controls AREA 4 Brightness co...

Page 34: ...controls Use the wheel 8 arrows to pan tilt the camera connected to the selected input Use the centre key for automatic positioning of the camera Use controls on the right to increase and decrease Zo...

Page 35: ...Rs can be accessed 1 using smartphones with Goolink application Such application ensures only live view of camera images 2 via IE browser and e Vision DDNS service 3 setting a public static IP address...

Page 36: ...k Guide DVR Serie AHD Full HD 090000969 Start the application Select the icon in the red square above to reach the device Select QR Code Scan In DEVICE QR NAME OSD menu read the QR code with your smar...

Page 37: ...displayed Select device and camera to display 10 2 Access with e Vision DDNS service Before proceeding please read note on page 39 thoroughly To access the DVR from a remote post using IE browser the...

Page 38: ...cess with M EYE application Before proceeding please read note on page 39 thoroughly The DVR can be accessed using a smartphone with the MEye application in two cases when a public static IP address i...

Page 39: ...P and the router public dynamic IP on the port required For the NAT a TCP port with a number greater than port 1024 must always be used Default ports 80 5050 to 5053 Now it will be possible to start I...

Page 40: ...D Full HD December 2015 Edition Made in China 090000969 Le informazioni e le caratteristiche di prodotto non sono impegnative e potranno essere modificate senza preavviso Product specifications as des...

Reviews: