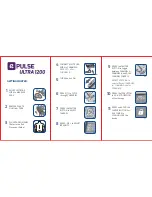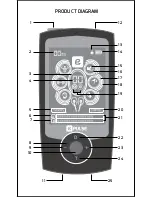
1. Turn the unit ON.
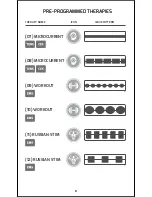
2. PRESS the (T) button to begin selecting your therapy (continue
pressing to cycle trough each therapy).
3. PRESS the CENTER button to activate your desired therapy
(both CHANNEL A and CHANNEL B will be activated by default).
4. PRESS (-) or (+) to modify the INTENSITY of both channels
simultaneously.
5. PRESS the (CENTER) button to select CHANNEL A ONLY
(the A and B CHANNEL indicator inside the middle circle tells you
which CHANNEL you are selecting).
6. At this point you can either adjust the INTENSITY of your therapy
or assign a therapy to CHANNEL A ONLY.
7. PRESS(–) or (+) to modify the INTENSITY of CHANNEL A.
8. PRESS the (T) button to assign a therapy to CHANNEL A ONLY
(continue pressing the (T) button to cycle trough each therapy).
9. PRESS the (CENTER) button to activate your selected therapy.
10. PRESS (-) or (+) to modify the INTENSITY of CHANNEL A.
11. PRESS the (CENTER) button to select CHANNEL B ONLY
(the A and B CHANNEL indicator inside the middle circle tells you
which CHANNEL you are selecting).
12. PRESS (-) or (+) to modify the INTENSITY of CHANNEL B.
13. PRESS the (T) button to assign a therapy to CHANNEL B ONLY
(continue pressing the (T) button to cycle trough each therapy).
14. PRESS the (CENTER) button to activate your selected therapy.
15. PRESS (-) or (+) to modify the INTENSITY of CHANNEL B.
16. PRESS the (CENTER) button to select CHANNEL A and
CHANNEL B (the CHANNEL INDICATOR inside the middle circle will
show both CHANNELS as active).
17. REPEAT STEPS 4 through 15 to change therapies on
CHANNEL A and/or B.
18. PRESS the (D) button to adjust the DURATION of your therapy.
19. PRESS and HOLD the (CENTER) button for 3 seconds to LOCK
your unit.
20. PRESS and HOLD the (CENTER) button for 3 seconds to UNLOCK
your unit.
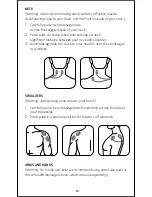
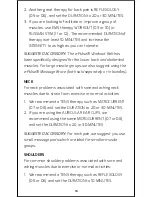
NECK
(Warning: We recommend using small pads for effective results.
Avoid placing close to your head, and the front and side of your neck.)
1. Carefully place two massage pads
across the targeted area of your neck.
2. Place pads vertically when pain extends across a
significant distance between your neck and shoulder.
3. Avoid placing pads too close to your head or near the esophagus
or windpipe.
SHOULDERS
(Warning: Avoid placing pads close to your heart.)
1. Carefully place two massage pads horizontally across the area of
your trapezoids.
2. Place pads in a parallel position for rotator cuff ailments.
ARMS AND HANDS
(Warning: For hands and wrist we recommend using small size pads or
the e-Pulse® Massage Gloves, which are sold separately.)
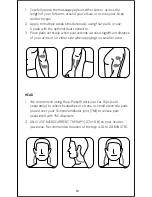
1. Carefully place the massage pads on either side or across the
length of your forearm, around your elbow, or across your bicep
and/or triceps.
2. Apply to multiple areas simultaneously using four pads, or use
6 pads with the optional dual connector.
3. Place pads vertically when pain extends across a significant distance
of your arms or on either side when applying to a smaller area.
HEAD
1. We recommend using the e-Pulse® Auricular Ear Clips (sold
separately) to relieve headaches or stress, or small electrode pads
placed over your Tempomandibular joint (TMJ) to relieve pain
associated with TMJ disorders.
2. ONLY USE MICROCURRENT THERAPY (07 or 08) on your head or
jaw areas. Recommended duration of therapy is 10 to 20 MINUTES.
LOWER/MID/UPPER BACK
(Warning: Avoid placing pads directly on spine.)
1. Carefully place the massage pads across the targeted area such as
your low/mid and/or upper back.
2. Apply to multiple areas simultaneously using four pads, or use
6 pads with the optional dual connector.
3. Place pads vertically when pain extends across a significant distance
of your back.
LEGS
(Warning: Avoid placing pads close to your groin area.)
1. Carefully place the massage pads on either side or across the
targeted area such as your ankle, across the length of your shin,
around your calf, knee, hamstring, or across your thigh.
2. Apply to multiple areas simultaneously using four pads, or use
6 pads with the optional dual connector.
3. Place pads vertically when pain extends across a significant distance
of your legs or in either side when applying to a smaller area.
PAD PLACEMENT RECOMMENDATIONS
11


