background image

25

25

USB RECORD  DIGITAL/FREEVIEW MODE

USB RECORD – DIGITAL/FREEVIEW MODE
Built into this television is a USB record facility. This function is available in Digital/Freeview mode when
used in conjunction with a compatible USB memory stick or USB Hard drive. The benefi ts of this are as
follows:

 Pause live TV/Radio and then playback, fast forward and rewind (up to live TV)

 One button record, if you decide you want to record the current programme

 Easy programmable recording from the 7 day TV Guide

 Record TV/Radio and watch/listen back on your computer/laptop

Due to the nature of the product, it is necessary to use a high speed USB memory stick (as the TV reads
from and writes to the memory stick at the same time, some memory sticks may not be suitable)

You can purchase high speed memory sticks from some computer stores, alternatively, we have a selection
of tested and compatible memory sticks available to purchase directly from the helpline/web site. These
are available in 4GB, 8GB and 16GB. (Please check the web site/helpline for latest specifi cations and prices)

Minimum Specifi cation

 - USB Memory Stick

Read Speed 

20 MB/s (Mega Byte Per Second)

Write Speed 

6 MB/s (Mega Byte Per Second)

If you wish to use a USB portable hard drive larger than 32GB, please refer to the FAQ section at the rear 
of this user guide.

Tip: When you switch the TV to standby or change channel the Time Shift memory is wiped. To restart 
time shift you must press play/pause button. 

Tip: This television contains one TV tuner, therefore it can only record the channel you are watching or 
record one channel while the television is in standby mode. 

Note: USB record function is only avilable in Digital/Freeview TV/Radio mode. Due to copyright laws and 
illegal copying/recording it is not possible to record to/from any other input/output source.

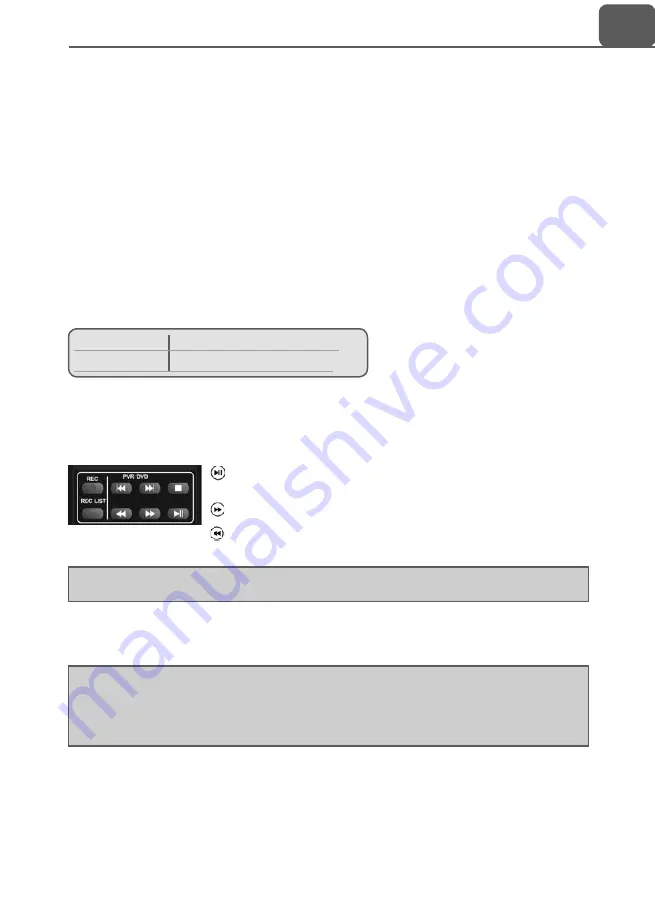
Pause Live TV/Radio (Time Shift)

Pausing Live TV/Radio is very simple.

 - Press the play/pause button and the television will pause and the live 

content will be recorded. To resume watching press play/pause again.

 - Press fast forward to go forward in a recording (i.e. to skip adverts)

 - Press fast rewind to go back in a recording (i.e. if you fast forwarded too 

far)

One Button Record

At any point in time you may decide to record the current channel that you are watching. To do this you  
need to press the [REC] button.

USB Record

Summary of Contents for U215-98G-GB-FTCUP-UK

Page 1: ...U215 98G GB FTCUP UK Full HD LCD TV with Freeview USB Media Player Model No User Guide...

Page 2: ...he television if it is damaged in any way Always place the television on a at level surface avoiding anywhere which may be subject to strong vibration Ensure the television is not placed on top of the...

Page 3: ...ionary Moving or low contrast graphics are less likely to cause ageing of the screen Time Displays Teletext Do not view a stationary page for long period of time TV DVD Menus e g Listings of DVD disk...

Page 4: ...nections 14 15 TV Menu Operation 16 21 Channel Menu 16 Picture Menu 17 Sound Menu 18 Time Menu 19 Feature Menu 20 Setup Menu 21 PC Operation 22 23 7 Day TV Guide USB Record 24 USB Record Digital Freev...

Page 5: ...orrectly The safest way to package your item in the event of warranty service repair is in it s original box packaging WHAT IS INCLUDED IN THE BOX Accessories Included with this TV are the following a...

Page 6: ...es 2 Remove the 4 screws highlighted IMPORTANT Before drilling any holes in the wall ensure you are not drilling where there could be any electric wires water or gas pipes Wall mounting the TV This te...

Page 7: ...uning the TV Getting Started Initial Set Up Fig A Fig B 3 Insert the batteries supplied into the Remote control and press the Standby button to power on the TV Tip If the TV nds some but not all of th...

Page 8: ...e remote control 1 Press SOURCE AV The source menu will appear 2 Press or to select the input you require 3 Press OK B Using the buttons on the Television 1 Press SOURCE 2 Scroll up down using CH CH b...

Page 9: ...ust the system settings to your preference MENU To display OSD menu EXIT To exit all menus NUMBER BUTTONS 0 9 to select a TV channel directly To return to the previous channel viewed FAV To display fa...

Page 10: ...L M DC12V Power USB USB port HDMI HDMI input SCART SCART input VGA PC Audio In 3 5mm PC audio input VGA PC VGA PC input COAX Audio Out Digital Coax output HEADPHONES 3 5mm Headphone output Component...

Page 11: ...onent Component HD Green Blue Red White Red Audio In L R Audio In L R Connecting a Camcorder Camera or Games Console Source should be set to Video Connecting a High De nition HD Device Option 1 via HD...

Page 12: ...igital signal Analogue Manual Tuning Allows you to manually tune your analogue signal Programme Edit Allows you to delete skip and add favourite channels To access this menu press MENU button on the r...

Page 13: ...decrease the brightness of the picture Colour Increases the colour from black and white Tint Lets you increase or decrease the level of tint within the picture Sharpness Increase or decrease the sharp...

Page 14: ...movies Personal Selects your personal sound settings Sports Emphasises sound for sports Digital Output This is the digital COAX Audio output Choose from the following options Off Off Auto Selects the...

Page 15: ...me Allows you to set a speci c time for your TV to turn off On Time Allows you to set a speci c time for your TV to turn on the channel it will then display the source it will be on and also the volum...

Page 16: ...ed into the COMMON INTERFACE PORT CI Card In System Lock Allows you to lock or unlock the menu You will be asked to enter a 4 digit password use the button to quit the password input Use the button to...

Page 17: ...On Screen Menu stays on the screen before disappearing Reset to default Reset Menu System This resets the menus to factory settings Reset TV Channels This clears all the TV channels from the televisio...

Page 18: ...er 6 Left click on the drop down for Screen refresh rate and select 60 Hertz if you experience picture noise or ickering select 50 hertz or 70 hertz 7 Click on Apply then click Yes and the settings wi...

Page 19: ...he television to be used as a computer monitor H Offset Changes the horizontal position of the picture V Offset Changes the vertical position of the picture Size increase picture size Phase To adjust...

Page 20: ...iew a previous day by pressing YELLOW View the next day by pressing BLUE 3 Press EXIT to exit the 7 day TV Guide 7 Day TV Guide Note This TV is designed to operate with USB memory sticks up to 32GB It...

Page 21: ...Minimum Speci cation USB Memory Stick Read Speed 20 MB s Mega Byte Per Second Write Speed 6 MB s Mega Byte Per Second If you wish to use a USB portable hard drive larger than 32GB please refer to the...

Page 22: ...ed on your USB Memory Stick On switching to USB source the above menu screen will appear The content will be divided into Photo Music Movie and Text based on le type You can navigate through the menus...

Page 23: ...unctions At the point of manufacturer of this TV the latest Revision 9 remote controls are only available to purchase directly from Sky alternatively you can purchase our versions from the helpline we...

Page 24: ...SCART you should connect the aerial cable from the wall socket to your VCR DVD Recorder and another aerial cable from the VCR DVD Recorder to the TV Game Consoles I have connected my PS3 to the TV vi...

Page 25: ...PAL SECAM Video Inputs 1 x SCART 1 x Video 1 x Component YPbPr 1080i 1 x 3 5mm jack for component Sound Inputs 1 x 3 5mm jack for PC audio input 1 x pair RCA shared for Video YPbPr component audio in...

Page 26: ...30 General Information...

Page 27: ...egion How the switchover affects your TV equipment Your new TV has a digital tuner built in which means it is ready to receive the Freeview signal by simply connecting it into your aerial socket you c...

Page 28: ...U21 MAN 0004...

Reviews: