


11
E-flite Fokker DVII 250 Slow Flyer Assembly Manual
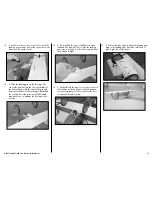
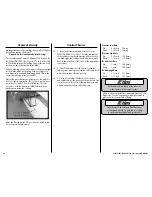
8. Slide the tail assembly in position on the
fuselage. Make sure the hinge on the rudder goes
into the slot at the rear of the fuselage. The tabs
on the fin will fit into the slots in the fuselage. The
rudder will fit close to the fuselage as shown in
the second photo when the stabilizer is positioned
correctly.
9. Before using foam-safe CA to glue the tail
in position you must check its alignment to the
fuselage. The stabilizer must be parallel to your
work surface. Lightly sand the area of the fuselage
where the stabilizer rests to correct any alignment
problems.
Work Surface
Parallel
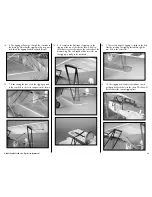
10. Also check that the stabilizer is square to the
fuselage by measuring from a center point on the
fuselage to each stabilizer tip. Use a hobby knife to
enlarge the slots in the fuselage if any adjustments
are required.
A
A
A=A
11. Once the alignment of the tail has been
checked and set, use foam-safe CA on the
stabilizer base of the fuselage and on the rudder
hinge to secure the tail to the fuselage. Allow the
CA to fully cure before proceeding.
Connecting the Linkages
Required Parts
Fuselage assembly Micro pushrod keeper (2)
Transmitter
Motor battery
1.5mm machine screw (2)
Pushrod wire (2) (if removed earlier)
Required Tools and Adhesives
Pliers
Phillips screwdriver: #1
Ruler
Diagonal cutter
Threadlock
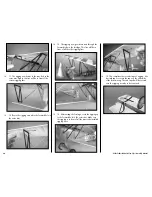
1. If you have removed the pushrods from the
fuselage they will need to be replaced at this time.
2. Insert the pushrod wire into the center hole of
the rudder control horn.


