background image

-54-

1st level

84. Press Switch-controlled Fire Siren in Medium Volume and Light

Press the switch (62), you will hear the siren from the speaker (93). Then press the press switch (61), now
you will hear the fire siren in a medium volume. The lamp (76) and flashing LED (69) turn on at the same time.

85. Magnet-controlled Fire Siren in Medium Volume and Light

Replace the press switch (61) with the reed switch (83), press the switch (62), you will hear the
siren from the speaker (93). Move the magnet (7) towards the reed switch (83). You will now hear
a fire siren in medium volume. The lamp (76) and flashing LED (69) are also on.

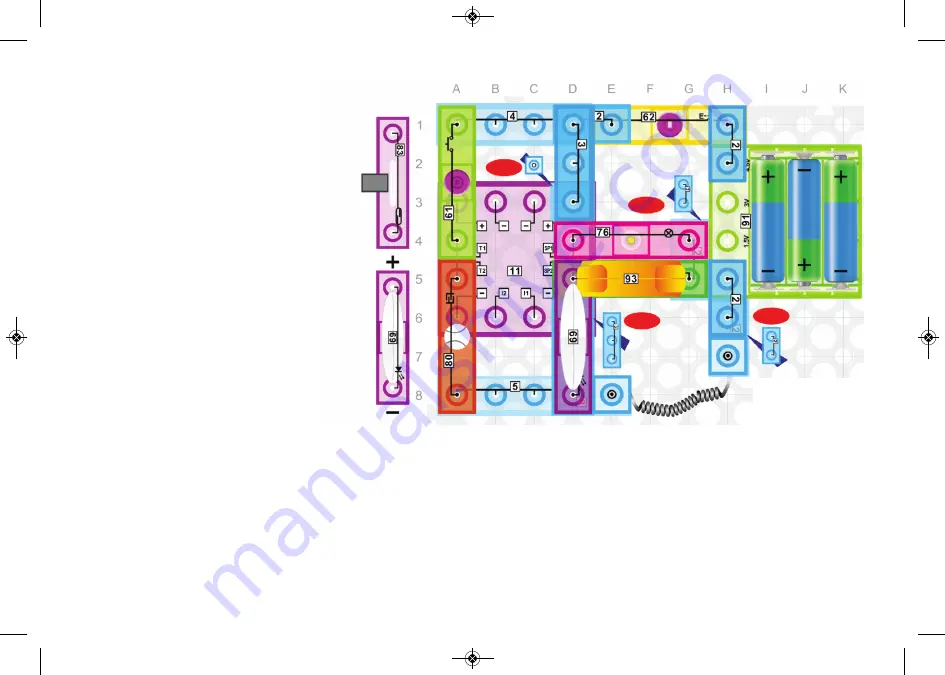
82. Siren with Sound in 

Medium Volume and Light

Build the circuit, press the switch
(62), you will hear the siren in a
medium  volume.  Also  the  lamp
(76) and flashing LED (69) are on.

2nd level

1st level

83. Touch-controlled Gun Sounds

in Medium Volume and Light

Press the switch (62), you will hear the siren in
a medium volume from the speaker (93). Then
keep  touching  the  touch  plate  (80),  you  will
hear the sounds of a gun in a medium volume.
Then hold the touch plate (80) and you will hear
the sounds of a machine gun. The lamp (76)
and flashing LED (69) will also turn on at the
same time.You may need to lick your fingers to
make the touch plate (80) function properly.

2nd level

Note:

You may need to

twist  the  LED  (69)
heart  attachment    to
clear the speaker (93)
so it fits properly.

E-BLOX_2X_Model_115_042517  5/17/2017  10:58 AM  Page 55

Summary of Contents for CIRCUIT BUILDER 115

Page 1: ...E BLOX_2X_Model_115_042517 5 17 2017 10 58 AM Page 1 ...

Page 2: ... safety features in them and could put your child at risk of injury FCC Notice Please note that changes or modifications not expressly approved by the party responsible for compliance could void the user s authority to operate the equipment NOTE This equipment has been tested and found to comply with the limits for a Class B digital device pursuant to Part 15 of the FCC Rules These limits are desi...

Page 3: ...fire or attempt to open its outer casing lBatteries are harmful if swallowed so keep away from small children 1 Most circuit problems are due to incorrect assembly always double check that your circuit exactly matches the drawing for it 2 Be sure that parts with positive negative markings are positioned as per the drawing 3 Be sure that all connections are securely made 4 Try replacing the batteri...

Page 4: ...menon It was to be many centuries before anyone was able to connect this phenomenon with electricity and a century more before electrical current was put to practical use 3 How to Categorize Electricity Q Are we using the same electricity to power the air conditioner and the remote control A Good question Actually they are totally different What we use in the air conditioner is called alternating ...

Page 5: ...ented by a German named Siemens Q What is the unit for electricity A Electricity has various related units of measure Electrical current flow is measured in Amperes Amps which is named in honor of the famous French physician André Marie Ampère and the contribution that he made Electrical resistance is measured in Ohms which is named after the German physicist George Ohm for his contributions Elect...

Page 6: ...r generation and solar thermal energy Certainly there will be more methods for electricity generation to be found since the scientists are always researching Q How do we recycle used batteries A Battery recycling aims to reduce the number of batteries being disposed as municipal solid waste Batteries contain a number of heavy metals and toxic chemicals and their dumping has raised concerns over so...

Page 7: ...e of power supply in which chemical energy is converted into electricity A switch is a device that controls all the other components in the circuit It is used for power connection and disconnection A switch should be connected in series with the other functional components otherwise it will cause a short circuit Home appliances are electrical mechanical machines which accomplish some home function...

Page 8: ...allel circuit All home circuits are parallel circuits to avoid interferences A conductor is an object or type of material that allows the flow of electrical current in one or more directions The conductivity varies for different materials For example metal lead acid or alkali salt are good conductors Humans are conductors too so be careful around electricity A semiconductor material has an electri...

Page 9: ... 1 Spring Wire 6EB2X09 1 Motor Shaft Cap 6EB2X59 1 Motor Top 6EB2X64 2 Level 1 Block 6EB2X100 2 Level 2 Block 6EB2X200 2 Plated Block 6EB2X101 8 Important If any parts are missing or damaged DO NOT RETURN TO RETAILER Call toll free 855 MY EBLOX 693 2569 or e mail us at help myeblox com Customer Service 880 Asbury Dr Buffalo Grove IL 60089 U S A Parts List colors and styles may vary Symbols and Num...

Page 10: ...Speaker 6EB2X93 1 Magnet 6EB2X07 1 Fan Blade 6EB2X60 1 Motor 6EB2X95 Qty Name Symbol Part 1 Base Grid 6EB2X39 1 Three in One 6EB2X11 1 1 Battery Holder Battery Cover 6EB2X91 6EB2X91C 9 E BLOX_2X_Model_115_042517 5 17 2017 10 58 AM Page 10 ...

Page 11: ...a spacer or for interconnection between different layers You need a power source to build each circuit The part is marked 91 and requires three 3 1 5V AA batteries not included The four connections are marked 1 5V 3V and 4 5V A short circuit indicator LED lights if any of the outputs are shorted or under a high current draw Only use the battery holder when the cover is securely in place Included i...

Page 12: ...is removed the switch opens OFF The blue level blocks 100 200 are non conductive and just used as building blocks The touch plate 80 is a type of switch when both electrodes are touched together using your finger shorts the two electrodes and a small amount of current flows activating the circuit The LED 69 is a light emitting diode inside the heart and may be thought of as a special one way light...

Page 13: ...everything from simple electronic toys to the most advanced computers The three in one 11 modules contain specialized sound generation ICs and other supporting components resistors capacitors and transistors that are always needed with them This was done to simplify the connections you need to make to use them The pin descriptions are given here for those interested see the projects for connection...

Page 14: ...E Blox is not responsible for parts damaged due to incorrect wiring Here are some important guidelines DO USE EYE PROTECTION WHEN ExPERIMENTING ON YOUR OWN DO include at least one component that will limit the current through a circuit such as the speaker lamp LED integrated circuit IC which must be connected properly or motor DO disconnect your batteries immediately and check your wiring if somet...

Page 15: ...uit has a SHORT CIRCUIT path as shown by the arrows The short circuit prevents any other portions of the circuit from ever working NEVER DO THIS Examples of SHORT CIRCUITS NEVER DO THIS NEVER DO THIS NEVER DO THIS WARNING SHOCK HAZARD Never connect E Blox Circuit BuilderTM to the electrical outlets in your home in any way E BLOX_2X_Model_115_042517 5 17 2017 10 58 AM Page 15 ...

Page 16: ... hear a siren sound from the speaker Space Battle Build project 52 you should hear a space battle sound from the speaker Music Build project 47 you should hear a music from the speaker 2 Wire Blocks 1 5 Spring Wire 9 and Speaker 95 Use this mini circuit to test each of the Wire Blocks and Speaker 95 one at a time The lamp 76 should light if the part is functioning properly Follow the steps below S...

Page 17: ... controlled Fan Speed 29 Description 30 Testing Conductors 29 31 Simple Telegram Training Simulator 30 32 Reverse controlled Motor Circuit 30 33 Double Switch Series Connection Controlling Lamp 31 34 Double Switch Parallel Connection Controlling Lamp 31 35 Triple Switch Series Connection Controlling Lamp 32 36 Triple Switch Parallel Connection Controlling Lamp 32 37 Triple Switch Series Parallel C...

Page 18: ...Fire Siren in Medium Volume and Light 54 86 Space Battle in Medium Volume and Light 55 87 Switch controlled Space Battle in Medium Volume and Light 55 Description 88 Touch controlled Space Battle in Medium Volume and Light 55 89 Magnet controlled Space Battle in Medium Volume and Light 55 90 Music in Medium Volume and Light 56 91 Press Switch controlled Music in Medium Volume and Light 56 92 Magne...

Page 19: ...ry holder before using it Press the switch 62 the lamp 76 will turn on Press it again the lamp 76 will turn off 2 LED Switch Replace the lamp 76 with the LED 69 making sure it s in the correct direction Press switch 62 the LED 69 will turn on Press it again the LED 69 will turn off 3 Magnetic Lamp Put the magnet 7 near the reed switch 83 the lamp 76 will turn on Move the magnet 7 away the lamp 76 ...

Page 20: ...on hold the press switch 61 LED 69 will light up Release the press switch 61 LED 69 will turn off 6 Switch controlled Fan Assemble the fan by following the assembly diagram below Then press the switch 62 the fan will start spinning WARNING Moving parts Do not touch the fan or motor during operation Do not lean over the motor Fan Assembly Motor shaft cap Fan Motor top Motor E BLOX_2X_Model_115_0425...

Page 21: ...Fan Put on the fan blade 60 press and hold the press switch 61 then the fan will start spinning Release the press switch 61 the fan will stop WARNING Moving parts Do not touch the fan or motor during operation Do not lean over the motor WARNING Moving parts Do not touch the fan or motor during operation Do not lean over the motor E BLOX_2X_Model_115_042517 5 17 2017 10 58 AM Page 21 ...

Page 22: ...he fan blade 60 then press the switch 62 Wait for the motor 95 to run fast Press the switch 62 again the flying saucer will take off 11 Magnet controlled Flying Saucer Replace the press switch 61 with the reed switch 83 move the magnet 7 towards the reed switch 83 Wait for the motor 95 to start running Move the magnet 7 away then the flying saucer will take off Reminder Remove the shaft cap before...

Page 23: ...and Motor Series Connection First put on the fan blade 60 then press the switch 62 the fan will start working and the lamp 76 turns on at the same time Press the switch 62 again the fan will stop and the lamp 76 will turn off 13 Press Switch controlled Lamp and Motor Series Connection Replace the switch 62 with the press switch 61 put on the fan blade 60 then press and hold the press switch 61 the...

Page 24: ...h 62 the LED 69 will light up with the lamp 76 16 Switch controlled Motor LED Parallel Connection Press the switch 62 the LED 69 will light up the motor 95 will start running 1st level 1st level 1st level Level block E BLOX_2X_Model_115_042517 5 17 2017 10 58 AM Page 24 ...

Page 25: ...uces the voltage across the lamp 76 thus limiting the current flowing through the lamp and preventing it from lighting 18 Switch controlled Lamp LED Motor Parallel Connection Press the switch 62 the LED 69 and the lamp 76 will light up The motor 95 will also start running at the same time 2nd level 1st level 1st level 2nd level E BLOX_2X_Model_115_042517 5 17 2017 10 58 AM Page 25 ...

Page 26: ...oltage across the lamp 76 thus limiting the current through the lamp 76 preventing it from lighting 20 Switch controlled Lamp LED Motor Series Parallel Connection I Build the circuit you will find that the motor 95 spins the LED 69 lights and the lamp 76 lights dimly The lamp 76 is dim because it is connected with the LED 69 in a series circuit and thus the voltage drop across the LED at least 1 5...

Page 27: ...p LED and Motor Series Parallel Connection III Build the circuit you will find that the LED 69 lights and the motor 95 spins very slowly but the lamp 76 does not light If the motor does not spin you may need to get it started by spinning the shaft with your finger This is because the lamp 76 and motor 95 are each connected in series with the LED 69 and voltage drop across the LED at least 1 5 volt...

Page 28: ...s Parallel Connection IV Build the circuit press and hold the press switch 61 the LED 69 will light the lamp 76 will light dimly and the motor 95 will spin at the same time 1st level 2nd level 1st level E BLOX_2X_Model_115_042517 5 17 2017 10 58 AM Page 28 ...

Page 29: ... towards the reed switch 83 the motor 95 will turn on and the LED 69 will stop working 26 Adjustable Lamp Brightness Press the switch 62 the lamp 76 will turn on dimly the motor 95 will turn on at the same time Press the press switch 61 the motor 95 will stop while the lamp 76 will become brighter 27 Magnet controlled Lamp Brightness Replace the press switch 61 with the reed switch 83 by using the...

Page 30: ...ctive or not You just need to connect the material across the two touch plate 80 leads If the LED 69 turns on it means the material is a conductor If the LED 69 does not turn on it means the material is an insulator The brightness of the LED 69 also tells how good a conductor the material is where better conductors make the LED 69 brighter and poorer conductors make the LED 69 dimmer You may be ab...

Page 31: ... clockwise Release the press switch 61 the motor 95 will stop Then put the motor 95 in backwards Press and hold the press switch 61 the fan blade 60 will spin counterclockwise Release the press switch 61 the motor 95 will stop Note Use the 3 wire blocks to connect the motor 95 backwards WARNING Moving parts Do not touch the fan or motor during operation Do not lean over the motor E BLOX_2X_Model_1...

Page 32: ...e time the lamp 76 will turn on as well 34 Double Switch Parallel Connection Controlling Lamp Either press the switch 62 or press and hold the press switch 61 to light up the lamp 76 However if you want to turn off the lamp 76 you should release the press switch 61 and turn off the switch 62 by putting it in the up position 1st level 1st level E BLOX_2X_Model_115_042517 5 17 2017 10 58 AM Page 32 ...

Page 33: ...tch 83 The lamp 76 will turn on 36 Triple Switch controlled Lamp Parallel Connection Build the circuit press either switch 61 or 62 or move the magnet 7 towards the reed switch 83 The lamp 76 will light up If you want to turn off the lamp 76 all of the switches must be turned off 1st level 1st level 1st level E BLOX_2X_Model_115_042517 5 17 2017 10 58 AM Page 33 ...

Page 34: ...d the press switch 61 then the lamp 76 will light up Or if you press the switch 62 and move the magnet 7 towards the reed switch 83 then the lamp 76 will light up If you want to turn off the lamp 76 you should release the press switch 61 and move the magnet away from the reed switch 83 Or you can just turn off the main switch 62 E BLOX_2X_Model_115_042517 5 17 2017 10 58 AM Page 34 ...

Page 35: ...tion There are two ways to light up the lamp 76 in this circuit you can either press the switch 62 or place the magnet next to the reed switch 83 and the press switch 61 at the same time 2nd level 2nd level E BLOX_2X_Model_115_042517 5 17 2017 10 58 AM Page 35 ...

Page 36: ...ing Press the switch 62 again the motor 95 will stop Press and hold the press switch 61 the lamp 76 will turn on Release the Press switch 61 and the lamp 76 will turn off WARNING Moving parts Do not touch the motor during operation Do not lean over the motor E BLOX_2X_Model_115_042517 5 17 2017 10 58 AM Page 36 ...

Page 37: ...amp 76 will light up Press and hold the press switch 61 the motor 95 will turn on Then press the switch 62 again both the lamp 76 and the motor 95 will turn off WARNING Moving parts Do not touch the motor during operation Do not lean over the motor E BLOX_2X_Model_115_042517 5 17 2017 10 58 AM Page 37 ...

Page 38: ...he lamp 76 and the motor 95 If you want to turn off the lamp 76 or turn off the motor 95 release the press switch 61 and make sure the switch 62 is in the UP position 1st level 1st level 1st level 1st level WARNING Moving parts Do not touch the motor during operation Do not lean over the motor E BLOX_2X_Model_115_042517 5 17 2017 10 58 AM Page 38 ...

Page 39: ... lamp 76 press the switch 62 and press and hold the press switch 61 at the same time Or press the switch 62 first then hold the press switch 61 The motor 95 and the lamp 76 will turn on 1st level WARNING Moving parts Do not touch the motor during operation Do not lean over the motor E BLOX_2X_Model_115_042517 5 17 2017 10 58 AM Page 39 ...

Page 40: ...6 and the LED 69 press the switch 62 first then hold the press switch 61 finally move the magnet 7 towards the reed switch 83 In the paralleled circuit even if the lamp 76 or LED 69 is broken the other one can still work 1st level E BLOX_2X_Model_115_042517 5 17 2017 10 58 AM Page 40 ...

Page 41: ... 40 44 Siren Press the switch 62 you will hear the siren from the speaker 93 1st level 1st level E BLOX_2X_Model_115_042517 5 17 2017 10 58 AM Page 41 ...

Page 42: ...the touch plate 80 the sounds will turn into gun sounds Tightly press the touch plate 80 now it is machine gun sounds You may need to lick your fingers before touching the touch plate 80 to make this project work effectively 2nd level 1st level 1st level E BLOX_2X_Model_115_042517 5 17 2017 10 58 AM Page 42 ...

Page 43: ...nds Press the switch 62 you will hear the space battle sounds form the speaker 93 Hold the press switch 61 and now you can hear other sounds 2nd level 1st level 1st level E BLOX_2X_Model_115_042517 5 17 2017 10 58 AM Page 43 ...

Page 44: ... 43 47 Music Press the switch 62 you will hear some music from the speaker 93 1st level 1st level E BLOX_2X_Model_115_042517 5 17 2017 10 58 AM Page 44 ...

Page 45: ...Fire Siren Press the switch 62 you will hear the siren from the speaker 93 When you hold the press switch 61 you will hear a fire siren 2nd level 1st level 1st level E BLOX_2X_Model_115_042517 5 17 2017 10 58 AM Page 45 ...

Page 46: ... magnet 7 towards the reed switch 83 you will hear the fire siren 1st level 2nd level 1st level Level block 49 Touch controlled Machine Gun Sounds Press the switch 62 you will hear the siren from the speaker 93 Then touch the touch plate 80 several times you will hear the gun sounds Hold the touch plate 80 you will hear machine gun sounds You may need to lick your fingers to make the touch plate 8...

Page 47: ... make it work 54 Magnet controlled Sounds of Space Battle Replace the press switch 61 with the reed switch 83 Press the switch 62 you will hear the sounds of space battle from the speaker 93 Move the magnet near the reed switch 83 several times and the sounds will change 52 Press Switch controlled Sounds of Space battle Press the switch 62 you will hear the sounds of space battle from the speaker ...

Page 48: ...ch 62 now the music is on Touch the touch plate 80 the music will restart You may need to lick your fingers to make the touch plate 80 function properly 58 Magnet controlled Music Player Replace the press switch 61 with the reed switch 83 then press the switch 62 You will hear some music from the speaker 93 Move the magnet 7 towards the reed switch 83 the music will restart Move the magnet 7 away ...

Page 49: ... Red Light Warning Press the switch 62 the siren will be heard from the speaker 93 At the same time you can see the red light warning in the LED 69 2nd level 1st level 2nd level 60 Touch controlled Machine Gun Sounds with Red Light Warning Press the switch 62 and keep touching the touch plate 80 the sounds of a machine gun will be heard from the speaker 93 with the red light warning on the LED 69 ...

Page 50: ...the LED 69 Then touch the touch plate 80 several times the sounds will change You may need to lick your fingers to make the touch plate 80 function properly 65 Magnet controlled Space Battle with Red Light Warning Replace the press switch 61 with the reed switch 83 press the switch 62 you will hear sounds of space battle from the speaker 93 with the red light warning on the LED 69 Then keep moving...

Page 51: ...arning is on the LED 69 Move the magnet 7 towards the reed switch 83 the music will be restarted Move the magnet 7 away the music will turn off 66 Music with Red Light Warning Build the circuit press the switch 62 you will hear music from the speaker 93 with the red light warning 1st level 2nd level 67 Press Switch controlled Music and Red Light Warning Press the switch 62 the music will turn on w...

Page 52: ...the reed switch 83 then press the switch 62 You will hear the siren in a low volume from the speaker 93 while the red light turns on from the LED 69 Move the magnet 7 towards the reed switch 83 the fire siren will turn on in a low volume with the flashing red LED 69 1st level 2nd level 71 Touch controlled Gun Sounds in Low Volume and Red Light Press the switch 62 you will hear a siren in a low vol...

Page 53: ...the switch 62 and you will hear the sounds of space battle in low volume Move the magnet 7 towards the reed switch 83 several times the sounds will change 74 Space Battle in Low Volume Build the circuit press the switch 62 you will hear the sounds of space battle in a low volume You will also see the flashing red light from the LED 69 2nd level 1st level 75 Press Switch controlled Space Battle in ...

Page 54: ...ic will turn off 81 Touch controlled Music in Low Volume Press the switch 62 you will hear the music play in a low volume from the speaker 93 Then touch the touch plate 80 the music will be restarted and the red light will turn on from the LED 69 You may need to lick your fingers to make the touch plate 80 function properly 1st level 2nd level 79 Press Switch controlled Music in Low Volume Press t...

Page 55: ...ren with Sound in Medium Volume and Light Build the circuit press the switch 62 you will hear the siren in a medium volume Also the lamp 76 and flashing LED 69 are on 2nd level 1st level 83 Touch controlled Gun Sounds in Medium Volume and Light Press the switch 62 you will hear the siren in a medium volume from the speaker 93 Then keep touching the touch plate 80 you will hear the sounds of a gun ...

Page 56: ...e magnet 7 towards the reed switch 83 several times the sound will change 1st level 2nd level 87 Press Switch controlled Space Battle in Medium Volume and Light Press the switch 62 you will hear the sounds of space battle in medium volume from the speaker 93 with the lamp 76 and flashing LED 69 on as well Press the press switch 61 several times and the sound will change 1st level 86 Space Battle i...

Page 57: ...and flashing LED 69 are also on You may need to lick your fingers to make the touch plate 80 function properly 90 Music in Medium Volume and Light Build the circuit press the switch 62 you will hear some music in medium volume the lamp 76 and LED 69 will be on as well 2nd level 1st level 91 Press Switch Controlled Music in Medium Volume and Light Press the switch 62 you will hear some music in med...

Page 58: ...press switch 61 with the reed switch 83 and press the switch 62 put the magnet 7 on the reed switch 83 the lamp 76 will turn on and flash quickly 1st level 94 Steady Flashing Lamp Build the circuit press the switch 62 the lamp 76 will flash steadily 95 Press Switch controlled Steady Flashing Lamp Press the switch 62 the lamp 76 will flash steadily Press the Touch Plate 80 and the lamp 76 will go o...

Page 59: ...ed Speed Replace the press switch 61 with the reed switch 83 press the switch 62 the lamp 76 will flash slowly Then move the magnet 7 towards the reed switch 83 several times the flashing speed of the lamp 76 will change 1st level 98 Press Switch controlled Flashing Lamp Varied Speed Build the circuit press the switch 62 the lamp 76 will flash slowly Then press the press switch 61 and the flashing...

Page 60: ...sh slowly Move the magnet 7 towards the reed switch 83 the lamp 76 will turn off Now put the magnet 7 on the reed switch 83 and do not move it The lamp 76 will flash slowly when you move the magnet 7 away the lamp 76 will turn off 1st level 102 Press Switch controlled Slow Flashing Lamp Press the switch 62 the lamp 76 will flash slowly Press the press switch 61 and the lamp 76 will turn off Now ho...

Page 61: ...eplace the press switch 61 with the reed switch 83 press the switch 62 the LED 69 will flash slowly in its maximum brightness Put the magnet 7 on the reed switch 83 and LED 69 will flash quickly 105 Steady Flashing LED Build the circuit press the switch 62 and the LED 69 will flash steadily 106 Press Switch controlled Flashing LED Press the switch 62 the LED 69 will flash steadily Press the touch ...

Page 62: ...ightness Replace the press switch 61 with the reed switch 83 press the switch 62 the LED 69 will flash slowly Move the magnet 7 towards the reed switch 83 several times the flashing speed and brightness of the LED 69 will be changed 1st level 109 Press Switch controlled Flashing LED Varied Speed and Brightness Build the circuit press the switch 62 the LED 69 will flash slowly Press the press switc...

Page 63: ...ress the switch 62 the LED 69 will flash slowly Move the magnet 7 towards the reed switch 83 the LED 69 will flash slowly too When you move the magnet 7 away the LED 69 will turn off Put the magnet 7 on the reed switch 83 the LED 69 will flash slowly again 113 Press Switch controlled Slow Flashing LED Press the switch 62 the LED 69 will flash slowly Press the press switch 61 and the LED 69 will tu...

Page 64: ... you to connect to other E Blox sets A simple demo circuit is shown on the right and the parts needed to build it are shown below Plated blocks 6EB2X101 Plated 1x3 blocks 6EB3622Tin from E Blox pARTSTM Starter Plus Deluxe set Battery block 6EB3795 from E Blox pARTSTM Starter Plus Deluxe set LED Block 6EB2X69 E BLOX_2X_Model_115_042517 5 17 2017 10 58 AM Page 64 ...

Page 65: ...tch Follow the adventures of Seymour and his robot Robyn as they investigate a mysterious light in the distant ocean horizon The storybook includes QR codes that create an interactive learning environment using online resources Models are built in several parts of the story further enhancing the learning experience Other E Blox Products E BLOX_2X_Model_115_042517 5 17 2017 10 58 AM Page 65 ...

Page 66: ...s are safe to use thanks to a low current power supply 9V battery our patented battery holder which will sound an alarm and shut down if a short circuit exists and tin just like the cans your food comes in Let your imagination run wild as you create your own circuits integrated into whatever you are inspired to build Perfect for budding scientists technicians engineers artists or mathematicians E ...

Page 67: ... 66 This page intentionally left blank E BLOX_2X_Model_115_042517 5 17 2017 10 58 AM Page 67 ...

Page 68: ...E BLOX_2X_Model_115_042517 5 17 2017 10 58 AM Page 68 ...

Reviews: