


EN
ENTER 40
32
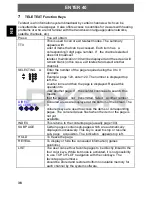
6.2.1 Satellite
settings
Add satellites:
Press
RED
to add a new satellite, in which you must input an unique longitude,
and edit the satellite's name with soft keyboard.
Edit satellites:
Press
GREEN
to edit the focused satellite.
Delete satellite:
Press
YELLOW
to delete the focused satellite.
Press
OK
to confirm.
6.2.2 Transponder
Press
EPG
to switch the list to show transponders of the focused satellite. Also
you can press
EPG
to switch back to satellites' list.
Add transponder:
Press
RED
to add a new transponder. It can't save an existing TP under the
same satellite.
Edit transponder:
Press
GREEN
to edit the focused transponder. It can't save an existing TP
under the same satellite.
Delete transponder:
Press
YELLOW
to delete the focused transponder. Press
OK
to confirm.
Single Transponder Scan:
Press
BLUE
to pop the menu of scanning setting. After configuring the settings,
Press
OK
to start scanning.
Multi-Transponder Scan:
Press
OK
to select transponders with the mark"
",then press
BLUE
to pop the
menu of scanning setting. After Configuring the settings, press
OK
to start
multi-transponder scanning.
6.2.3 Channel
search
Single Satellite Scan:
Press
BLUE
to pop the menu of scanning settings.
Scan Mode:
Press
/
to select default, which scans the default transponders built in
and NetWork,
which scan with NIT on.
Crytped:
Press
/
to select All Channels or FTA Channels;
Service Type:
Press
/
to select ALL, DTV or Radio.
Press
OK
to start scanning with the above settings.
Multi-Satellites Scan:
Press
OK
to select satellites with the mark "
“, then press
BLUE
to pop the


