background image

10 


Connect your camera and your PC with the supplied USB cable. 

Click 

Start

Select 

Programs

ArcSoft PhotoImpression 3.0


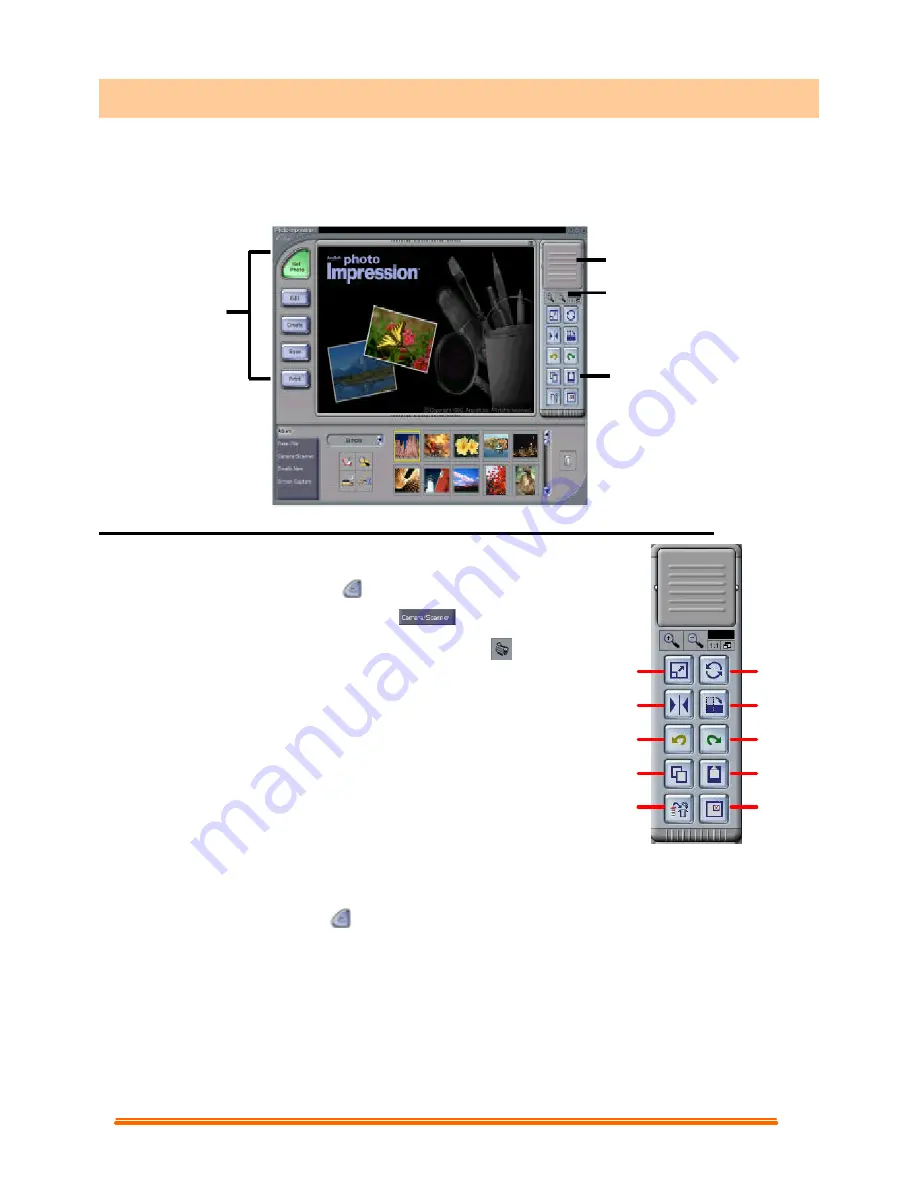
The PhotoImpression Main Screen will appear on your desktop. 


5.1 Viewing Camera Images through PhotoImpression 3.0 

5.1.1 Viewing Camera Images through


 PhotoImpression:


Click the

 [Get Photo

button. 

Click the 

[Camera/Scanner 

]

 button 

View live video from the 

[Video Camera 

]

 button 

and you can get photos from the camera to the 

PhotoImpression main screen. 

5.1.2 Editing an Image:  

The toolbar along the right side of the main screen contains a 

number of editing tools, such as resize, mirror, rotation, etc. 

5.1.3 Working with “Albums”:  

Use the feature to organize photo files into groups and select them by clicking on a thumbnail 

photo rather than  remembering a file name.  

Click the

 [Get Photo

]

 button and  

[Select Album


]

 to view the album options. 

5.1.4 Getting Help:  

PhotoImpression provides extensive online help. If you need more information or     instructions 

on how to use a specific feature or tool, click the 

[Help (?)]

 button in the upper right-hand corner 

of the screen.  

5. Getting Started With PhotoImpression 3.0 

Command 

Buttons 

Navigation Window 

Magnification  
Controls 

Tool Bars 

Main Screen


Delete Icon 

Copy Icon 

Cancel Icon 

Mirror Icon 

Crop/

Resize Icon 

Free Rotation 
Icon  


90

°

 Rotation 

Icon  


Reverse Icon  

Paste Icon  

Close Icon  


Summary of Contents for DX-WC101 - PC Web Camera

Page 1: ...a and PC Camera driver 03 1 2 2 Restart Your Computer 04 1 3 How To Use Your PC Camera 05 2 How To Install MicroSoft NetMeeting For Windows 98 Me 2000 2 1 How To Install Microsoft NetMeeting 06 2 2 Ho...

Page 2: ...Run and execute the file launch exe on the CD to start the installer program 1 1 2 Install Application Software Check the box in front of the Software you would like to install then click the Install...

Page 3: ...n the screen asking you to search a new device 1 2 1 3 In this dialog box you will be asked to select a method to search for driver for your PC Camera Choose Install from the software automatically Re...

Page 4: ...and driver location Then displays the detected device and the driver location 1 2 1 6 Click Next from the following screen Windows will copy Driver files into your system 1 2 1 7 When Windows has fini...

Page 5: ...Getting started page working with VideoImpression 2 Press the snapshot button on the top of camera to capture a single frame 1 3 3 Preview 1 Follow steps 1 3 in Set the Focus to enable live preview 2...

Page 6: ...ect the appropriate location for the shortcuts 2 1 5 Click Next follow the instructions in the Audio Tuning Wizard and then click Finish After you run NetMeeting for the first time you can modify the...

Page 7: ...end instant messages 3 2 How To Start With PC Camera 3 2 1 Plug the PC camera into your PC first 3 2 2 Click the Messenger to go to the main screen 3 2 3 Click the Webcam icon during a conversation or...

Page 8: ...ession To capture a video from the camera to the VideoImpression main screen u Click the New button u Click the Capture button 4 1 2 Working with Albums Use the options on the Album Screen to modify y...

Page 9: ...humbnail and clicking on the Edit Movie icon This will take you to the editing screen 4 1 4 Getting Help VideoImpression provides an extensive online Help If you need more information or instructions...

Page 10: ...er of editing tools such as resize mirror rotation etc 5 1 3 Working with Albums Use the feature to organize photo files into groups and select them by clicking on a thumbnail photo rather than rememb...

Reviews: