background image

8

SETTING  UP & TUNING IN

Master and Slave mode

The subwoofer can operate in two different modes: Master
or Slave mode. If your system consists of multiple
subwoofers, it is desirable that all subwoofers operate with
identical settings (Volume, Low-Pass filter (Hz), Phase and
LF Extension). 

Using the Master/Slave feature of Dynaudio subwoofers
this is easily achieved: The Master subwoofer (connected
directly to the subwoofer Output of the amplifier or receiver)
will control all Slave subwoofers (connected to the Master
subwoofer). Thus, using a single remote control, all
subwoofers in the system will follow all settings from the
Master subwoofer. Note that in Slave mode, only the
On/Off and Auto/Manual selections are available.

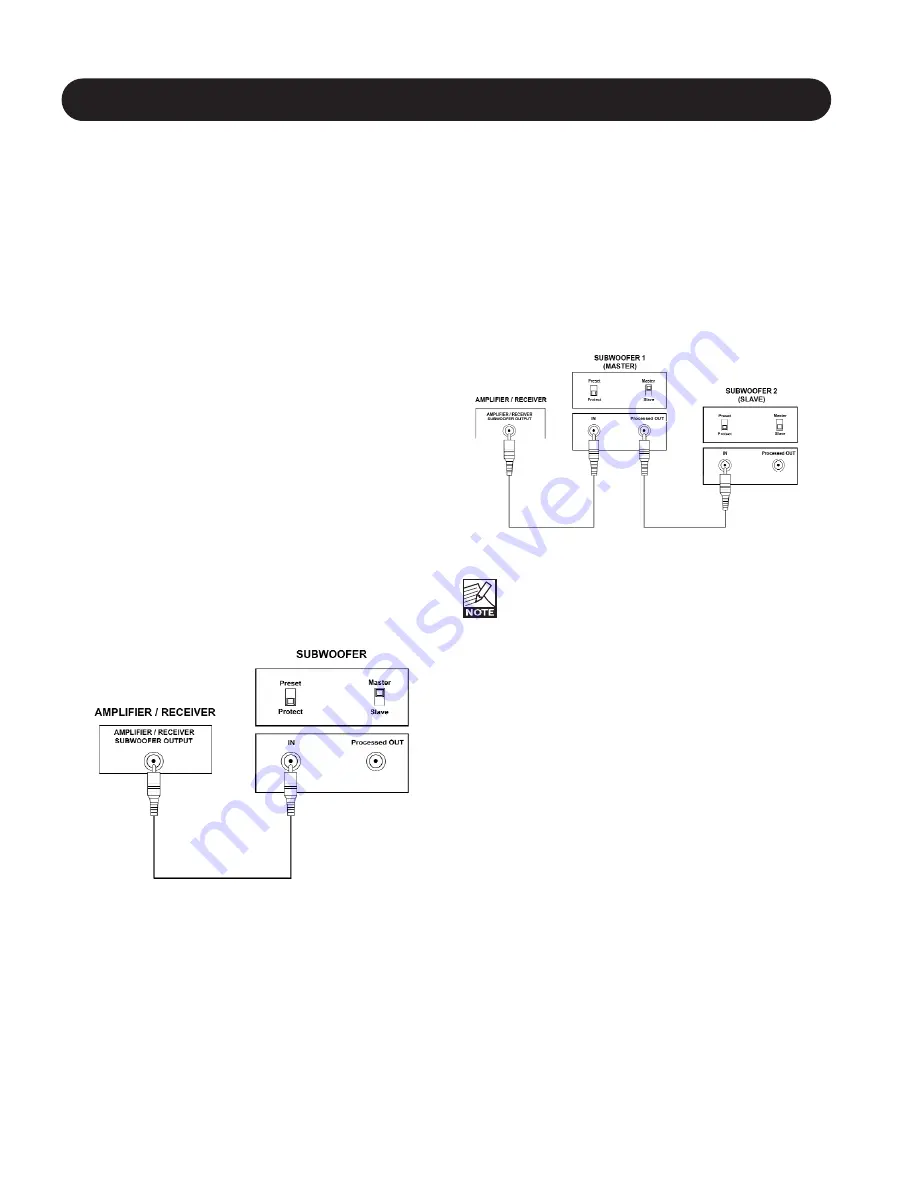
Single subwoofer connection

• From the processor or receiver's low-level (not a speaker

Output) subwoofer Output (often marked as "subwoofer
out", "Sub out" or "LFE"), connect a mono RCA-to-RCA
(No. 4 in fig. 2; refer also to fig. 3) or XLR-to-XLR patch
cord to the subwoofers Input. Refer also to the section
"Using the XLR connectors" below in this chapter.

• Set the subwoofers Input switch (No. 7 in fig. 2) to the

"Master" position if you wish to use and change the
settings with the remote control.

• After all connections are made, connect the supplied

mains lead to the subwoofers IEC power socket (No. 1 in
fig. 2) and a mains outlet.

Multiple Subwoofer connection

• From the processor or receiver's subwoofer Output (often

marked as "subwoofer out", "Sub out" or "LFE"), connect
a mono RCA-to-RCA or XLR-to-XLR patch cord to the
Input (No. 4 in fig. 2) of the first subwoofer in the daisy-
chain. This is now the Master subwoofer.

• Set the master subwoofers Input switch (No. 7 in fig. 2)

to the "Master" position.

• From the Master subwoofers "processed Out" Output

(No. 6 in fig. 2), connect a mono RCA-to-RCA or XLR-to-
XLR patch cord to the next subwoofers (Slave) Input.
Refer also to fig. 4.

• Any subsequent Slave subwoofers can be connected in

a daisy-chain style, going from the "processed Out"
Output (No. 6 in fig. 2 to the next Slave subwoofers
Input.

• Set the Slave subwoofers Input switch (No. 7 in fig. 2) to

the "Slave" position.

• After all connections are made, connect the supplied

mains leads to the subwoofers IEC power sockets (No. 1
in fig. 2) and a mains outlet.

Figure 4

• In order to avoid interference and noise, we 

recommend you use quality, well shielded cables.

• When using multiple subwoofers in a Master-

Slave setup, it is recommended that the 
subwoofers are all the same model.

• If you wish to use multiple subwoofers with full 

individual control, set the Input switch for all to the
"Master" position. From the Amplifier, processor or
receiver's subwoofer Output, use a Y-connector.

Summary of Contents for BM 10S

Page 1: ......

Page 2: ......

Page 3: ...they exit from the apparatus 11 Only use attachments accessories specified by the manufacturer 12 Use only with the cart stand tripod bracket or table specified by the manufacturer or sold with the apparatus When a cart is used use caution when moving the cart apparatus combination to avoid injury from tip over 13 Unplug this apparatus during lightning storms or when unused for long periods of tim...

Page 4: ...s B Digital device pursuant to part 15 of the FCC rules These limits are designed to provide reasonable protection against harmful interference in residential installations This equipment generates uses and can radiate radio frequency energy and if not installed and used in accordance with the instructions may cause harmful inter ference to radio communications However there is no guarantee that i...

Page 5: ...n 8 Remote Control and Battery Connection 9 Adjusting settings 10 Switching the Subwoofer On Off 10 Automatic Mode for On Standby 10 Temporary Manual mode for On Standby 11 Subwoofer Level Control 11 Setting Cross over Frequency 12 Select EXT On or Off 12 Setting Phase 12 Storing and recalling presets 12 Positioning the Subwoofer Introduction 13 Finding Optimal Settings 15 Level 15 Cross over freq...

Page 6: ...ers also an ideal choice for demanding Home Theater set ups In order to obtain the best possible performance from your Dynaudio subwoofer please carefully read and follow the instructions We wish you many musical and exciting moments with your Dynaudio Subwoofer Wilfried Ehrenholz Dynaudio Features Powerful integrated amplifier Full remote control 4 presets to store your favorite settings for volu...

Page 7: ... switching The Manual status LED will light up green Briefly pressing the red O Power Standby button will switch it to Standby even if a music signal is still present Note that on the next occasion a music signal presents itself after a 20 minute silence the subwoofer will switch to On again automatically If you prefer the subwoofer remains switched to Standby all the time regardless of Input sign...

Page 8: ...derside of the subwoofer Open the polythene bag and remove from around the base of the subwoofer Again carefully tilt the subwoofer on its side and again to turn it onto its feet Note that the top part of the protective material will now come off easily so ensure that the subwoofer doesn t drop or slide away in the process Check that the contents are complete Subwoofer The factory set power requir...

Page 9: ...itch 3 Balanced audio Input 4 Unbalanced audio Input 5 Balanced processed audio Output 6 Unbalanced processed audio Output 7 Input Master Slave function switch 8 Preset Settings Store Protect switch 9 Remote Control sensor 10 Heat sinks Figure 2 ...

Page 10: ... are made connect the supplied mains lead to the subwoofers IEC power socket No 1 in fig 2 and a mains outlet Multiple Subwoofer connection From the processor or receiver s subwoofer Output often marked as subwoofer out Sub out or LFE connect a mono RCA to RCA or XLR to XLR patch cord to the Input No 4 in fig 2 of the first subwoofer in the daisy chain This is now the Master subwoofer Set the mast...

Page 11: ...n doubt consult your dealer DO NOT use XLR and RCA connections in parallel at the same time for the same connection Remote Control battery battery replacement Before the DSC 1 remote control can be used it needs to be fitted with the battery cell that comes separately packed with the remote control To replace and insert a battery refer to fig 5 Release the battery tray by pushing its locking tab N...

Page 12: ...utomatic switching works by signal sensing As long as a music signal is available on the subwoofers Input it will remain switched on After 20 minutes of not sensing any Input music signal or receiving a signal from the remote control the subwoofer will automatically switch to Standby mode When in Standby mode the Power status LED No 2 in fig 7 is red when switched to On the LED is green During the...

Page 13: ...f it was switched On it will switch to Standby The subwoofer can be switched from Standby either manually or automatically The subwoofer is factory set at Automatic as this will be the most convenient setting in most cases Back to Automatic mode Press either the I or O button briefly Regardless if the subwoofer is switched On or in Standby mode the subwoofer will switch back to Automatic mode agai...

Page 14: ... results with EXT switched off Many vinyl records contain and the turntable itself will generate very low frequencies rumble which with the subwoofers low frequencies capabilities can otherwise prove distracting from enjoying the music The EXT mode is disabled when the subwoofer is set to Slave mode Refer also to section Master and Slave Mode in this chapter Loud volume levels over prolonged perio...

Page 15: ...also involve finding the right settings such as Level Cross over frequency and Phase for that location The subwoofers presets will prove to be a useful tool when trying to find a suitable setting You can store the settings that match a particular position so you can easily swap between locations It will also allow you to make small changes in settings and to store these as separate presets This wa...

Page 16: ...less than the corner placement as above Room modes can also still be considerable but less so than with corner placement From the listening position check if the bass is even across the entire bass spectrum If not move the subwoofer away or towards your listening position until most even response has been obtained Avoid placing the subwoofer exactly half way or at a quarter of the wall s length re...

Page 17: ...right setting for Phase may result in having to decrease level even if this was set correct before It is recommended that you double check the previous settings before moving on to the next one Obtaining the best integration of the subwoofers generally involves a considerable amount of repeated fine tuning Once done use the presets to store the settings It is advisable to reserve one preset as the...

Page 18: ...ers cross over frequency hasn t been set to the same or lower frequency compared to the setting chosen with the bass management system Selecting the correct frequency depends to a large extend on the main speakers Sometimes main speakers are specifically intended to work with a subwoofer In such cases the main speakers can get damaged by a full range amplifier signal If in doubt check the instruct...

Page 19: ...hase settings you can adjust the timing relationship between the subwoofers and main speakers If either subwoofer or main speaker are slightly delayed in response in relation to the other it can result in decreased bass Output in the frequency response area where they overlap each other The Phase relationship between subwoofer and satellite speakers is very dependent on relative distance construct...

Page 20: ...bInputs Status LED is red The subwoofer has been set to temporary manual On Standby switching Manual status LED is green woofer s Check if all signal cables are connected Make sure to switch the system off first before making any changes Check if the subwoofer Output on the source is engaged Switch back to automatic On Standby facility by briefly pressing the green I button on the remote The subwo...

Page 21: ...mpletely using the switch on the back panel No 2 in fig 2 Wait for at least 10 seconds Press and hold the A preset button No 6 in fig 6 While holding down the A preset button switch on subwoofer back on The power Status LED will start to flash green Release the A preset button The subwoofer is now reset to the factory default settings All previously stored presets will be deleted also when resetti...

Page 22: ... V Input Impedance 20 k Ohms 20 k Ohms Output Single ended RCA Balanced XLR Single ended RCA Balanced XLR Master Slave Link Yes Yes Remote Control included included No of Presets 4 4 Each Preset includes level crossover frequency phase level crossover frequency phase extended frequency range extended frequency range Drive Unit 12 30 cm long throw 10 24 cm long throw Magnetic Shielding Yes Yes Inte...

Reviews: