background image

Page 7

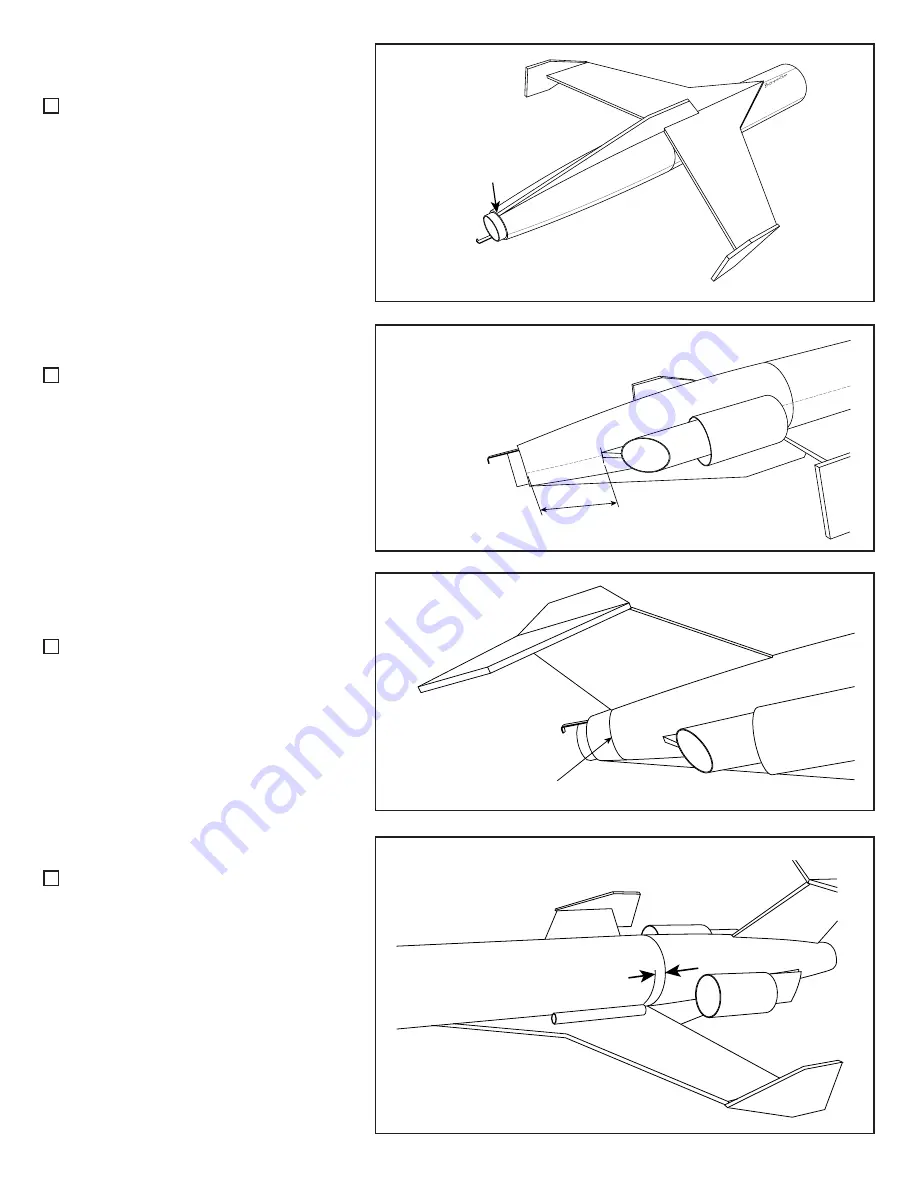
     26. Attach the ventral fin to the bottom 
of the rocket using “thick-viscosity” CA glue. 
Make sure the fin is straight along the tube.

     27. Mark the boattail 2.0 inches (50.8mm) 
from the rear end as shown. Apply “thick-vis-
cosity” CA glue to the balsa wood standoff and 
attach the jet engine pods to the boattail at this 
location. Perform the same step for the sec-
ond jet engine on the other side of the rocket.

     28. The vertical tail is glued to the top of 
the boattail using “thick-viscosity” CA glue. 
The rear edge butts against the little raised 
plastic line on the boattail. Make sure the fin is 
perpendicular to the boattail and also straight 
along the plastic seam line on the top of the 
rocket.

     29. Using wood glue, attach the launch lug 
to the tube. It is wedged between the top of 
left wing and the tube. Position it so that its 
rear edge is 0.5” (13mm) from the rear edge 
of the body tube. Allow the glue to dry. Apply 
a bead of wood glue to both sides of each 
launch-lug/body tube joint. Pull your finger 
along the joint to smooth out and remove the 
excess glue. Lay the tube horizontally while 
the glue dries.

If the fin hangs over the 
edge, sand off the tip.

2.0 inch (50.4mm)

Perform two times

Raised plastic line

0.5 inch (13mm)

Summary of Contents for LexxJet

Page 1: ...nd 400 grit Sanding Block Aluminum Angle to draw lines on the tube Ruler Wood ller or sanding sealer to smooth balsa ns Paint Brush Spray Paint 24mm Spent Engine casing to insert engine block Long woo...

Page 2: ...d prevent the ns from bonding well to the body tube when they are glued on later Set them aside to dry completely When they are dry sand the sealer smooth until you get a desirable surface nish You ma...

Page 3: ...you made Take the green ring slide it onto the engine hook and then onto the engine tube until it it up against the mark Be sure that the engine hook remains perpendicular to the engine tube 11 Glue...

Page 4: ...tic to keep the parts from sticking to it Then glue the two wing halves together using wood glue The root edge joint should lay at on the table and the winglets will lift up the tips to give the corre...

Page 5: ...line drawn on the tube in the previous step to make the diagonal end cut Sand the edge on a piece of sandpaper laid on a at surface to make the edge perfectly at Repeat for the other tube 20 Glue the...

Page 6: ...f the lines on the tube Mark the tube on the opposite side of the engine hook as the bottom of the rocket 24 The easiest way to extend the lines from the tube to the boattail is to use a piece of mask...

Page 7: ...butts against the little raised plastic line on the boattail Make sure the n is perpendicular to the boattail and also straight along the plastic seam line on the top of the rocket 29 Using wood glue...

Page 8: ...nter of its top pull the lines together to even up the ends Thread the four looped lines through the loop at the base of the nose cone Take the top of the parachute and pull it through all four string...

Page 9: ...r motor combinations that will work well in the DynaStar LexxJet rocket kit Download the RockSim le for this kit and a free trial version of RockSim at www Apog eeRockets com LexxJet asp Launch Suppli...

Page 10: ...ch sys tem The light or buzzer on the controller should come on Give a loud countdown 5 4 3 2 1 LAUNCH Push and hold the button until the engine ignites Then remove the safety key and place the safety...

Reviews: