background image

DS752LR4  User  Manual   19 

display will automatically switch the 
brightness according to the time set. 

High Level 

100 

Adjusts the highest brightness level.   
Range 0 – 100. 

Low Level 

20 

Adjusts the lowest brightness level.   
Range 0 – 100. 

High Level Time 

08:00 

Set high level time. 

Low Level Time 

18:00 

Set low level time. 

Local Dimming 

Medium 

Adjusts the contrast.    High is the highest 
contrast.    Off is the lowest contrast. 
(Off, Low, Medium and High) 
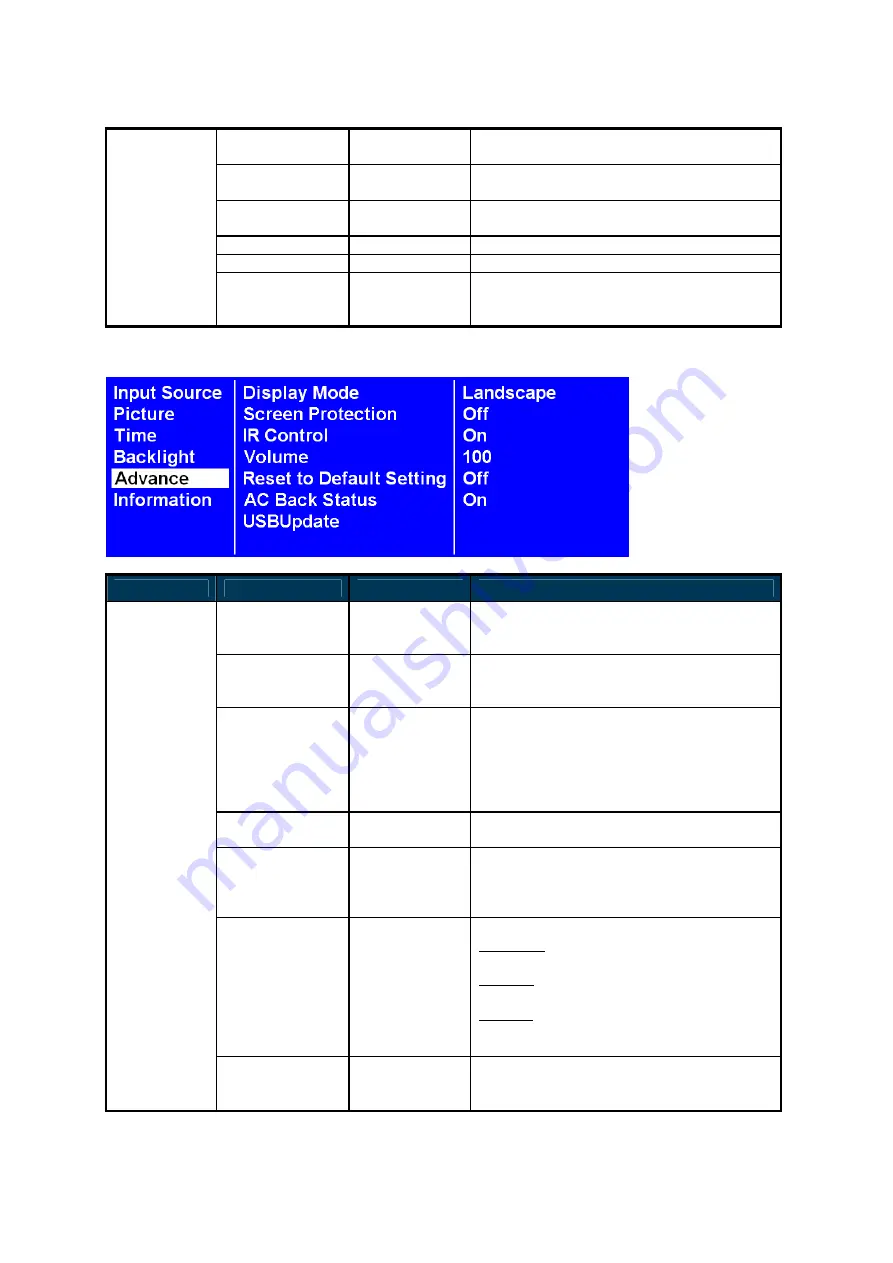
 

5. Advance 


ITEM 1 

ITEM 2 

DEFAULT


DESCRIPTION


Display Mode 

Landscape 

Change the Menu orientation.    The Menu 
can be displayed in either LANDSCAPE or 
PORTRAIT mode.


Screen 
Protection 

Off 

Turn on / off image burn-in protection. 
Set image burn-in protection interval. 
Range 0 – 100 minutes. 

IR Control 

On 

Enable/disable the remote control for Menu. 

Note

: When disabled, the remote control 

function can be enabled again from 
the control panel on the display or 
through the DynaScan “Display 
Manager” application. 

Volume 

100 

Set volume. 
Range 100 – 0. 

Reset to Default 
Setting 

Off 

Restore all settings to default. 

Note

: It does not modify CURRENT TIME, 

POWER ON TIME and POWER OFF 
TIME. 

AC Back Status 

Power On 

Choose to use the AC back status function. 
Power On: Display booting up when the 

power back after an outage. 

Standby: Display keeps soft-off status when 

the power back after an outage. 

Memory: Display will back to the last state


when the power back after an 
outage. 

Advance 

USBUpdate 


Select to upgrade the firmware version; the 
corresponding I/O position for USB port, 
please refer to 

p.12 - K


Summary of Contents for DS752LR4

Page 1: ...ual DS752LR4 Version 2 06 The use of diagrams and illustrations in the manual are for reference only The actual product may be different Product design and specifications are subject to change without...

Page 2: ...ontrol Batteries 6 Installation 7 Mounting 7 Wall Mounting 10 Connecting to a Power Source 10 Connecting an External Video Source 11 Input Output Terminals 12 Operating Instructions 13 Powering On Off...

Page 3: ...can is firmly committed to its environmental protection efforts and we believe that reducing our products impact on the environment is of the utmost importance We are dedicated to meet the latest envi...

Page 4: ...g measures Reorient or relocate the receiving antenna Increase the separation between the equipment and receiver Connect the equipment into an outlet on a circuit different from that to which the rece...

Page 5: ...not use chemical liquids and unplug while cleaning Do not use extreme force or any sharp or pointed objects to touch the display Do not drop or allow any object to fall to the display Do not operate t...

Page 6: ...nd other particles Unplug the LCD immediately and contact a DynaScan certified service professional as soon as possible when any of the following situations occurs Damaged power cord or power plug If...

Page 7: ...ada EU Except U K Japan Taiwan Voltage 120V 230V 100V 110V NEMA TYPE NEMA 5 15 CEE 7 7 NEMA 1 15 NEMA 5 15 IEC Display Plug IEC Plug TYPE IEC320 C13 Installing and Replacing Remote Control Batteries 1...

Page 8: ...disasters DynaScan recommends having certified professionals to evaluate the installation site and perform the mounting operation Do not to cover the vent and or the heat sink in order to ensure prope...

Page 9: ...rotated clockwise when looking at the front of the display such that the left edge becomes the top edge Front Portrait mode Rotate the set clockwise 90 mandatory The orientation sticker can be found o...

Page 10: ...d the outer edge of the LCD or video wall matrix from other objects to ensure proper ventilation For installations with screens inset into the wall refer to section Enclosures for cooling and ventilat...

Page 11: ...tion angle must be within 15 degrees of the vertical axis Do not install the wall mount while the power is turned on as it may cause serious injury from electrical shock Connecting to a Power Source U...

Page 12: ...Using the DP cable or HDMI cable provided insert one end into the DP IN or HDMI 1 IN HDMI 2 IN on the back of the display shown the in the diagram below Connect the other end of the DP cable HDMI cabl...

Page 13: ...via a HDMI cable H HDMI 2 IN Connect the HDMI output of a PC or an AV device via a HDMI cable I DP IN Connect the DP output of a PC or an AV device via a DP cable J Audio OUT Connect the audio signal...

Page 14: ...erating Instructions Powering On Off the Display To turn on off the display press the power switch on the back of the display as shown in the diagram below NOTE The remote control only works when the...

Page 15: ...e DS752LR4 model is at the front of the display with a receiving angle of 30 from the left and right The IR receiver configurations of the model are shown in the figure below The operating range of th...

Page 16: ...On Off MENU OSD On Off UP Move the cursor up or change the setting of selected item LEFT Exit the current selection RIGHT Select the highlighted item DOWN Move the cursor down or change the setting o...

Page 17: ...eypad ITEM DESCRIPTION MENU OSD On Off Power On Off UP Move the cursor up or change the setting of selected item DOWN Move the cursor down or change the setting of selected item LEFT Exit the current...

Page 18: ...play Input Source Failover 3 DSM365 Set the Failover 3 input to display 2 Picture ITEM 1 ITEM 2 DEFAULT DESCRIPTION Color Temperature D65 Select the color temperature User2 User1 D93 D65 and D55 Red A...

Page 19: ...power on off schedule function Power On Time 08 00 Set turn on time Time Power Off Time 18 00 Set turn off time 4 Backlight ITEM 1 ITEM 2 DEFAULT DESCRIPTION Backlight Auto Brightness If the AUTO BRIG...

Page 20: ...Set image burn in protection interval Range 0 100 minutes IR Control On Enable disable the remote control for Menu Note When disabled the remote control function can be enabled again from the control...

Page 21: ...ess of ambience monitoring Ambience Light Sensor Over Heat Protection Inactive It will enter into protection mode when the display internal temperature is over heat 65 C Brightness 75 67 C Brightness...

Page 22: ...0W Bezel Width T B L R 17 8 17 8 17 8 17 8 mm Cabinet Color Black Monitor Dimension LxHxD 1688 x 967 5 x 94 2 mm Monitor Weight set package 60 kg 68 kg MECHANICAL SPECS VESA Mounting Dimension 4 Holes...

Page 23: ...ixels V Lines Refresh Rate 640 480 60 Hz 800 600 60 Hz 1024 768 60 Hz 1280 768 60 Hz 1280 800 60 Hz 1280 960 60 Hz 1280 1024 60 Hz 1366 768 60 Hz 1440 900 60 Hz 1600 1200 60 Hz 1920 1080 60 Hz 1920 12...

Page 24: ...Connected to 7 8 02 RXD 03 TXD 04 Connected to 6 05 GND 06 Connected to 4 07 Connected to 1 8 08 Connected to 1 7 09 NC RS 232 Input PIN No NAME 01 Connected to 7 8 02 TXD 03 RXD 04 Connected to 6 05...

Page 25: ...efer to section Input Mode p 22 The remote control does not work Check whether there are batteries in the remote control Check the batteries for freshness polarity etc Check whether the remote is in t...

Page 26: ...USB flash drive storage SD card or Internet How to Switch to DSM365 Press the MENU button on either the rear panel control or remote control to show the OSD Use the navigation arrows to select and ad...

Page 27: ...DS752LR4 User Manual 26 www dynascandisplay com Copyright DynaScan Technology Inc All Rights Reserved...

Reviews: