Step /
Étape
#
3
Head Support Pad /
Coussin de support de tête
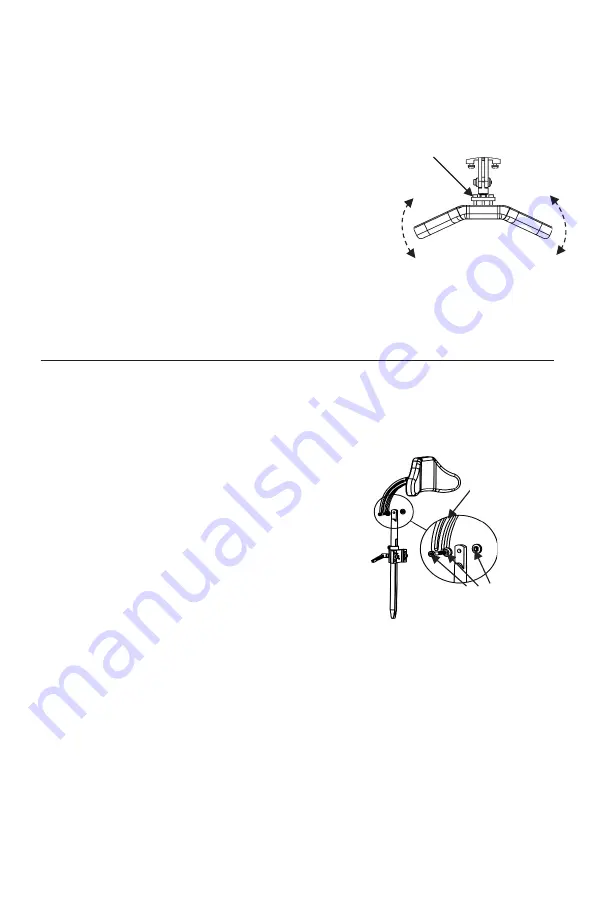
Unzip the back of the pad cover exposing the inside
of the pad. Set the ball on the head support into the
receiver inside the back of
the pad. Secure using the 3 screws provided (Figure
4). The pad can then be bent in or out
to customize the fit for the user.
Décompressez l’arrière de la housse de protection
en exposant l’intérieur du coussin. Placez la balle sur
le support de tête dans le récepteur à l’arrière du
coussin. Fixez en utilisant les 3 vis fournies (Figure
4). Le coussin peut ensuite être plié ou déplié pour
personnaliser l’ajustement pour l’utilisateur.
Next, slide the Head Support’s vertical post through the
mounting bracket and secure in place using the latch clamp
(see Figure 3). The channel in the vertical post should slide
over the Channel Screw (illustrated in Figure 2), ensuring
the post cannot rotate after installation.
Set the post to the desired height, and slide the locking
collar down to the top of the mounting kit. Secure in place
by tightening its screw against the head support vertical
post. This will ensure that the height of the head support
will always return to same height that it is set to.
Step 3 – Head Pad
Unzip the back of the pad cover exposing the inside of the
pad. Set the ball on the head support into the received
inside the back of the pad. Secure using the 3 screws
provided (see Figure 4). The head pad can then be bent in
or out to customize the fit to the user’s head.
OPTIONAL STEP – Install Flip Back Hardware (if ordered)
To install the optional flip back hardware, first remove the
head support arm by unfastening the hardware (3 pieces)
that secures it (see Figure 5). Set the hardware and head
support arm aside to reattach after the flip back has been
installed.
Next, install the flip back post extension over
the existing post. With the hardware
provided with, secure the flip back extension
by inserting the latch clamp through the
channel (with thin washer and heavy duty
washer) and tightening the special nut on the
other side.
Note: both the heavy duty washer and the special
nut must be installed with the small two sided
protrusion going into the elongated holes on each
side of the flip back post extension
(Figure 4)
Screws used to secure
Pad to Head Support
(Figure 5)
Support Arm
Hardware
Latch Clamp
(Figure 3)
Flip Back
Post Extension
Special Nut
Latch Clamp
Thin Washer
Heavy Duty Washer
(Figure 6)
Locking
Collar
(Figure 4)
Screws used to secure
Pad to Head Support
Vis utilisées pour fixer le
coussin au support de tête
(FIGURE 4)
Optional Step /
Étape facultative
Install Flip Back Hardware
(if ordered)
Installez le matériel rabattable
(si commandé)
To install the optional flip back hardware, first
remove the head support arm by unfastening
the hardware (3 pieces) that secures it (Figure
5). Set the hardware and head support arm
aside to reattach after the flip back has been
installed.
Pour installer le matériel rabattable optionnel,
retirez d’abord le bras de support de tête en
détachant le matériel (3 pièces) qui le fixe
(Figure 5). Réglez le matériel et le bras de
support de tête de côté pour les remettre en
place après que le rabat arrière a été installé.
Next, slide the Head Support’s vertical post through the
mounting bracket and secure in place using the latch clamp
(see Figure 3). The channel in the vertical post should slide
over the Channel Screw (illustrated in Figure 2), ensuring
the post cannot rotate after installation.
Set the post to the desired height, and slide the locking
collar down to the top of the mounting kit. Secure in place
by tightening its screw against the head support vertical
post. This will ensure that the height of the head support
will always return to same height that it is set to.
Step 3 – Head Pad
Unzip the back of the pad cover exposing the inside of the
pad. Set the ball on the head support into the received
inside the back of the pad. Secure using the 3 screws
provided (see Figure 4). The head pad can then be bent in
or out to customize the fit to the user’s head.
OPTIONAL STEP – Install Flip Back Hardware (if ordered)
To install the optional flip back hardware, first remove the
head support arm by unfastening the hardware (3 pieces)
that secures it (see Figure 5). Set the hardware and head
support arm aside to reattach after the flip back has been
installed.
Next, install the flip back post extension over
the existing post. With the hardware
provided with, secure the flip back extension
by inserting the latch clamp through the
channel (with thin washer and heavy duty
washer) and tightening the special nut on the
other side.
Note: both the heavy duty washer and the special
nut must be installed with the small two sided
protrusion going into the elongated holes on each
side of the flip back post extension
(Figure 4)
Screws used to secure
Pad to Head Support
(Figure 5)
Support Arm
Hardware
Latch Clamp
(Figure 3)
Flip Back
Post Extension
Special Nut
Latch Clamp
Thin Washer
Heavy Duty Washer
(Figure 6)
Locking
Collar
(Figure 4)
Support Arm
Bras de support
Hardware
Matériel
(FIGURE 5)
4
Summary of Contents for NXT MultiFit
Page 7: ...7 7...


