

7
Copyright © 2014 - 2022 by Dynamic Projection Institute GmbH. All rights reserved. http://www.dynamicprojection.com
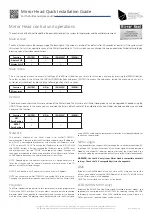
Weights and dimensions shown are approximate. Specifications and appearance are subject to change without notice.
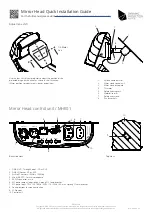
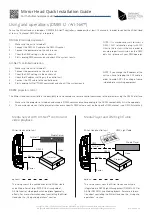
Mirror Head control unit operations
The control unit of the Mirror Head offers the possibility to adjust the system to the projector and the control environment.
Main screen
The Main-Screen shows the company logo. The back-light of the screen is turned off on default after 30 seconds of inactivity if the system is on
this screen. To turn it on again press any of the Mirror Head buttons. On this screen you can change the screen orientation for better handling by
pressing special keystroke combinations:
Main menu
This is the top level menu to access all settings of the Mirror Head. You can return to this screen anytime by pressing the (MENU) button.
To select an item in the list use the (UP) or (DOWN) buttons and press (ENTER) to access the sub-menu. Inside this menu you can start a
mirror-reset (calibration) by pressing the following buttons for 3 seconds.
Version
The version menu shows the firmware version of the Mirror Head. The firmware of all Mirror Head products can be upgraded if needed using the
USB OTG connector. In this menu you can override the factory default center of the calibration function. Under standard conditions you should
never use this function.
Function
(ENTER)
(UP)
▲
(DOWN)
▼
(MENU)
Display FLIP
X
X
-
-
Display FLOP
X
-
X
-
Function
(ENTER)
(UP)
▲
(DOWN)
▼
(MENU)
SET
Zero Position
X
X
-
-
RESET
Zero Position
X
-
X
-
Function
(ENTER)
(UP)
▲
(DOWN)
▼
(MENU)
Mirror reset
-
X
X
-
Network
The network interface of the Mirror Head is for Art-Net™ DMX512
communication. Please note that the Mirror Head supports static IP addresses
only (DHCP is not supported) and comes with a factory set IP address set to
2.0.0.3, netmask 255.0.0.0. To change the IP-address use the (UP), (DOWN)
and (ENTER) buttons. After you changed the IP address press (ENTER) over
and over again until you see “DONE” on the top of the screen. Changes will
then apply immediately to the network interface of the Mirror Head. To force
an ARP update disconnect the network cable for at least 5sec.
NOTE: Depending on the network infrastructure it is maybe necessary to
reset the switches and / or network interfaces of other devices if the IP-
address of the Mirror Head changes.
NOTE: Every device in an IP network must have its own IP address.
NOTE: You cannot use Art-Net™ DMX512 and analog DMX at the same time.
Changing this physical layer requires a power off-on cycle of the Mirror Head.
Projector
The Mirror Head offers the possibility for a remote control of the projector over
DMX via the RS232 interface. This menu allows you to select the connected
projector brand (see Appendix for compatibility and function list) to be used
with the Mirror Head. The projector must be connected with the Mirror Head
using a RS232 cable and the remote control function must be enabled and set
correctly on the projector.
Mirror angle
This option offers you the possibility to change the tilt-axis between Mode-90°
and Mode-162° for specific versions of the Mirror Head. Switching between
Mode-90° and Mode-162° does not require a restart of the Mirror Head. If you
switch the mode the center position on the tilt-axis of the Mirror Head changes.
WARNING: Use the 162° only if your Mirror Head is compatible with this
setting – Check the 162° compatibility list in the appendix.
DMX
By default the DMX-Address of the unit starts at 001. Here you can set the
offset if you need to change the DMX-Address of this unit. The DMX fixture
for the Mirror Head is in the appendix.
NOTE: The Mirror Head unit is always a slave device.
LEDs (MH08–MH13 only)
By default the RGB LEDs of the Mirror Head (if available for your model - see
appendix) are controlled over Art-Net™/DMX by selecting the specific RGB
and intensity channel values. If the LEDs should be on no matter if there is a
DMX signal or not, the fixed values can be set here.
QIG - Version 2.6
Mirror Head Quick Installation Guide
For the full manual please visit
http://dynamicprojection.com/mirror-head-assembly


