Dynamic Projection MH26 Manual Download Page 17

17

Copyright © 2014 - 2022 by Dynamic Projection Institute GmbH. All rights reserved. http://www.dynamicprojection.com

Weights and dimensions shown are approximate. Specifications and appearance are subject to change without notice. 


DMX-512 controlled operation

1. 

Make sure the unit is turned off.

2. 

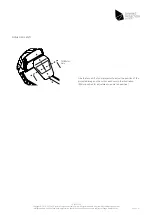
Connect the DMX XLR cable to the DMX-IN socket.

3. 

Connect the power-cord so the unit turns on.

4. 

Check the DMX settings in the control unit.

5. 

Start sending DMX commands and check if the system reacts.

NOTE: It is maybe necessary to insert a DMX / XLR termination plug (with 120 Ohm) in the last unit in the link in order to ensure proper 
transmission on the DMX data link – please ask your DMX operator.
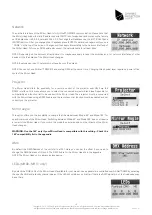
Art-Net

 controlled operation

1. 

Make sure the unit is turned off.

2. 

Connect the power-cord so the unit turns on.

3. 

Check the DMX settings in the control unit.

4. 

Check the IP address settings in the control unit.

5. 

Connect the CAT cable to the control board.

6. 

Start sending Art-Net™ DMX commands and check if the system reacts.

When the Mirror Head is connected to the network, it can be controlled by sending DMX data over the network using the Art-Net™ 
protocol. Configure the IP address and netmask according to your network infrastructure (common IP addresses used for Art-Net™ 
devices are 2.x.x.x or 10.x.x.x) as well as the DMX startaddress (channel offset).

NOTE: If you change the IP address of the unit you have to replug the CAT cable in order to avoid ARP / IP caching of some intermediate 
switching equipment.

When configured correctly, the device will react to packets sent to IP address itself, the network broadcast address as well as the 
limited broadcast address 255.255.255.255 - e.g. if the Mirror Head is set to its factory default IP address 2.0.0.3 (netmask 255.0.0.0), 
packets sent to 2.0.0.3, 2.255.255.255 and 255.255.255.255 may be used to control the Mirror Head.

NOTE: It is recommended to send Art-Net™ packets with a constant data rate of 40 packets per second and “hold” the DMX values 
for a short amount of time. Sending single packets may not have the intended effect regarding certain projector commands (e.g. lamp 
on / off) as well as for mirror movement speed – your mileage may vary.

The Mirror Head will honour the DMX channel offset but not the Art-Net™ universe. This means that in setups with multiple Mirror 
Heads and/or other Art-Net™ compliant devices in multiple universes, the Mirror Heads will react to packets sent to all universes – this 
can lead to unintentional / unexpected movement / behaviour.

One way to circumvent this problem is by reconfiguring the Mirror Head to use an IP address in a different network, and send the DMX 
data meant for the Mirror Head only to this network.

However, if the Art-Net™ data is incoming in the form of limited broadcast packets (destination address 255.255.255.255), the network 
separation by IP address will not work. In this case, the Mirror Head must be physically separated from the network where the data is 
being transmitted and other means of redirecting the DMX data for the Mirror Head must be used. (e.g. by routing or a proxy)

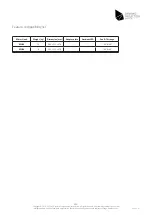
RS232 projector control

The Mirror Head control unit offers the possibility to send some basic remote control commands to the projector using the RS232 interface.
1.  

Make sure the projector is turned on and accepts RS232 commands corresponding to the RS232 compatibility list in the appendix.

2.  

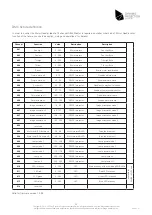
The commands are sent to the projector whenever a specific DMX value is sent on the specific DMX channel – see DMX fixture chart.

Example:
-   

To turn the projector ON send a value between 230 and 238 on DMX channel 9 for 3 seconds.

-  

To turn the projector OFF send a value between 250 and 255 on DMX channel 9 for 3 seconds.

Version 2.7

Summary of Contents for MH26

Page 1: ...Specifications and appearance are subject to change without notice Mirror Head Manual Manual for MH28 MH26 VERSION 2 7 Version 2 7 1 F Copyright 2014 2022 by Dynamic Projection Institute GmbH All rig...

Page 2: ...roduction 3 Warranty 3 Safety 4 Operating determinations 5 Package contents 6 Technical specifications 6 Description of the device 7 Mirror Head control unit 9 Mirror Head assembly 10 Mounting of the...

Page 3: ...duct keep this manual for the entire service life of the product pass this manual on to every further owner or user of the product download the latest version of the user manual from our website In ca...

Page 4: ...put pressure on pull or heat up the power cord Never operate next to sources of heat or cold Disregard can lead to power cord damages fire or mortal electrical shock The cable insert or the female par...

Page 5: ...clamps Do not mount projectors to this unit that this unit was not designed for Make sure that the area below the installation place is blocked when rigging de rigging or servicing the fixture To prev...

Page 6: ...nels are required to control the unit Art Net connection RJ45 Art Net designed by and Copyright Artistic License Holdings Ltd OEM code 0x1140 High resolution micro step motors with maintenance free di...

Page 7: ...e for projectors It can be set to move either rapidly or slowly to project pictures videos and texts onto any imaginable surface Projections can be moved around from one surface to another or remain s...

Page 8: ...om Weights and dimensions shown are approximate Specifications and appearance are subject to change without notice 1 Surface coated mirror 2 Mirror Head control unit 3 Mirror Head base plate 4 Tilt mo...

Page 9: ...power input 100V 2A 60Hz 240V 1A 50Hz 10A max 3 prong C14 male socket 8 Control buttons for menu navigation 9 LCD display 10 Control unit Elektronik Frontansicht komplett all rights reserved by www d...

Page 10: ...check which model of the Mirror Head you have and follow the instructions carefully Only work at a clean working place and avoid any obstacles that can damage the Mirror Head or projector You need the...

Page 11: ...cond person to help 8 Lock in the Mirror Head into the base plate and secure the two screws at the front and the two screws at the bottom NOTE This step of the installation can be reversed 9 Connect t...

Page 12: ...and dimensions shown are approximate Specifications and appearance are subject to change without notice Use the lens shift of your projector to adjust the position of the projected image on the mirro...

Page 13: ...tice Mounting of accessories NOTE This device is only allowed for an installation via the original mounting brackets clamps or stands NOTE The manufacturer cannot be made liable for damages caused by...

Page 14: ...al trussing systems have to be used The device must never be fixed swinging freely in the room Devices in hanging installations may cause severe injuries when crashing down If you have doubts concerni...

Page 15: ...cal throw ratio calculation you measure the distance from the center of the mirror to the wall you are projecting on and add 0 08m 8cm DMX OUT DMX IN ARTNET LAN RS 232 MENU ENTER AC OUT AC IN Mirror H...

Page 16: ...Mirror Head unit will respond to the controller If you set for example the address to channel 15 the device will use the channels 15 to 28 for control Make sure that you don t have any overlapping cha...

Page 17: ...tmask 255 0 0 0 packets sent to 2 0 0 3 2 255 255 255 and 255 255 255 255 may be used to control the Mirror Head NOTE It is recommended to send Art Net packets with a constant data rate of 40 packets...

Page 18: ...ssing special keystroke combinations Main menu This is the top level menu to access all settings of the Mirror Head You can return to this screen anytime by pressing the MENU button To select an item...

Page 19: ...or Head offers the possibility for a remote control of the projector over DMX via the RS232 interface This menu allows you to select the connected projector brand see Appendix for compatibility and fu...

Page 20: ...pection is for general safety and to avoid danger to life keep service serious The operator has to make sure that safety relating and machine technical installations are inspected by an expert and ski...

Page 21: ...in the main menu of the control unit The LEDs do not light when i set the DMX values Make sure your units does have LED support Check the menu LED in the control unit and see if LED control over DMX...

Page 22: ...possible You can try to move the position of the mirror by a few steps over DMX to go into a position where you do not hear it anymore NOTE Please keep in mind that during normal operation the Mirror...

Page 23: ...th Part 15 of the FCC rules Operation is subject to the following two conditions 1 this device may not cause harmful interference and 2 this device must accept any interference received including inte...

Page 24: ...own are approximate Specifications and appearance are subject to change without notice Appendix for Mirror Head MH28 MH26 Version 2 7 RS232 projector list and functions I DMX fixture definition II Fea...

Page 25: ...projection com Weights and dimensions shown are approximate Specifications and appearance are subject to change without notice RS232 Projector list and functions EPSON Serial 115200 none 8 1 Picture m...

Page 26: ...on mode 4 008 reserved 009 Motor and LED drivers on 28 38 Mirror motors LED Turns the drivers on 009 Motor and LED drivers off 50 58 Mirror motors LED Turns the drivers off 009 Lamp mode 1 130 138 RS2...

Page 27: ...ojection com Weights and dimensions shown are approximate Specifications and appearance are subject to change without notice Feature compatibility list Mirror Head Weight kg Dimension mm Adapter plate...

Page 28: ...LPLM14 TR 3 41 5 11 Zoom Lens ELPLM10 TR 3 39 5 17 1 Zoom Lens ELPLM13 TR 2 28 3 46 Zoom Lens ELPLM09 TR 2 20 3 56 1 Zoom Lens ELPLL09 TR 4 79 7 2 Zoom Lens ELPLM11 TR 4 95 7 54 1 Zoom Lens ELPLL10 TR...

Page 29: ...nical mirror drive PAN TILT Copyright c 2014 2022 by Dynamic Projection Institute Herstellungs und Vertriebs GmbH All Rights Reserved 2020 12 10 MH26 Mirror Head MH26 3 3 2 2 1 1 884 8 7 2 272 Legacy...

Page 30: ...bs GmbH All Rights Reserved 2020 12 10 MH26 Mirror Head MH26 Mirror Head MH26 Frame ELPMB59 Stacking and Rigging Frame by LANG Projector EPSON EB L1000 Fixture total 64 kg 212 696 943 239 884 295 301...

Page 31: ...ol buttons 3 1pcs Mechanical mirror drive PAN TILT Copyright c 2014 2022 by Dynamic Projection Institute Herstellungs und Vertriebs GmbH All Rights Reserved 2019 07 02 MH28 Mirror Head MH28 3 2 1 637...

Page 32: ...nd Vertriebs GmbH All Rights Reserved 2019 07 02 MH28 Mirror Head MH28 Mirror Head MH28 Frame Carry Handle Lang Frame Projector EPSON EB L25000U Fixture total 93 kg with Carry Handle Fixture total 100...

Page 33: ...6 18 244 x 272 x 47mm L W H 1 3 kg not included Projector Mirror Head Baseplate Mirror Head Mirror Head Lens Extension Screw DIN912 M6 20 Screw DIN912 M6 10 Washer M6 Screw DIN912 M6 30 Nut M6 Compone...

Reviews: