background image


CAUTION

Do not touch the connectors on Touch pad and in the computer with your 

bare hands. Touch pad can fail if they are contaminated with sweat, natural oils, etc. from 

your hands. 

4.14 Touch pad 

Removing Touch pad 


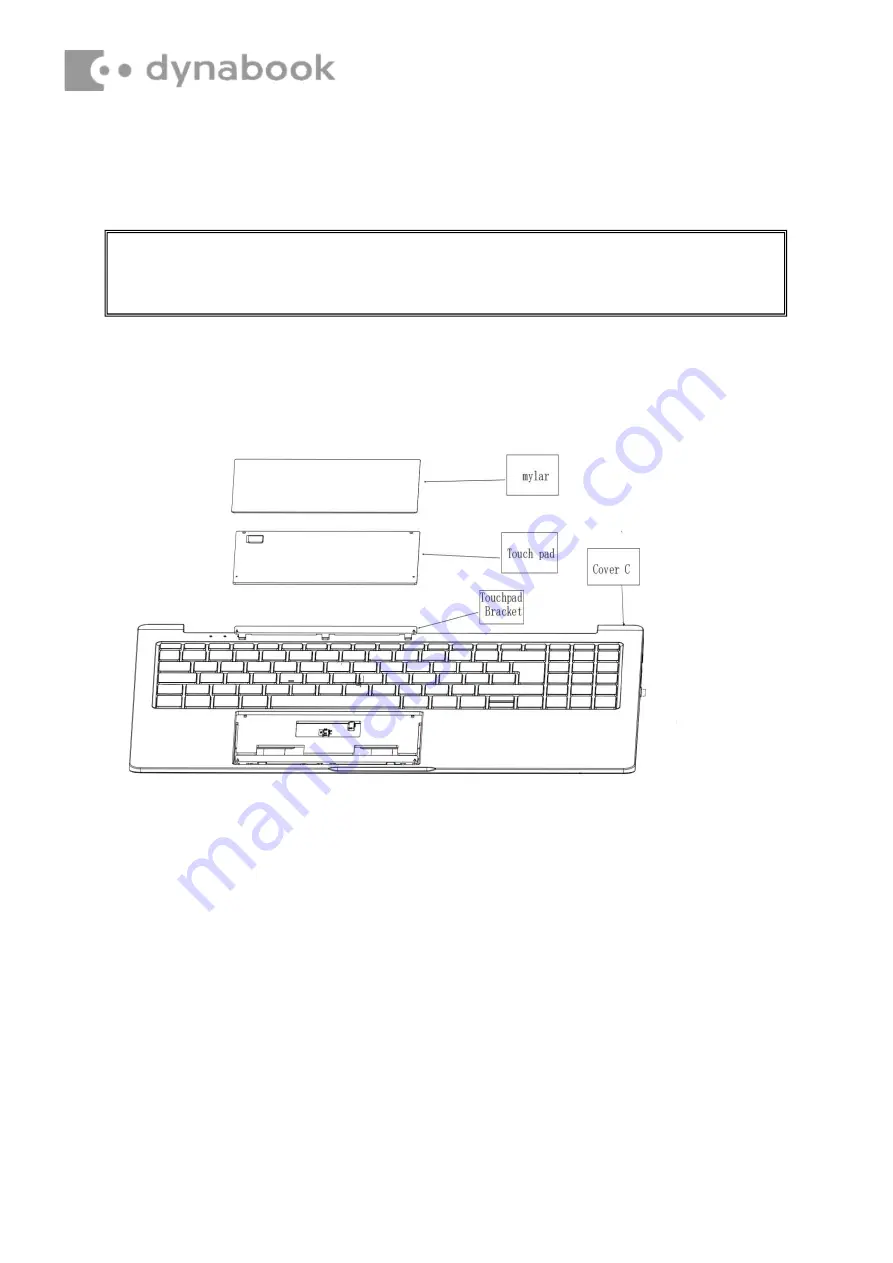
Remove Touch pad according to the following procedures and Figures 4-35. 


1. 

Separate the touchpad from the C shell  

2. 

.Detach the bracket from the trackpad 


Figure 4-35 Removing Touch pad 

Summary of Contents for Satellite C50-J

Page 1: ...s of the Dynabook Maintenance Manual For your safety and the safety of the people around you it is important that you use Electrostatic Discharge ESD equipment Correctly utilizing of the equipment inc...

Page 2: ...anual Some tools are required in order to remove this component Once removed these components should be recycled as per local requirements To remove the battery the base assembly must be removed first...

Page 3: ...TE Dispose of the used battery packs as required by local ordinances or regulations Removing Battery Pack Remove battery pack according to the following procedures and Figure 4 9 1 Remove Battery Myla...

Page 4: ...ce Manual to check how the mainboard is removed Please refer to the information below for the removal of the SSD One Philips screwdriver with type 1 bit will be required to remove the screws indicated...

Page 5: ...re 4 4 Removing SSD 4 13 Figure 4 5 Removing SODIMM 4 14 Figure 4 6 Removing LCD Module Assembly 4 17 Figure 4 7 Removing the CPU Cooling Module and Fan 4 19 Figure 4 7 Applying silicon grease CPU 4 2...

Page 6: ...according to the following procedures and Figure 4 7 1 Remove seven M2 0x7 5x4 5black Phillips head screws securing Base Enclosure and four M2 0x 3 5x4 5black Phillips head screws securing Base Enclo...

Page 7: ...ll Base Enclosure according to the following procedures and Figure 4 7 1 Place Base Enclosure in correct position 2 Secure Base Enclosure with seven M2 0x7 5x4 5black Phillips head screws and M2 0x3 5...

Page 8: ...se of the used battery packs as required by local ordinances or regulations 4 3 Battery Pack Removing Battery Pack Remove battery pack according to the following procedures and Figure 4 9 1 Remove Bat...

Page 9: ...ally check the battery s terminals If they are dirty clean them with a dry cloth Installing Battery Pack Install battery pack according to the following procedures and Figure 4 9 1 Take a new or recha...

Page 10: ...minated with sweat natural oils etc from your hands 4 4 SSD Removing SSD Remove SSD according to the following procedures and Figures 4 13 1 Remove thermally conductive pad 2 Remove one M2_L0 3xL2 2 O...

Page 11: ...SD into CN8 on system board 2 Secure it with one M2_L0 3xL2 2 OD5 5 T0 6 black Phillips head screw 3 Install thermal silica gel CAUTION Do not touch the connectors on SSD and in the computer with your...

Page 12: ...they are contaminated with sweat natural oils etc from your hands 4 5 SODIMM Removing SODIMM Remove SODIMM according to the following procedures and Figures 4 14 1 Press both sides of the J1 connecto...

Page 13: ...e hands SODIMM can fail if they are contaminated with sweat natural oils etc from your hands Installing SODIMM Install SODIMM according to the following procedures and Figures 4 14 1 Aim the SODIMM at...

Page 14: ...fasten LCD cable 2 Remove PC gasket from WIFI module Remove plastic chips on wifi module 3 Disconnect LCD cable from CN6 on system board 4 Released wireless antenna cables from top cover latch 5 Open...

Page 15: ...Figure 4 18 Removing the LCD Module assembly...

Page 16: ...mark portions 3 Close LCD Module Assembly 4 Note the module definition grey wire connects MAIN interface and black wire connects AUX 5 Routing antenna cables under Rib on Top cover to secure antenna c...

Page 17: ...ove CPU Cooling Module and Fan_VGA SKU only Remove CPU Cooling Module and Fan according to the following procedures and Figures 4 19 and 4 20 1 Remove cushion for FAN 2 Remove four M2 0x3 0x4 5 black...

Page 18: ...Figure 4 20 Applying silicon grease...

Page 19: ...m CN6 IO Board cable from CON19 Touch Pad cable from TPCON1 Keyboard cable from KBCON1 FAN cable from CN21 Battery Pack cable from CN3 RTC Battery from RTC CN1 Released wireless antenna cables from to...

Page 20: ...m Board with four M2 0x3 0x4 5and one M2 0x2 5x5 0 black Phillips head screw mark portions 3 Connect following cable to the connector on System Board Speaker cable from SPK LCD cable from CN6 IO Board...

Page 21: ...the following procedures and Figures 4 23 1 Disconnect the following cable from the connector on IO Board IO Board cable from JDB1 2 Remove three M2 0x3 0x4 5 black Phillips head screw securing IO Boa...

Page 22: ...ocedures and Figures 4 23 1 Place IO Board in correct position 2 Securing IO Board with three M2 0x3 0x4 5 black Phillips head screw 3 Connect following cable to the connector on System Board IO Board...

Page 23: ...Speaker Removing Speaker Remove Speake according to the following procedures and Figure 4 25 1 Disconnect Speaker cable from SPK on system board 2 Remove left and right Speaker Figure 4 25 Removing Sp...

Page 24: ...Installing Speaker Install Speaker according to the following procedures and Figure 4 25 1 Place speaker in correct position 2 Connect speaker cable to SPK on system board...

Page 25: ...r Black Remove the four rubber footpads from the B shell 2 Remove four M2 0x3 0x4 5 black Phillips head screws securing the LCD Module Mask as Figure 4 1 shown 3 Insert your finger between the edge of...

Page 26: ...Figure 4 28 Removing the LCD Module Mask...

Page 27: ...a Shutter Installing the LCD Module Mask Install the LCD Module Mask according to the following procedures and Figure 4 27 4 28 1 Install the LCD Module Mask and follow step 3 2 1 to press lock the la...

Page 28: ...ations NOTE The LCD cable must be carefully peeled away before disconnecting it from the module 4 12 LCD Panel Removing the LCD Panel Remove the LCD Panel according to the following procedures and Fig...

Page 29: ...1 Figure 4 29 Removing LCD Panel follow direction 1 Figure 4 30 removing the LCD cable...

Page 30: ...nstall the LCD Panel according to the following procedures and Figures 4 29and4 30 Installing the LCD panel Install the LCD Panel according to the following procedures 1 Turn the LCD upside down 2 Con...

Page 31: ...ter only for Non Touch SKU 4 13CCD Module Removing the CCD Module Remove the CCD Module according to the following procedures and Figure 4 33 1 Lift the CCD Module from the LCD module cover 2 Disconne...

Page 32: ...ve CCD Module release paper 2 Connect LCD cable to CCD module connector 3 After ripping off FPC release paste FPC into shell LCD cover 4 Seat the CCD Module in the correct position 5 Route the LCD cab...

Page 33: ...ad can fail if they are contaminated with sweat natural oils etc from your hands 4 14 Touch pad Removing Touch pad Remove Touch pad according to the following procedures and Figures 4 35 1 Separate th...

Page 34: ...etc from your hands Installing Touch pad Install Touch pad according to the following procedures and Figures 4 35 1 Tear off 3MM adhesive release paper 2 Paste the touchpad holder 3 Tear off fingerpr...
Page 35: ...edding The following components contained within the AC adapter potentially contain hazardous substances and require special handling Printed Circuit Board 10 cm2 Capacitor 25 mm in height Photos of t...

Page 36: ...Conventional type AC adapter AC Adapter with casing removed AC adapter printed circuit board AC adapter capacitor...

Reviews: