background image

5

3. Connecting your LabelWriter Printer

At some point during the software installation, you will be asked to connect your 
LabelWriter printer to the USB port. 

NOTE  

For Windows, do not connect the printer to 

your computer until instructed to do so during the 
software installation.

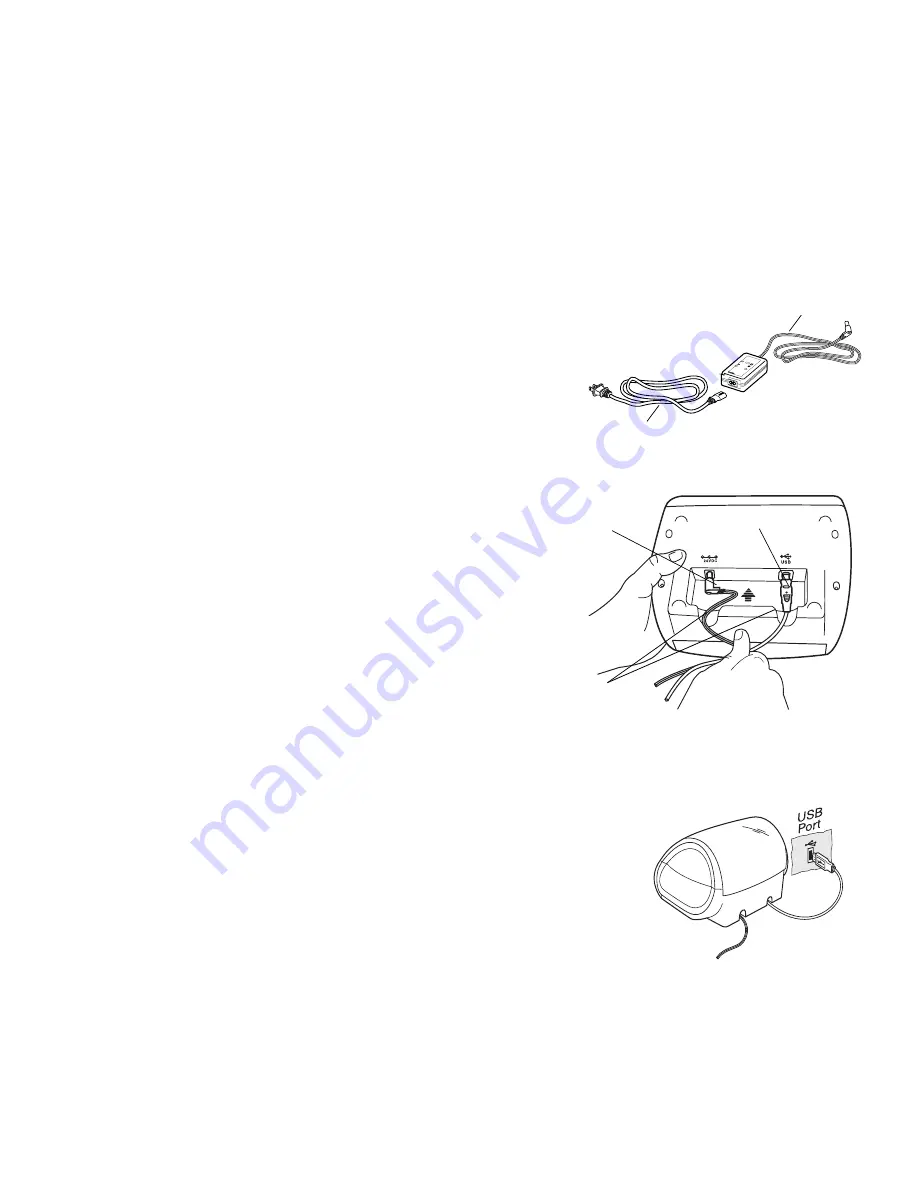
To connect the power

1

Plug the power cord into the power adapter. See 
Figure 4. 

2

Plug the power adapter into the power 
connector on the bottom of the printer. See 
Figure 5. Make sure to push the plug in 
completely.

3

Plug the other end of the power cord into a 
power outlet.

To connect the USB cable

1

Plug the USB cable into the USB port on the 
bottom of the printer. See Figure 5.

2

Insert the power and USB cables into the right and left 
cable channels and set the printer down on your work 
surface.

3

When prompted during the software installation and 
while the printer is turned on, plug the USB cable into 
an available USB port on your computer. See Figure 6.

Switching Adapter 

SHO

CK HA

ZA

RD

RISK

 OF E

LECTRIC 

SHO

CK

DRY

 LO

CAT

IO

N U

SE ONL

Y .

NON-SE

RVI

CEAB

LE P

ARTS INSI

DE.

FOR USE WI

TH

 IT

E O

NLY

.

END A

ST

 FOR 

KO

NT

ORSM

AS

KINER.

CAUT

ION

T es

ted

 to

 c

ompl

y

with

 FC

C s

ta

nd

ard

s

FO

R H

OM

E O

R

OF

FIC

E USE

I.T

.E. P

OWER

 S

UPP

LY

C

Mode

l No.:

TESA2-240100

0

U.S. P/N: 90819

Europe P/N

: 92

488

3

INP

UT

:100-240V

-50/

60Hz M

ax

0.64A

OU

TPU

T :2

4V --- 0-1.0A

MADE

 IN CH

IN

A

LIS

TE

D

15WM

 E198850

U L

U L

N10

926

Power Adapter

Power Cord

Figure 4

Figure 5

Power

USB

Cable

Channels

Figure 6

Summary of Contents for LabelWriter Twin Turbo

Page 1: ...LabelWriter Twin Turbo www dymo com QuickStart LW Twin Turbo_QSC indd 1 23 01 2006 15 41 22...

Page 2: ...uses heat from a thermal print head to print on specially treated labels Labels are the only supplies you will ever need to buy QSG Swit chin g Ada pter SHOCK HAZAR D RISK OF ELECTR IC SHOCK DRY L O...

Page 3: ...remove labels from the printer The LED status light allows you to visually determine the current state of each side of the printer Solid blue power is on and the printer is ready Flashing blue labels...

Page 4: ...and then Run on the Windows taskbar The Run dialog box appears b Enter D install exe where D is the letter assigned to the CD ROM drive and click OK 2 Select the language version you wish to install...

Page 5: ...on the bottom of the printer See Figure 5 2 Insert the power and USB cables into the right and left cable channels and set the printer down on your work surface 3 When prompted during the software in...

Page 6: ...d adjust it to fit snugly against the roll See Figure 7 5 Insert the label spool into the slots in the printer cover 6 Cut the first label in half so that you have a clean edge and insert the label in...

Page 7: ...ctions to register the software You are also asked to enter your default return address and default logo file 2 At the main window click once on the label and type some text 3 Choose a font and a just...

Page 8: ...8 930113 DYMO bvba Industriepark Noord 30 9100 Sint Niklaas Belgium DYMO Purchase Registration Sanford Australia 1 11 Keysborough Ave Keysborough Victoria 3173 Australia...

Reviews: