


- 10 -
Place a flat washer and a spacer on each of the hex head bolts.
The
bottom antenna element has larger holes on one side, these
larger holes face the spacers.
The bottom antenna element is
installed so the spacers are
inside
of the element. Refer to
Figures 3
&
4
for details.
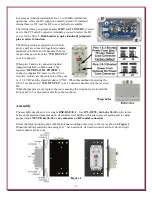
On the bottom hex head bolt, install an external tooth washer, the
short antenna wire with a ring terminal, followed by a flat washer,
split washer and a hex nut as shown in
Figure 5
. Note the direction
of the wire in the photo. On the top hex head bolt, install a flat
washer, split washer and a hex nut. Tighten in place.
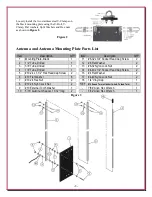
The other end of the short antenna wire has a fork lug, is connected
to the
ANTENNA
on the AVA-3 as shown in
Figure 6
between
the two flat washers. Tighten in place.
Figure 6
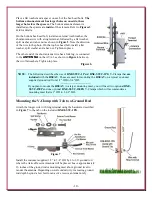
NOTE:
The following describes the use of
DXE-SSVC-1P
and
DXE-SSVC-1PG
V-Clamps that
are
included
with the
RSEAV
. These are used for mounting the
RSEAV
on a typical customer
supplied ground rod from 1/2" OD to 3/4" OD.
---------------------------------
If you plan to mount the
RSEAV
to a larger mounting mast, you will need two optional
DXE-
SSVC-150P
and one optional
DXE-SSVC-150PG
V-Clamps which will accommodate a
mounting mast that is 1" OD to 1-1/2" OD.
Mounting the V-Clamp with Tab to a Ground Rod
Attach the longer wire with ring terminal using the hardware described
in
Figure 7
to the tab on the included
DXE-SSVC-1PG
.
Figure 7
Figure 7
Install the customer supplied 1/2” to 3/4” OD by 4 to 6 ft. ground rod
where the Active Receive Antenna will be placed. Leave approximately
16 inches of the ground rod or mounting mast above ground level to
mount the antenna. Depending on soil conductivity, increasing ground
rod depth beyond a few feet for an active receive antenna
rarely


