background image

PAGE 18

BULLETIN F-56

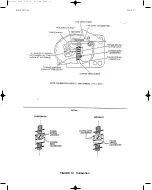
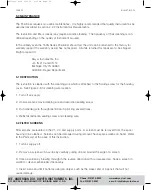
2)  CONCENTRIC - Adjust Range Spring active coils by loosening Range Spring Locknut and turning 

Range Spring.  Four to four and one-half active coils are desired for a standard input span.

SEPARATE - Adjust Range Spring active coils by loosening Range Spring Lockscrew and turning 
Range Spring.  Four to four and one-half active coils are desired for a standard input span.

3)  CONCENTRIC - Tighten Fine Zero Locknut and Range Spring Locknut after making adjustment.

SEPARATE - Tighten Fine Zero Locknut and Range Spring Locknut after making adjustment.

3.  Turn on supply pressure.

4.  Zero Adjustment

A.  Fine Zero Adjustment

1)  Set input signal to desired minimum range value.

2)  Loosen Fine Zero Locknut.

3)  Turn Fine Zero Thumbwheel until desired valve position is reached and tighten Fine Zero 

Locknut.

If Positioner can not be zeroed, proceed to Coarse Zero Adjustment.  Otherwise proceed to  
step 5 Span Adjustment.

B.  Coarse Zero Adjustment

1)  Center fine zero adjustment by loosening Fine Zero Locknut and turning Fine Zero Thumbwheel

so that approximately one thread (1/16˝) of the Fine Zero Screw projects above Fine Zero 
Thumbwheel.

2)  Loosen Coarse Zero Lockscrew 1/4 turn.  The Span Nut must be tight against the spring.

3)  CONCENTRIC - Turn Coarse Zero and Span Nut and Fine Zero Thumbwheel simultaneously in

the same direction until valve is in desired position.  Continue to turn Coarse Zero and Span 
Nut until Coarse Zero Lockscrew and Range Spring Locknut are accessible.

Bulletin F-56  6/27/05  9:37 AM  Page 18

Summary of Contents for W.E. Anderson 150N Series

Page 1: ...and Operating Instructions Bulletin F 56 W E ANDERSON DIV DWYER INSTRUMENTS INC P O BOX 358 MICHIGAN CITY INDIANA 46361 U S A Phone 219 879 8000 www dwyer inst com Fax 219 872 9057 e mail info dwyer...

Page 2: ...UIPMENT NEEDED 11 2 4 3 PROCEDURE 11 3 0 CALIBRATION 16 3 1 EQUIPMENT NEEDED 16 3 2 PROCEDURE 16 4 0 PRINCIPLE OF OPERATION 20 5 0 MAINTENANCE 22 5 1 RESTRICTION 22 5 2 FILTER SCREENS 22 LIST OF ILLUS...

Page 3: ...ponse to an input sig nal Mechanical feedback is provided by a characterized cam No additional parts are necessary to change between single or double acting actuators or direct reverse action 1 1 MODE...

Page 4: ...KG CM2 supply Adjustable Range 30 of input span or maximum rated travel Stroke Rectilinear 1 2 to 2 Temperature Limits 40 F to 180 F 40 C to 82 C Weight 2 5 lbs 1 3 kgs Gauges Two 0 160 PSIG 0 11 2 K...

Page 5: ...Positioner The Positioner will need to be calibrated before being put into service 2 1 SHIPPING AND STORAGE If the Positioner is to be stocked stored or shipped to another location prior to piping mak...

Page 6: ...tuator at mid stroke Connection between actuator stem and feedback lever is typically made using a slotted brack et attached to actuator stem and a feedback pin attached to the feedback lever The slot...

Page 7: ...BULLETIN F 56 PAGE 7 FIGURE 2 1 Cam and Associated Hardware Bulletin F 56 6 27 05 9 37 AM Page 7...

Page 8: ...PAGE 8 BULLETIN F 56 FIGURE 2 2 Typical Positioner Mounting and Feedback Pin Connection Bulletin F 56 6 27 05 9 37 AM Page 8...

Page 9: ...ion may cause damage to the Positioner Supply pressure to Positioner must not exceed actuator maximum pressure rating Refer to the table to determine the required pneumatic connections between the Pos...

Page 10: ...or deviation from specified performance 2 3 2 Instrument Air Requirements Instrument quality air must be supplied to the Positioner CAUTION Synthetic compressor lubricants in the air stream at the Pos...

Page 11: ...e of a cam for identification The number designates the type of cam i e linear modified equal percentage or quick opening as indi cated in the model designation The letter denotes the side of the cam...

Page 12: ...cam or to Figure 2 5 when using the B side of a cam Detail A shows cam nomenclature 1 Turn on the supply pressure 2 Ensure that valve actuator is seated in the position desired with no Positioner inpu...

Page 13: ...BULLETIN F 56 PAGE 13 FIGURE 2 3 Standard Cam Characteristics Bulletin F 56 6 27 05 9 37 AM Page 13...

Page 14: ...PAGE 14 BULLETIN F 56 FIGURE 2 4 Cam Installation A Side Example Bulletin F 56 6 27 05 9 37 AM Page 14...

Page 15: ...BULLETIN F 56 PAGE 15 FIGURE 2 5 Cam Installation B Side Example Bulletin F 56 6 27 05 9 37 AM Page 15...

Page 16: ...n procedure for the Positioner at hand 3 1 EQUIPMENT NEEDED Pressure regulator adjustable from 0 to 30 psig qty 1 Pressure gauge 0 to 30 psig qty 1 Small slotted screwdriver qty 1 3 8 open end wrench...

Page 17: ...BULLETIN F 56 PAGE 17 FIGURE 3 1 Calibration Bulletin F 56 6 27 05 9 37 AM Page 17...

Page 18: ...red minimum range value 2 Loosen Fine Zero Locknut 3 Turn Fine Zero Thumbwheel until desired valve position is reached and tighten Fine Zero Locknut If Positioner can not be zeroed proceed to Coarse Z...

Page 19: ...Reduce input to zero value 3 CONCENTRIC Loosen Range Spring Locknut and Fine Zero Locknut and adjust the number of active range spring coils as follows SEPARATE Loosen Range Spring Locknut and Fine Ze...

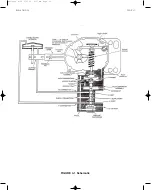
Page 20: ...ool operates over the V1 and V2 ports and simultaneously sup plies one output and exhausts the other on an input signal change or it blocks both ports so they nei ther supply nor exhaust when the posi...

Page 21: ...BULLETIN F 56 PAGE 21 FIGURE 4 1 Schematic Bulletin F 56 6 27 05 9 37 AM Page 21...

Page 22: ...supply 2 Unscrew and remove cleaning sire and restriction sealing screw 3 Run cleaning wire through restriction in pilot ring several times 4 Reinstall restriction sealing screw and cleaning wire 5 2...

Reviews: