

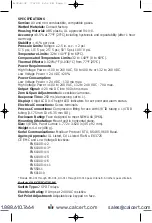


6
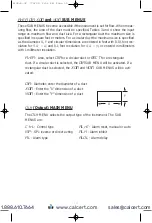
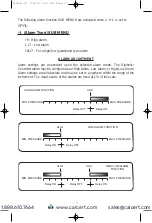
SETTING SET POINTS AND ALARMS
The hot key provides direct access to the Set Point and Alarm MENU. The
Set Point and Alarm MENUS that are displayed are based upon the Control (CtrL)
SUB MENU.
SP/AL
SP/AL
SP/AL
SP/AL
SP/AL
SP/AL
SP/AL
SP/AL
SP/AL
SP/AL
SP/AL
SP/AL
SP/AL
SP/AL
SP/AL
SP/AL
SP/AL
SP/AL
SP/AL
SP/AL
SP/AL
SP/AL
SP/AL
SP/AL
SP/AL
SP/AL
Visible when
Visible when
Visible when
Visible when
Visible when
Visible when
mode =
mode =
mode =
mode =
mode =
mode =
CONTROL MODE
CONTROL MODE
CONTROL MODE
CONTROL MODE
CONTROL MODE
CONTROL MODE
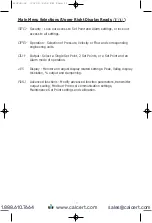
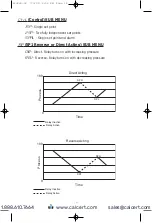
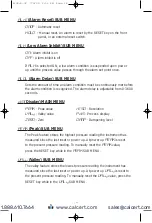
SET POINT ADJUSTMENT
Adjusting the Digihelic
®
Controller Set Points is quick and simple. Instead of setting
a set point and deadband, simply adjust
SP1H
or
SP2H
for the desired relay turn
on point, and then adjust
SP1L
or
SP2L
for the desired relay turn off point.
PRESSURE
PRESSURE
0
0
TIME
TIME
0.2
0.2
0.4
0.4
0.6
0.6
0.8
0.8
1.0
(in. w.c.)
In the above graph, an instrument with a 1.0˝ range would have the SP1 relay turn
on at 0.8˝ and off at 0.4˝.
SP1H
sets the relay turn on point, and
SP1L
sets the relay
turn off point. The relays outputs normally function in the direct acting mode, which
means the relays turn on with an increase in pressure. SP1 may be configured to act
as a reverse acting relay (refer to the 1SP SUB MENU setting, page 15). When set
for reverse acting,
SP1H
sets the relay turn OFF point, and
SP1L
sets the relay turn
ON point. SP2 is always direct acting.
SP/AL
SP/AL
B-32:B-32 7/9/09 2:52 PM Page 7
www.calcert.com
1.888.610.7664
0
5
10
15
20
25
30


