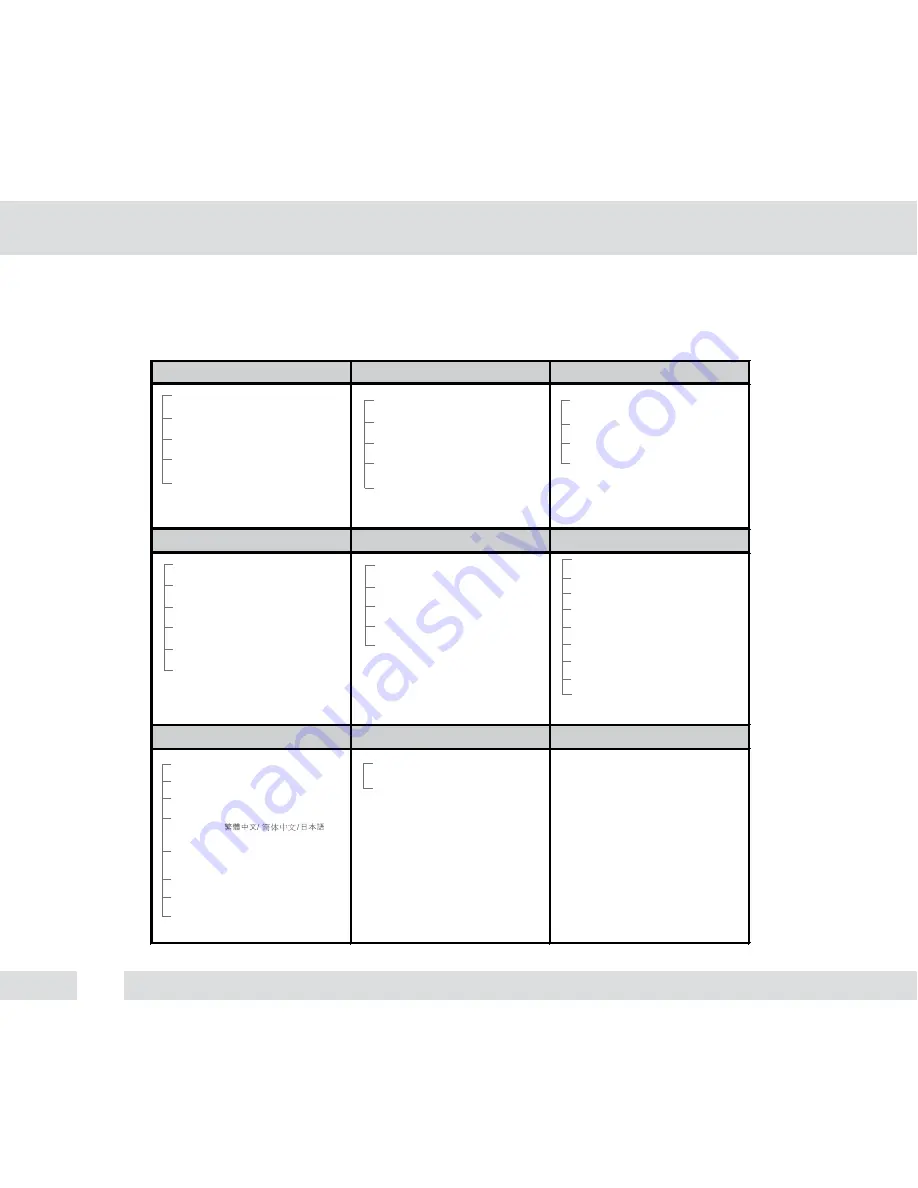
DW DWC-V562D User Manual Download Page 12

M

ODULE OSD MENU*

EXPOSURE

COLOR

DAY NIGHT

FUNCTION

MOTION

PRIVACY

SET-UP

EXIT

LENS


MANUAL, DC

BACKLIGHT


OFF / BLC / HME /D-WDR

AGC

   OFF / LOW / MID / HIGH / HIGHEST

2D-DNR

  OFF / LOW / MIDDLE / HIGH

EXIT JUMP

   SAVE & EXIT / EXIT


WB MODE


AWC / ATW / MANUAL / PUSH

RED GAIN


0~255

BLUE GAIN

   0~255

COLOR MODE

  NORMAL / COOL / WARM

EXIT JUMP

   SAVE & EXIT / EXIT


DAY & NIGHT


AUTO / COLOR / B&W

NIGHT C.


0~100

NIGHT A.

   0~100

EXIT JUMP

   SAVE & EXIT / EXIT


MIRROR


MIRROR / OFF

SHARPNESS


0~30

GAMMA

   MANUAL / 0.45 / 0.60 / 1.0

SLC

   OFF / ON

NIGHT-UP

   OFF / ON

EXIT JUMP

   SAVE & EXIT / EXIT


AREA SET

   AREAS 1~4 OFF / ON

SENSITIV.


1~30

SHOW INDI.

   OFF / ICON / TRACE

EXTER-OUT.

   OFF / ON

EXIT JUMP

   SAVE & EXIT / EXIT


MASK1


OFF / ON

MASK2


OFF / ON

MASK3


OFF / ON

MASK4


OFF / ON

MASK5


OFF / ON

MASK6


OFF / ON

MASK7


OFF / ON

MASK8


OFF / ON

EXIT JUMP

   SAVE & EXIT / EXIT


TITLE


OFF / ON

DPC SET


OFF / AUTO

MONITOR

   MODE1 / MODE2

LANGUAGE

   ENGLISH / 


   DEUTSCH / FRENCH / ITALIAN / RUSSIAN


OSD COLOR

   BLUE / GREEN / CYAN / RED /

   MAGENTA / YELLOW / PURPLE / GRAY

COMMUNICA.


OFF / ON

FACTORY SET.


NO / YES

EXIT JUMP

   SAVE & EXIT / EXIT


SAVE & EXIT

EXIT


SPANISH / DUTCH

12

Summary of Contents for DWC-V562D

Page 1: ...OUT MANUAL Before installing and using the camera please read this manual carefully Be sure to keep it handy for future reference 960H Vandal Dome Camera DWC V562D DWC V562DIR User Manual 11192012 Val...

Page 2: ...perature Be careful when installing near the ceiling of a kitchen or a boiler room as the temperature may rise to high levels Cleaning To remove dirt from the case moisten a soft cloth with a soft det...

Page 3: ...and Glossary Troubleshooting Warranty Information Specifications Features Parts and Descriptions Dimensions Included Accessories Base Installation Connecting to Monitors Adjusting the Camera 4 5 6 7 8...

Page 4: ...sking Exposure AGC SMART BLC AWB Night Up Mirror Image Control Programmable Privacy Zones 8 Motion Detection Easy Icon Driven OSD Menu with Built In Joystick Auto Sensing 12VDC or 24VAC with Line Lock...

Page 5: ...Input Connector 12VDC 24VAC Dual Voltage 3 Video Output Connector BNC 6 Dome Cover Rubber 7 Mounting Plate Assembly Screws 9 Camera Base 10 Control Board 11 Power Board 12 Mounting Screws 13 8 Upper R...

Page 6: ...DIMENSIONS IN MILLIMETERS INCHES See below for diagrams of the exact dimensions for Surface Mount Housing 52 2 2 05 96 2 3 79 149 9 5 9 37 0 1 46 149 9 5 9 115 0 4 53 5 0 0 2 3 4 5 3 0 18 6...

Page 7: ...ION Included with Value Line Vandal Dome Camera 1 User Manual 2 Mounting Template 3 Second Video Jack 4 Three 3 Screws and Three 3 Dry Wall Anchors 5 L Wrench 1 2 144 0 5 0 Mounting Template VD101 15...

Page 8: ...ll mounts and wood screws 3 Use the joystick to adjust the OSD menu See pages 12 23 for details 2 Adjust the camera s 3 Axis Gimbal zoom and focus See pages 10 11 for details 4 Secure the dome cover t...

Page 9: ...p Down CCTV Monitor Monitor 11 8in 12VDC 24VAC Power connection 12VDC 24VAC Dual Voltage Auto polarity detection and protection All cameras are equipped with a second video output on the camera s Cont...

Page 10: ...r clockwise 1 Adjust the field of view by moving the handle to the RIGHT tele to zoom in or to the LEFT wide to zoom out 2 Adjust the focus the same way as described above AFTER the desired zoom posit...

Page 11: ...ADJUSTING THE 3 AXIS GIMBAL The Gimbal mechanism yields maximum rotation and placement as shown below 1 Rotation 360 3 Panning 360 2 Tilting 60 11...

Page 12: ...RROR MIRROR OFF SHARPNESS 0 30 GAMMA MANUAL 0 45 0 60 1 0 SLC OFF ON NIGHT UP OFF ON EXIT JUMP SAVE EXIT EXIT AREA SET AREAS 1 4 OFF ON SENSITIV 1 30 SHOW INDI OFF ICON TRACE EXTER OUT OFF ON EXIT JUM...

Page 13: ...ou can adjust the focus by finding the highest number on the FOCUS TARGET See page 10 for Focus information ELC levels and DC levels are adjustable The higher number the brighter the image E Shutter s...

Page 14: ...ns You can adjust the D WDR levels from 0 20 The lower the number the brighter the backlight D WDR BLC BACKLIGHT COMPENSATION Select MANUAL or SMART SMART is recommended BACKLIGHT OFF If MANUAL is sel...

Page 15: ...s the images 2D DNR Digital Noise Reduction OFF LOW MIDDLE HIGH 2D DNR reduces the noise on the screen in low light conditions and EXIT_JUMP SAVE EXIT EXIT Exit the OSD after saving the current settin...

Page 16: ...l the white balance manually by changing RED GAIN and BLUE GAIN see below PUSH Push Lock fixes the white balance based on current lighting RED GAIN 0 255 Adjusts the amount of red in the image BLUE GA...

Page 17: ...number the lower the light level B W COLOR Adjusts the light level at which the camera switches from night B W to day color mode This number should be lower than the value of COLOR B W above SMART IR...

Page 18: ...ithout saving Flips the image horizontally Sets the image sharpness The higher the number the sharper the image 18 Controls the output signal level The higher the setting the darker the dark colors wi...

Page 19: ...on will be more sensitive at a higher number SHOW INDI OFF ICON TRACE Set the Show Indicator to OFF ICON or TRACE If ICON is selected a bell will appear in the upper right hand corner when motion is d...

Page 20: ...or of the mask START POINT Select the START POINT to adjust the size of the privacy zone L_TOP Left Top R_TOP Right Top L BOT Left Bottom R_BOT Right Bottom MODIFY After selecting the START POINT you...

Page 21: ...OFF AUTO Dead Pixel Cancellation automatically removes defective pixels in real time If AUTO is selected you can define the following WHITE THR Cancels the white defective pixels BLACK THR Cancels th...

Page 22: ...ngs Note FACTORY SET does not affect the LENS DAY NIGHT CAMERA ID and DPC settings If ON is selected you can define the following PROTOCOL PELCO D only CAMERA ID Provide the ID no on the camera 0 255...

Page 23: ...EXIT SAVE EXIT EXIT Exit the OSD after saving the current settings Exit the OSD without saving EXIT 23...

Page 24: ...and make sure it is connected securely Check the lens iris adjustment on the menu setup of the camera Check the power supply and make sure the camera has the proper voltage and current Check the clear...

Page 25: ...Friday from 8 30AM to 8 00PM Eastern Standard Time A purchase receipt or other proof of the original purchase date is required before warranty service is rendered This warranty only covers failures du...

Page 26: ...d set forth above Some states do not allow the exclusion or limitation of incidental or consequential damages or limitations on how long an implied warranty lasts so the exclusions or limitations list...

Page 27: ...nes Color 700 TV Lines B W S N Ratio 52dB AGC off Scanning System 2 1 Interlace Synchronization Internal Video Output CVBS 1 0Vp p 75 Focal Length 2 8 11mm Auto Gain Control OFF LOW MID HIGH HIGHEST B...

Page 28: ...ones Title OFF ON Up to 16 Characters Dead Pixel Cancellation OFF AUTO Communication Protocol PELCO D Operating Temperature 10 o C 55 o C 14 o F 131 o F IP Rating IP66 Protects against dust and high p...

Page 29: ...MEMO...

Page 30: ...MEMO...

Page 31: ...MEMO...

Page 32: ...5436 W Crenshaw St Tampa FL 33634 Tel 866 446 3595 Fax 813 888 9262 www Digital Watchdog com technicalsupport dwcc tv Technical Support Hours Monday Friday 8 30am to 8 00pm Eastern Time...

Reviews: