background image


■ 

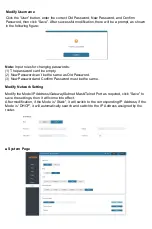
Output Page 

You can do the following operations on the Output page: 

① 

Outputs: 

Output channel of the device. 

② 

Name: 

The 

current output channel’s name. You can modify it by entering the corresponding 

name (max length: 12 characters) in the input box (Chinese name is unsupported). 

③ 

Cable: 

It indicates the connection status of output ports. When the output port is connected 

to the display, it shows green, otherwise, it shows gray. 

④ 

Scaler Mode: 

Set the current output resolution mode. 

⑤ 

ARC: 

Turn on/off the ARC function. 

⑥ 

Stream: 

Turn on/off the output stream. 


■ 

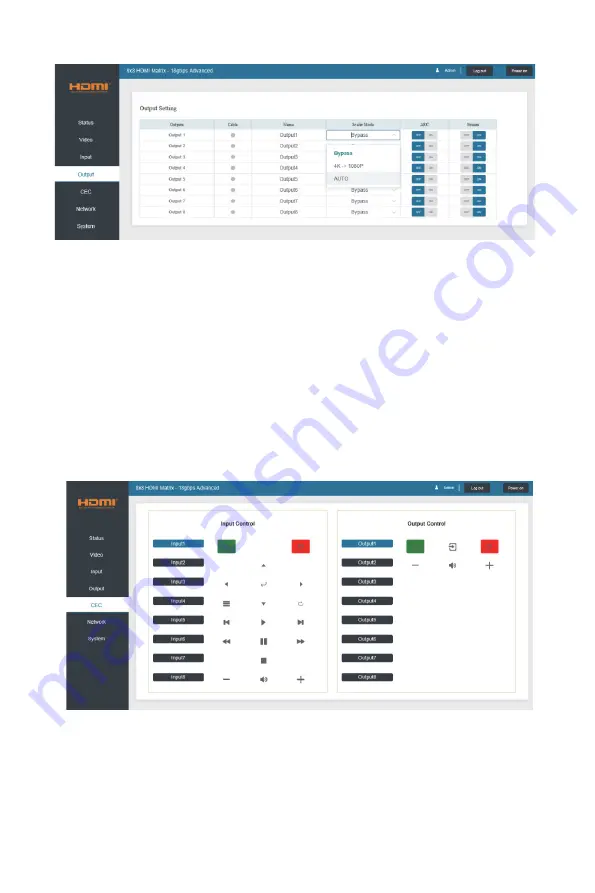
CEC Page 

You can perform CEC management on this page: 

① 

Input Control: 

You can control the operation of each input source by clicking the icons 

on the page. 

② 

Output Control: 

You can control the operation of each display, such as power on/off, 

/-, active source switching. 

Summary of Contents for DVDO-Matrix-88

Page 1: ...Version V1 0 0 DVDO Matrix 88 18Gbps 8x8 HDMI Matrix with ARC Function User Manual...

Page 2: ......

Page 3: ...rmined by turning the equipment off and on the user is encouraged to try to correct the interference by one or more of the following measures Reorient or relocate the receiving antenna Increase the se...

Page 4: ...f Contents Introduction 5 Features 5 Package Contents 5 Specifications 6 Controls and Functions 7 IR Remote 9 IR Cable Pin Assignment 10 EDID Management 11 Web GUI 13 RS 232 Control 19 Application Exa...

Page 5: ...I Features HDMI 2 0b HDCP 2 2 and HDCP 1 4 compliant Video resolution up to 4K2K 60Hz YUV 4 4 4 on all HDMI ports Support 18Gbps video bandwidth Dolby Vision HDR10 and HLG are supported Support 4K 108...

Page 6: ......

Page 7: ......

Page 8: ......

Page 9: ...uding All button Then press Input Y Y means input button from 1 to 8 The Matrix can be selected input and output source by using the IR remote There are two ways to receive the IR remote signal The fi...

Page 10: ...below IR Cable Pin Assignment...

Page 11: ...on to select the required EDID and press the ENTER button A prompt copy to input will appear Then press UP DOWN button to select the input port you need to set and press ENTER button again to confirm...

Page 12: ...TS 5 1 12 4K2K30_444 HD Audio 7 1 13 4K2K60_420 Stereo Audio 2 0 14 4K2K60_420 Dolby DTS 5 1 15 4K2K60_420 HD Audio 7 1 16 4K2K60_444 Stereo Audio 2 0 17 4K2K60_444 Dolby DTS 5 1 18 4K2K60_444 HD Audi...

Page 13: ...nd tool then you ll get the feedback information as shown below IP 192 168 62 109 in the above figure is the IP Address of the Matrix the IP address is variable depending on what the specific machine...

Page 14: ...nt device s OUTPUT port You can select signal source for it Input You can click the drop down menu to select signal source for the corresponding OUTPUT port Presets Name You can name the current scene...

Page 15: ...pecific operation is as follows Set EDID for the User Click the Browse button then select the bin file If you select the wrong EDID file there will be a prompt as shown in the following figure Make su...

Page 16: ...n status of output ports When the output port is connected to the display it shows green otherwise it shows gray Scaler Mode Set the current output resolution mode ARC Turn on off the ARC function Str...

Page 17: ...Network Defaults there will be a prompt as shown in the following figure Click OK to search the IP Address again as shown in the following figure After searching is completed it will switch to the log...

Page 18: ...e empty 2 New Password can t be the same as Old Password 3 New Password and Confirm Password must be the same Modify Network Setting Modify the Mode IP Address Gateway Subnet Mask Telnet Port as requi...

Page 19: ......

Page 20: ......

Page 21: ......

Page 22: ......

Page 23: ......

Page 24: ......

Reviews: