background image

12                                                     


DVDO-Controller-1 HDMI In-line Controller


User Manual


DVDO


DVDO-Controller-1_V1.0.0 

RS232 Control Tool 

RS232 port configuration tool is one control tool running on PC to pro-load the 
RS232 commands for this device to control the sink device. Connect a PC to 
this device via a UART-to-USB cable, running the configuration tool to set the 
connection parameters correctly before sending the pro-loading commands to 
this device. The default baud rate for this device is 57600. 
 
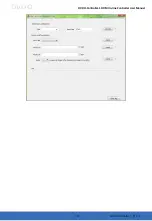
RS232 port configuration tool menus are described below:   


Baud rate: 

Choose the correct baud rate according to the sink 

device.   

Note:

 This might be different than the setting of 57600 above and 

is determined by the sink device you are connecting to. 


Power on: 

Pre-load and store the command for “power on” to a 

sink device, then click “Send” to send and store it on the device. 


Power off: 

Pre-load and store the command for “power off” to a 

sink device, then click “Send” to send and store it on the device. 

Note: 

If the sink device requires hex commands, make sure the 

Hex box is checked. 


Delay: 

Set delay time (0~30minutes) the sink device will power off 

automatically after it cannot detect the input signal, click “Send” to 
take effect.   
 

Summary of Contents for Controller-1

Page 1: ...Version V1 0 0 DVDO Controller 1 HDMI In line Controller User Manual ...

Page 2: ......

Page 3: ...t risk of electric shock or fire hazard due to overheating do not obstruct the unit s ventilation openings with newspapers tablecloths curtains and similar items 4 Do not install near any heat sources such as radiators heat registers stoves or other apparatus including amplifiers that produce heat 5 Do not place sources of naked flames such as lighted candles on the unit 7 Unplug this apparatus du...

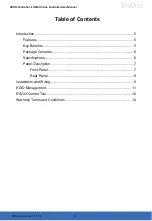
Page 4: ...DO Controller 1_V1 0 0 Table of Contents Introduction 5 Features 5 Key Benefits 5 Package Contents 6 Specifications 6 Panel Description 7 Front Panel 7 Rear Panel 8 Installation and Wiring 9 EDID Management 11 RS232 Control Tool 12 Warranty Terms and Conditions 14 ...

Page 5: ...ut signal status it could automatically trigger CEC commands to turn on or off TV with CEC support pre loaded RS232 commands to power on or standby projector and to turn on or off projection screen through relay control Features Supports video resolutions up to 4K 60Hz 4 4 4 8 bit and HDCP 2 2 HDMI audio de embedded out with digital coaxial and analog stereo Rotary switch for EDID management with ...

Page 6: ...al Input 1 x HDMI Output 1 x HDMI Input Output Signal Type HDMI up to 4K 60Hz 4 4 4 8 bit HDCP 2 2 Input Output Resolution Supported VESA 800x600 60Hz 1024x768 60Hz 1280x768 60Hz 1280x800 60Hz 1280x960 60Hz 1280x1024 60Hz 1360x768 60Hz 1366x768 60Hz 1440x900 60Hz 1600x900 60Hz 1600x1200 60Hz 1680x1050 60Hz 1920x1200 60Hz SMPTE 4096x2160 24 25 30 50 60Hz 3840x2160 24 25 30 50 60Hz 1080P 24 25 30 50...

Page 7: ...del 8kV Air gap discharge 4kV Contact discharge Power Supply DC 12V 1A Power Consumption Max 2W Device Dimensions W x H x D 120mm x 20mm x 80mm 4 72 x 0 79 x 3 15 Product Weight 0 23kg 0 51lb Panel Description Front Panel 3 2 1 No Name Description 1 Relay 1 2 Connect to the projector screen to turn it on off through relay control 2 HDMI Out Connect to an HDMI display device 3 RS232 Pre load and st...

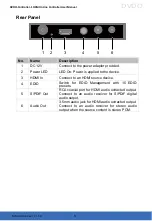
Page 8: ...er is applied to the device 3 HDMI In Connect to an HDMI source device 4 EDID Switch for EDID Management with 15 EDID presets 5 S PDIF Out RCA coaxial port for HDMI audio extracted output Connect to an audio receiver for S PDIF digital audio output 6 Audio Out 3 5mm audio jack for HDMI audio extracted output Connect to an audio receiver for stereo audio output when the source content is stereo PCM...

Page 9: ...s device 2 Connect an HDMI display device Such as projector to the HDMI OUT port of this device 3 Connect audio receivers to the S PDIF OUT port and AUDIO OUT port of this device 4 Connect projector to the RS232 port for pass through the commands to control the projector 5 Connect projection screen to the RELAY1 and RELAY2 ports to control the projection screen on off 6 Connect the power adapter p...

Page 10: ...10 DVDO Controller 1 HDMI In line Controller User Manual DVDO DVDO Controller 1_V1 0 0 PC Amplifier Projector Screen Projector HDMI Audio Audio Relay HDMI RS232 ...

Page 11: ...DMI Out 1 Set 3840x2160 60Hz 2CH as input EDID 2 Set 3840x2160 30Hz 2CH as input EDID 3 Set 1920x1080 60Hz 2CH as input EDID 4 Set 1280x720 60Hz 2CH as input EDID 5 Set 1920x1200 60Hz 2CH as input EDID 6 Set 1680x1050 60Hz 2CH as input EDID 7 Set 1600x1200 60Hz 2CH as input EDID 8 Set 1600x900 60Hz 2CH as input EDID 9 Set 1440x900 60Hz 2CH as input EDID A Set 1400x1050 60Hz 2CH as input EDID B Set...

Page 12: ...ration tool menus are described below Baud rate Choose the correct baud rate according to the sink device Note This might be different than the setting of 57600 above and is determined by the sink device you are connecting to Power on Pre load and store the command for power on to a sink device then click Send to send and store it on the device Power off Pre load and store the command for power of...

Page 13: ...13 DVDO Controller 1_V1 0 0 DVDO DVDO Controller 1 HDMI In line Controller User Manual ...

Page 14: ...s expired 3 The defects are caused by the fact that the product is repaired dismantled or altered by anyone that is not from an authorized service partner The defects are caused by the fact that the product is used or handled improperly roughly or not as instructed in the applicable User Guide 4 The defects are caused by any force majeure including but not limited to accidents fire earthquake ligh...

Page 15: ......

Page 16: ......
Reviews: