


5.
Collision Sensing
The DVR is fitted with a built-in collision sensor (G-sensor). In case of severe vehicle collision, the DVR
locks the image data generated at the time of the accident, and displays a lock icon in the middle of the
screen.
The collision sensor (G-sensor) supports sensitivity adjustment. By default, sensitivity adjustment is
<Off>. You can change the sensitivity settings as needed in the setting menu.
6.
Date and Time Setting
In standby state, press the <Menu> button twice to enter the system setting menu. Press the <Down>
button to move the cursor to the <Set the date> option. Press the <OK> button to confirm it, and enter
the <Setting> menu.
Press the <Up> and <Down> buttons to select values, press the <Menu> button to proceed to the next
option, and press the <OK> button to confirm the option and then exit.
[Note] To effectively record the date and time of obtaining the evidence of the traffic accident, set a
correct date and time before using the DVR.
7.
USB Mode
Connect the data recorder to the USB interface of a PC by using a data cable. Then, the screen displays
two modes: memory and camera. Press the <Up> or <Down> button to select the <Memory> option.
Press the <OK> button to enter the USB flash disk mode.
When you use a PC to copy a video-recording file, it is recommended that you use a card reader to copy
the video-recording file in the TF card to the PC.
8.
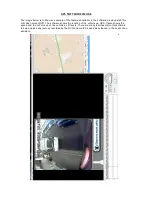
Playback of Recording File
In power-on state, press the <MIC> button twice to enter the playback mode. Press the <Up> or <Down>
button to find the desired type of file, and press the <OK> button to play back the file.
9.
PC Camera
Connect the data recorder to the USB interface of a PC by using a data cable. Then, the screen displays
two modes: memory and camera. Press the <Up> or <Down> button to select the <Camera> option.
Press the <OK> button to enter the PC camera mode.
After a driver is installed in the PC, <My Computer> displays the camera icon. Double-click the camera
icon to turn on the camera.
10.
Night Vision Capability
- 5-8 Metres to read a number plate.
SPECIFICATIONS
Built-In Imaging Sensor............................3 Megapixel
View Angle.................................................170 Degrees
Shooting Resolution Rate.........................FHD1920x1080 and HD1280x720
Frame Rate.................................................30FPS@HD1080P and 60FPS@HD720P
Video Compression Format......................H.264
Video Output Mode...................................NTSC/PAL
Screen Size.................................................1.5-Inch
Storage Temperature.................................-20°C to +70°C
Operating Temperature.............................-10°C to +60°C
Operating Humidity...................................15% to 65% (RH)
Max Memory Card Capacity.....................32GB
Memory Card.............................................Micro SD (TF Card)
Standard Voltage........................................DC5V (Output) - 12V/24V (Input)
GPS..............................................................YES
G Sensor......................................................YES
USB Cable Included....................................YES
12/24V Cigarette Cable/Plug Included.......YES
Certificate....................................................CE