background image

SET UP

NOTE: We recommend that the humidifier be disinfected prior to first use.

Please see CLEANING instructions.

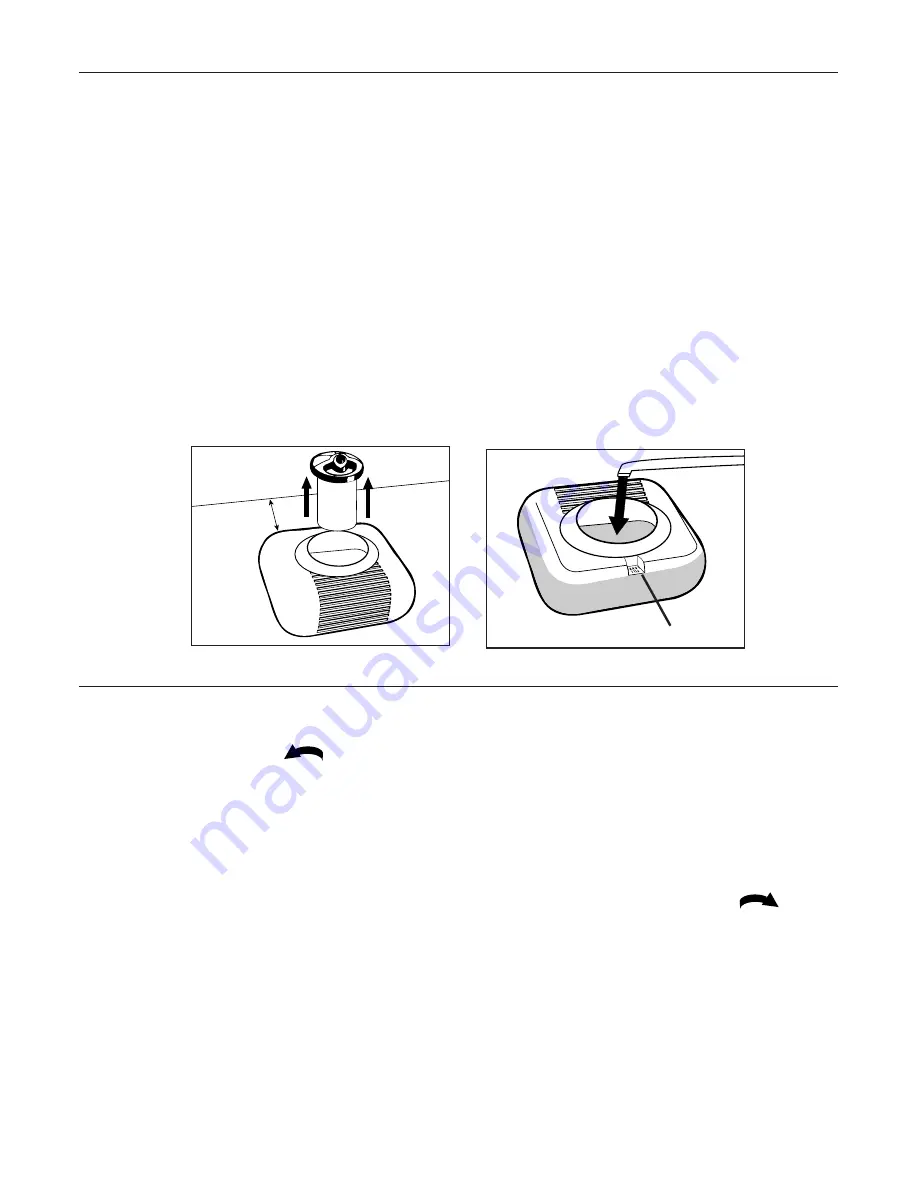
• Select a firm, level, flat location — at least six inches (15 cm) from any wall

for proper air flow and convenient to an electrical outlet (Fig. 1).

Place vaporizer where it is out of the reach of children. Make sure cord is

not in an area where it can be tripped over or pulled on. Be sure that the

steam outlet is pointed away from any person.

• Place the vaporizer on a water-resistant surface, as water can damage 

furniture and some flooring. Duracraft

®

will not accept responsibility for

property damage caused by water spillage.

Fig. 2

1. To remove the Steam Assembly, hold the Base and turn the Steam Assembly

counter-clockwise         then pull up.

2. Fill the Base with COOL tap water to the indent marked “Full Level” located on

the back of the unit (Fig. 2). 

DO NOT USE HOT WATER

. Doing so may

damage the vaporizer.

3. Replace the Steam Assembly back onto the Base. Turn it clockwise 

to lock in place. Once the Steam Assembly has been positioned, do not

attempt to move vaporizer. If it has to be moved, unplug it and empty the 

Base first.

CAUTION:  DO NOT PLUG IN THE HUMIDIFIER WITH WET HANDS AS AN 

ELECTRIC SHOCK COULD OCCUR.

4.  Plug the filled vaporizer into a polarized 120V outlet. DO NOT FORCE THE

POLARIZED PLUG INTO THE OUTLET; it will only fit one way.

FILLING

Fig. 1

Full Level

Indent

WALL

6" minimum

Summary of Contents for Baby's Breath DH-712 Series

Page 1: ...OWNER S MANUAL BABY S BREATH VAPORIZER Models DH 711 DH 712 DH 721 and DH 722 Series DH 711 ...

Page 2: ...utlet If you are unable to insert the plug fully into the outlet try reversing the plug If the plug should still fail to fit contact an electrician to replace the obsolete outlet DO NOT defeat the safety purpose of the polarized plug 6 Never plug in vaporizer without filling with water and always UNPLUG and empty the vaporizer before moving filling cleaning or storing UNPLUG the vaporizer before r...

Page 3: ...porizer manufactured by Honeywell If you would like more information on our full line of products please visit our website at www honeywell com yourhome M O D E L D H 7 1 1 D H 7 1 2 D H 7 2 1 a n d D H 7 2 2 Your vaporizer is made up of two parts Base Steam Assembly ...

Page 4: ...roperty damage caused by water spillage Fig 2 1 To remove the Steam Assembly hold the Base and turn the Steam Assembly counter clockwise then pull up 2 Fill the Base with COOL tap water to the indent marked Full Level located on the back of the unit Fig 2 DO NOT USE HOT WATER Doing so may damage the vaporizer 3 Replace the Steam Assembly back onto the Base Turn it clockwise to lock in place Once t...

Page 5: ... the water come to a boil Be sure to thoroughly mix the Baking Soda or DuraStart with the water in the Base NOTE Adding too much baking soda or DuraStart can cause boiling and or hot water spurting which may cause burns 2 If the Vaporizer boils excessively spurts hot water or blows fuses Your water s mineral content is too high Make sure no chemicals have been added to the water If any chemicals w...

Page 6: ...ly To add medicine to the Medicine Cup 1 Unplug the vaporizer and allow at least 10 minutes for the unit to cool 2 Carefully add liquid medication fill cup only halfway Fig 3 3 After use clean any residue from the cup WARNING DO NOT use any liquid medicine other than those specifically rec ommended for use with a steam vaporizer DO NOT pour medicine directly into the water as this may cause excess...

Page 7: ...e Clean all outside surfaces with a dry soft cloth DO NOT USE WATER THIS MAY DAMAGE THE VAPORIZER OR CAUSE ELECTRIC SHOCK STEP ONE SCALE REMOVAL 1 Fill the Base with either one cup 8 ozs of undiluted white vinegar OR DuraRinse Humidifier Cleaner part no AC 816 following bottle instructions 2 Let solution stand for 20 minutes 3 With the vinegar or DuraRinse in the Base clean all interior surfaces w...

Page 8: ...12 DH 721 and DH 722 are rated 5 0 amps at 120V 60Hz NOTE IF YOU EXPERIENCE A PROBLEM WITH YOUR VAPORIZER PLEASE SEE THE WARRANTY INSTRUCTIONS PLEASE DO NOT ATTEMPT TO OPEN OR REPAIR THE VAPORIZER YOURSELF DOING SO WILL VOID THE WAR RANTY AND COULD CAUSE DAMAGE TO THE UNIT OR PERSONAL INJURY IF THE PROBLEM PERSISTS PLEASE CONTACT THE CONSUMER SERVICE CEN TER Mail questions or comments to Honeywell...

Page 9: ...s mineral content is too low to allow for electrical current flow and the water will not come to a boil Unplug and remove the Heating Assembly Add 1 4 teaspoon of baking soda per gallon of water or 1 packet of Duracraft s DuraStart following the directions on the package to help the water come to a boil Be sure to thoroughly mix the Baking Soda or DuraStart with the water in the Base Q My vaporize...

Page 10: ... 7 00 9 45 Base for DH 722 DH722 1 7 00 9 45 Heating Assembly for DH 711 DH711 2 8 00 10 85 Heating Assembly for DH 712 DH712 2 8 00 10 85 Heating Assembly for DH 721 DH721 2 8 00 10 85 Heating Assembly for DH 722 DH722 2 8 00 10 85 DuraStart Vaporizer Steam Starter AC 820 5 00 6 65 DuraRinse Humidifier Cleaner 32 oz AC 816 5 00 6 65 Digital Hygrometer and Thermometer F C HAC 555 19 99 27 00 SUBTO...

Page 11: ...implied warranty lasts so the above limitations or exclusions may not apply to you This warranty gives you specific legal rights and you also may have other rights which vary from jurisdiction to jurisdiction This warranty applies only to the original purchaser of this product from the original date of purchase B At its option the manufacturer will repair or replace this product if it is found def...

Reviews:

Related manuals for Baby's Breath DH-712 Series