background image

IB-MP456-WC-E-030206

2-6. Disconnecting the Audio Player from Your Computer

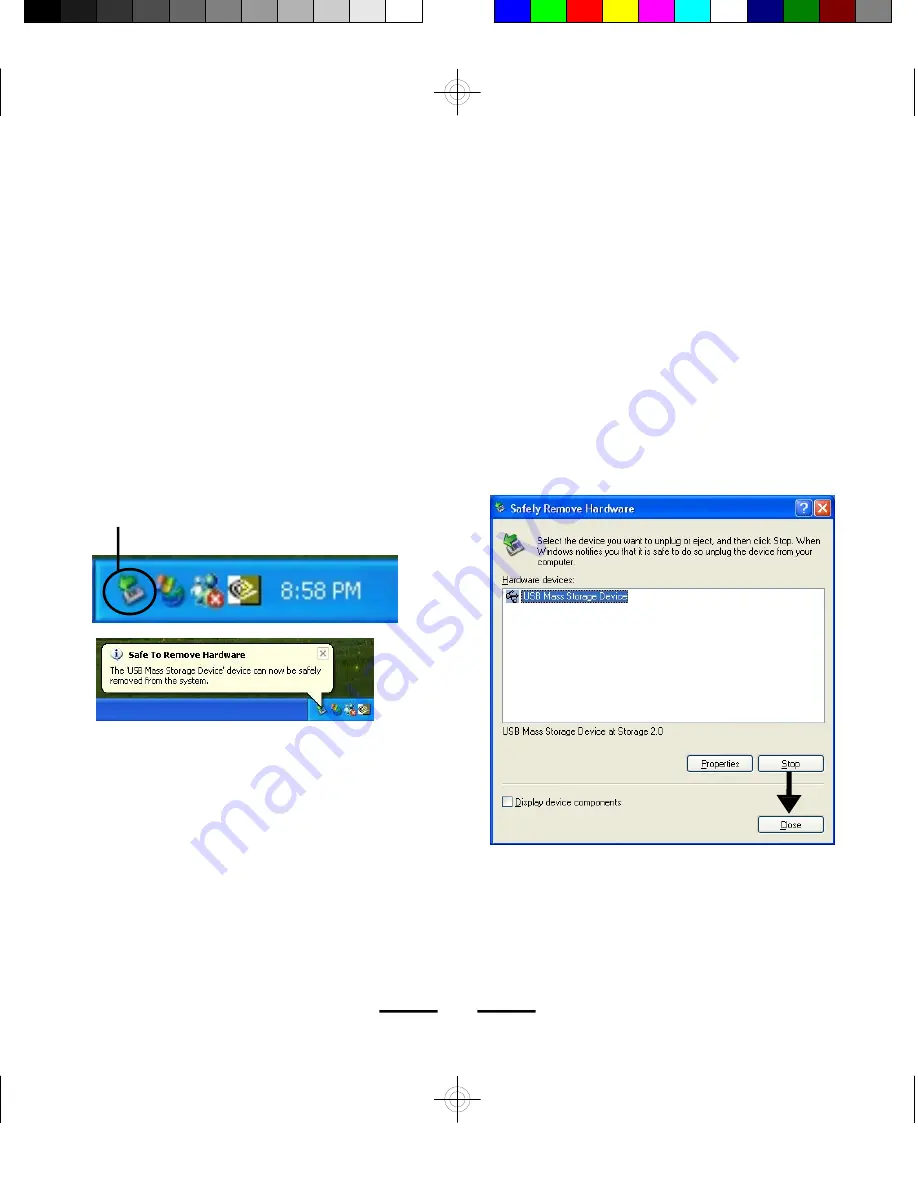
For  Windows  Me/2000/XP  users,  the  player  can  be  disconnected  safely  as  follows:
1. Click the 

Safely Remove Hardware

 icon in the Windows Toolbar (on the right bottom

corner  near  the  clock  icon  on  your  computer).

2. From the  list of  Hardware Devices,  select the player.
3. Click 

Stop

  button.

4. Click 

OK

 to confirm.

5. Click 

Close

  after  finished.

6. Now,  it  is  safe  to  disconnect  the  player.

NOTE:

Do not unplug  the Player while there is data transferring between the  player and the
computer or some data may be lost.

13

NOTE:

 Usually a small icon will appear,

clicking this icon will show the 

safely

remove hardware

 screen.

Fig.  2-6-1  Safely  Disconnecting  the  Player

Click  on  this  icon  to  disconnect
the  USB  cable  safely.

IB-MP456-WC-E-030206.pmd

10/16/2006, 11:25 AM

14

Summary of Contents for MP-456

Page 1: ...s accidental usage Includes USB cable and software disc Operates with one AAA alkaline battery Can also be used to record and transfer files as a portable media device Can display the ID3 song title Track Song time Battery Volume and Play mode indicators Requires Windows 98SE Me 2000 XP Mac OS X 10 2 6 or above Microphone Recording and Playback 2 Demo songs are included NOTE WMA Music with DRM Pro...

Page 2: ...torage Information of the Player 12 2 6 Disconnecting the Audio Player from Your Computer 13 3 Basic Operation of the Audio Player 3 1 Hanging the Earphones and Neck Strap Connection 14 3 2 Player Power On Off 15 3 3 Music Playback 15 3 4 Locking the Buttons 15 3 5 MODE Switch Operation 16 3 6 Using an External SD MMC Memory Card 17 3 7 Selecting Playback Mode 18 3 8 Microphone Recording 19 3 9 Re...

Page 3: ...Ripping Tracks from Music CDs 27 5 Helpful Information 5 1 Troubleshooting 29 5 2 Technical Specifications 31 5 3 Important Safety Instructions 32 5 4 Product Care 33 5 5 FCC ICES Compliance 33 5 6 Copyright and Licenses 34 5 7 Demo songs 35 Limited Warranty 36 2 IB MP456 WC E 030206 pmd 10 16 2006 11 24 AM 3 ...

Page 4: ...earphone sponges the earphone sponges are optional if you need please install them carefully 7 Quick Instructions 8 This booklet NOTE1 We suggest you put the Power On for both the audio player and your PC with Internet connection ready before you start the software installation NOTE 2 Software installation is only needed if your computer has the older Windows 98SE operating system If you have a ne...

Page 5: ...and playback Reverse dot matrix LCD screen 128x64 Deluxe stereo earphones with neck hanging strap Requires one AAA alkaline battery included Standard Mini USB port Plug Play cable included Supports Windows 98SE Me 2000 XP Mac OS X 10 2 6 or above 6 EQ settings normal rock jazz classic pop bass Playback sequence selection normal repeat one repeat all shuffle shuffle and repeat preview Separate powe...

Page 6: ...IB MP456 WC E 030206 1 3 Device Overview Fig 1 3 1 Device Overview 5 IB MP456 WC E 030206 pmd 10 16 2006 11 24 AM 6 ...

Page 7: ... Turn left PREV Skips to the previous track Turn left and hold to scan reverse Pushing the MODE Switch 1 During play press the MODE switch to select REPEAT ONE or REPEAT ALL 2 During play or in stop mode press and hold the MODE switch to enter the Menu mode 3 In stop mode press the MODE switch to select the play mode REPEAT ONE REPEAT ALL SHUFFLE SHUFFLE REPEAT or PREVIEW 8 Volume Button Press to ...

Page 8: ... 4 Lock Buttons are locked when appears in the display 5 Repeat Setting Displays repeat mode No mark NORMAL 1 REPEAT ONE REPEAT ALL S SHUFFLE S SHUFFLE and REPEAT Pre PREVIEW 6 Play Status Icon Playing Stop Pause 7 Number Shows current track number total number of tracks 8 Time Shows song s playing time total playing time of the song 9 Volume Volume control with 31 levels larger number louder volu...

Page 9: ...dows 98SE or Windows Me or Windows 2000 or Windows XP or Mac OS X 10 2 6 or above NOTE For Windows Me 2000 XP users no software installation is needed The set is fully plug and play For older computers running on Windows 98SE you will need to install drivers from the supplied disc For Windows 95 or earlier users this set will not work and we recommend you upgrade your operating system and get a co...

Page 10: ... prompted to install it or update your current version Details of Windows Media Player 9 0 on Pages 26 28 9 5 The Driver Setup disc contains Windows 98SE Driver Windows Media Player 9 0 Operating Instructions in PDF form Adobe PDF Reader 6 Installation is complete You are now ready to connect the audio player to your computer To Uninstall the Win98SE Driver Run 1 Start 2 MP 456 MP3 Audio Player 3 ...

Page 11: ...ers must use the USB cable included to connect the player and computer before you can download or upload music files to the computer 1 Connect the smaller plug of the USB cable to the mini USB port on the player as shown Plug only fits one way if the plug does not match the mini USB port don t force it just reverse it and try again Fig 2 3 1 Connecting the Audio Player and Your Computer Connecting...

Page 12: ...6 Disconnecting the Audio Player from Your Computer on page 13 to safely disconnect the player NOTE 1 This player does not support DRM protected files such as music downloaded from some online music stores NOTE 2 If you cannot download music from the web site to the MP3 player directly please download the music to the computer and then copy the music to the MP3 player NOTE 3 This player can also b...

Page 13: ...ayer highlight the disc you want to check Right click on the mouse press the mouse right button and then click on Properties A Properties window will pop up displaying the storage information of the player Fig 2 5 1 Storage Information of the Player 12 IB MP456 WC E 030206 pmd 10 16 2006 11 25 AM 13 ...

Page 14: ...Devices select the player 3 Click Stop button 4 Click OK to confirm 5 Click Close after finished 6 Now it is safe to disconnect the player NOTE Do not unplug the Player while there is data transferring between the player and the computer or some data may be lost 13 NOTE Usually a small icon will appear clicking this icon will show the safely remove hardware screen Fig 2 6 1 Safely Disconnecting th...

Page 15: ...rt the lock pin correctly into the earphones 3 Pull to close the loop 14 6 Hang the Player with the neck strap please note the earphones are marked R and L 5 Plug the earphones into the jack marked 7 Insert the earphones in your ears Fig 3 1 1 Using the Hanging Earphones 2 After it is through loop the lock into and through it IB MP456 WC E 030206 pmd 10 16 2006 11 25 AM 15 ...

Page 16: ...2 demo songs included To adjust the Volume press the VOL or VOL button If an SD MMC card is already inserted into the MP3 player when you turn on the player it will play the music on the card automatically refer to 3 6 Using an External SD MMC Memory Card on page 17 3 4 Locking the Buttons To prevent accidental pressing of the buttons slide the lock button to the locked position the lock icon will...

Page 17: ...turn MODE switch to the right To fast forward the music turn right and hold the MODE switch 2 Menu operation a To enter the setup menu press and hold the MODE switch until the menu appears b To select the menu option turn the MODE switch left or right c To confirm the selection press the MODE switch d To exit the setup menu press and hold the MODE switch 3 Repeat playback during play press the MOD...

Page 18: ...y icon will show in the display card play 4 If you want to listen to the music on the built in flash memory please press and hold the MODE switch to enter the menu and then turn the MODE switch to the left to select the FLASH MUSIC press the MODE switch to confirm The memory icon changes to Press the PLAY button to start to play the music on the built in flash memory I ou Love Y Flash memory in us...

Page 19: ...s the first 10 seconds of each song in sequence 6 Normal playback no mark Plays all the songs in sequence and the player will be automatically turned off when all the songs have been played 18 You can also select the playback mode in the SETUP menu 1 Press and hold the MODE switch to enter the menu then turn the MODE switch left or right repeatedly to select SET 2 Press the MODE switch to open the...

Page 20: ...return to the last menu NOTE The Record file will be saved as VXXX WAV The VXXX WAV file will be placed in the path of the built in flash and will be called for example MP 456 VOICE VXXX WAV 19 V002 WAV 00 01 51 3 9 Record Playback 1 Press and hold the MODE switch to enter the menu turn the MODE switch left or right to select VOICE 2 Press the MODE switch to enter record playing select your record...

Page 21: ...nter the Scan menu b Turn the MODE switch left or right to scan manually 0 1MHz step c Press button to start automatic scan it will stop when it finds an available FM station Fig 3 10 1 FM Menu Fig 3 10 2 Listen to the Radio Fig 3 10 3 Scan 4 Store FM station a When you find a station press the MODE switch until the word Store appears on the display b Turn the MODE switch left or right to select t...

Page 22: ...After finishing press the MODE switch to exit the menu The recorded file will be saved as FXXX WAV file in the path MP 456 flash memory VOICE FXXX WAV F001 WAV 00 01 51 Fig 3 10 5 FM record 6 Playing FM record files Please follow 3 9 Record Playback on page 19 F001 WAV Fig 3 10 6 Play FM record 21 Fig 3 10 7 Quit FM radio 7 Exit FM Radio Reception Press the MODE switch repeatedly until Quit shows ...

Page 23: ... switch to confirm and return to normal music play mode Fig 3 11 1 Selecting EQ band 2 LCD Display Contrast Setting This adjusts the contrast of the display a Press and hold the MODE switch to enter the menu then turn the MODE switch left or right to select SET option b Press the MODE switch to enter SET submenu Turn the MODE switch left or right to select Contrast c Press the MODE switch to enter...

Page 24: ...rn to normal music play mode Fig 3 11 3 Setting Backlight 4 Power Setting This shuts off the set if stopped or paused for a length time a Press and hold the MODE switch to enter the menu then turn the MODE switch left or right to select SET option b Press the MODE switch to enter SET submenu Turn the MODE switch left or right to select Power Set c Press the MODE switch to enter the Power Set setup...

Page 25: ...e in English or simplified Chinese characters 3 Traditional Chinese Shows the menu in traditional Chinese shows the song title in English or traditional Chinese characters 4 English European Shows the menu in English shows the song title in one of the languages prevalently used in Europe with the English alphabet such as English French Spanish Portuguese German etc 5 English Korean Shows the menu ...

Page 26: ...sic Files Voice 3 12 Deleting Music Files 1 Press and hold the MODE switch to enter the menu then turn the MODE switch left or right to select DELETE option 2 Press the MODE switch turn the MODE switch left or right to select Voice or Music 3 Press the MODE switch to confirm then turn the MODE switch left or right to select the file you want to delete 4 Press the MODE switch to enter the delete co...

Page 27: ...playing media tracks 2 Media Guide Search of media files music movies etc online 3 Copy from CD Copy and convert CD Audio tracks to WMA format 4 Media Library Create lists and manage media files 5 Radio Tuner Tune into streaming radio stations 6 Copy to CD or Device Copy tracks to your player or to a recordable CD CDR 7 Premium Services Subscribe to online music service where search and purchase o...

Page 28: ...racks from Music CDs Setup the Parameters 27 Adjusting the audio quality will allow more or less songs to fit into your player The sound will also be better if it is a larger file best quality but you will fit less songs into the player or your memory card Click CHANGE to select the position you want the recorded tracks to be placed Be sure not to select Copy pro tect music otherwise the music you...

Page 29: ...cted tracks Fig 4 2 2 Ripping Tracks from Music CDs Start copying from CD 6 After conversion Windows Media Player will automatically save the recorded tracks to the position you selected and you can copy your favorite music to your MP3 player according to the steps on page 11 7 You can also download the songs on the internet 28 3 5 NOTE WMA Music with DRM Protection is not supported by this audio ...

Page 30: ...s You can t play AAC files or WMA files downloaded from protected online stores No sound from earphones VOLUME control is too low Increase the VOLUME by pressing VOL Replace with a fresh battery Weak battery 29 Lock button is on Slide the lock button to OFF Sound skips or is distorted Music was not copied correctly Re copy the music using a slower speed The external SD MMC card will need more batt...

Page 31: ...ur computer takes a long time to boot up MP3 player is plugged into the computer Do not keep MP3 player plugged in while rebooting the computer 30 Lower the VOLUME control by pressing the VOL button Low battery Music is too loud Sound is distorted Replace the battery with a new one Ring tones or audio interference Cell phone may be too close to the set Move cell phone away from the MP3 player The ...

Page 32: ...rmat Voice Record Format WAV format IMPCM MSPCM PCM Mono 8k sampling rate Language English simplified Chinese traditional Chinese English European English Korean English Japanese English Russian Operating System Windows 98SE Me 2000 XP Mac OS X 10 2 6 or above S N Ratio 50 dB THD 0 01 5 Frequency Range 20Hz 20 kHz Battery 1 x AAA alkaline battery included Maximum Playing Time 7 8 hours on one alka...

Page 33: ...gh 6 Risk of explosion damage or battery leakage is possible if the battery is replaced incorrectly or by an incorrect type Never attempt to charge a non rechargeable alkaline battery Dispose of used batteries according to instructions or local laws 7 Use of earphones while operating a vehicle is not recommended and is unlawful in some states and areas Stop operating this set if you find it disrup...

Page 34: ...or help 5 5 FCC ICES Compliance This device complies with Part 15 of the FCC Rules and complies with Canada ICES 003 Rules Operation is subject to the following two conditions 1 This device may not cause harmful interference and 2 This device must accept any interference received including interference that may cause undesired operation 33 5 4 Product Care 1 Exposure to extreme hot or cold tempera...

Page 35: ...ed without a license from Microsoft Licensing Inc Microsoft Windows Media and the Windows Logo are trademarks or registered trademarks of Microsoft Corporation in the United States and or other countries All other product names may be trademarks of the companies with which they are associated This product is manufactured by a wholly owned subsidiary of Daiwa Associate Holdings Ltd for DURABRAND fo...

Page 36: ...es and Stray Instrumental written and performed by Loam Disher Torello Disher Robb Bruns and Tate Overton 5 7 Demo songs Music provided courtesy of Balboa http www BalboaNYC com 35 IB MP456 WC E 030206 pmd 10 16 2006 11 25 AM 36 ...

Page 37: ...itations or exclusions may not apply to you This warranty gives you specific legal rights and you may also have other rights which vary from state to state The following charges apply to repairs beyond the warranty period 30 00 Be sure to pack carefully and return postage paid insured together with your money order personal checks will not be accepted and sales receipt to LENOXX ELECTRONICS CORP 3...

Reviews: