background image

IB-HT395-WM-E-073003

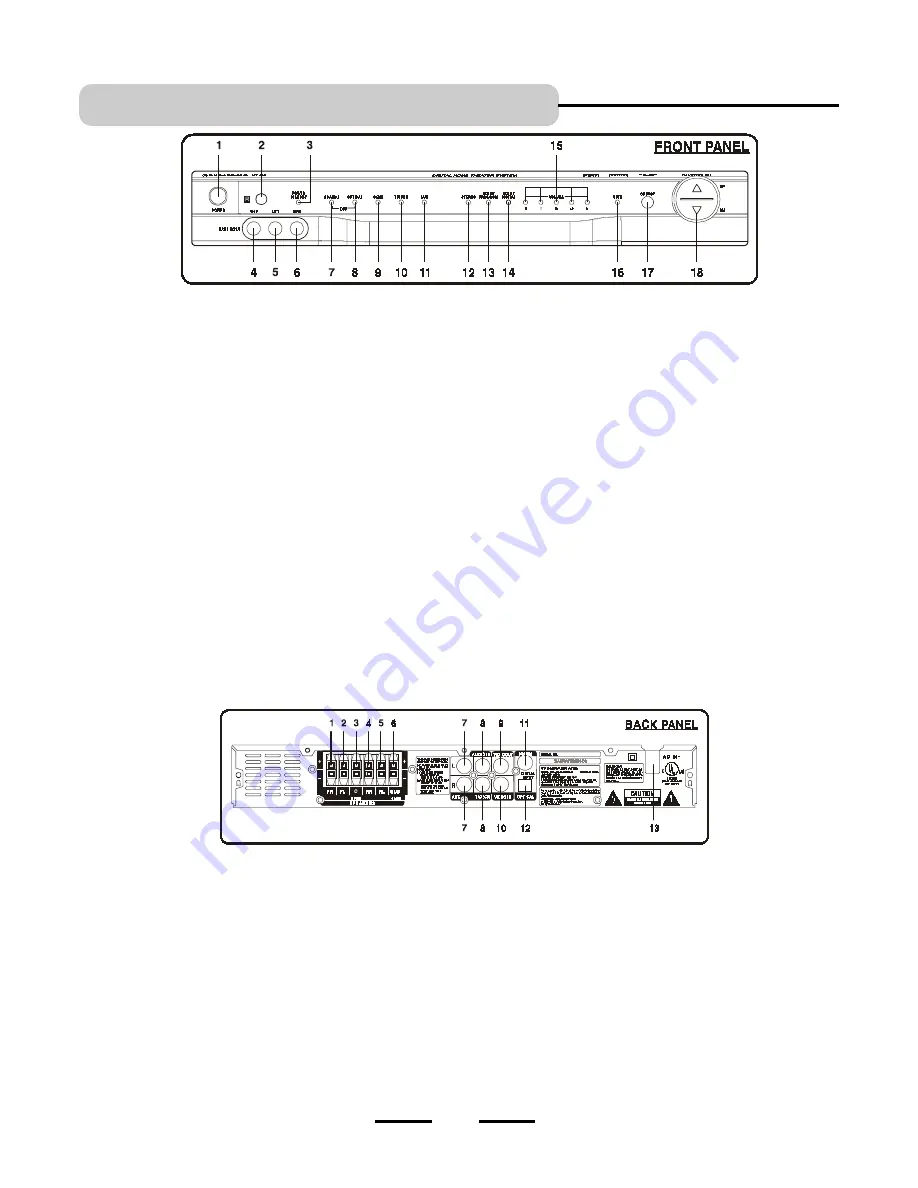
LOCATION OF CONTROLS

  9. GAME indicator - 

For TV GAME or VIDEO CAMERA

sound use, press the SOURCE button till this lights or

press the GAME button on your REMOTE control.

10. TV / VCR indicator - 

For TV / VCR sound use, press the

SOURCE button till this lights or press the TV / VCR

button on your REMOTE control.

11. AUX indicator - 

For Auxiliary input sound use, press the

SOURCE button till this lights or press the AUX button on

your REMOTE control.

12. STEREO indicator - 

In STEREO mode, this red indicator

lights up (for 2 channel sound).

13. DOLBY PRO LOGIC indicator -

 If a Dolby Pro Logic

Signal is received, this red indicator will light.

14. DOLBY DIGITAL indicator -

 If a Dolby Digital Signal

is received, this orange indicator will light.

15. VOLUME indicators - 

These indicators light up

showing the level of the master volume, also each

individual speaker’s volume.

16. MUTE indicator - 

In mute mode, this indicator will light.

17. SOURCE button - 

Press several times to select the sound

input source you want: DVD COAXIAL, DVD OPTICAL,

GAME, TV / VCR, or AUX.

18. MASTER VOLUME UP & DOWN control - 

Increases or

decreases the volume level of all speakers.

 8.  TV/VCR AUDIO INPUT jacks - 

Connect to audio output

 of a TV or VCR.

 1. MAIN POWER  button - 

Press to switch the set on or off.

NOTE: This button must be 

on

 in order to be able to use

the REMOTE control.

2. REMOTE CONTROL SIGNAL sensor - 

Receives the

signal from the REMOTE CONTROL (Aim the REMOTE

control towards this sensor).

3. POWER/STANDBY indicator - 

This indicator has 2

colors: red and green (red is standby, green is on). When the

set is off (standby), pressing the SOURCE or MASTER

VOLUME buttons on the main unit, or pressing any button

on the REMOTE CONTROL will turn the set on. The

indicator will become green. Also this indicator will flash

confirming that you pressed any button on the REMOTE

CONTROL.

4. VIDEO IN jack - 

For connection of a video signal from a

TV game or video camera (see details on Page 16 & 17).

5. AUDIO LEFT jack - 

Connect to the left channel audio

output of a TV game or video camera.

6. AUDIO RIGHT jack - 

Connect to the right channel

audio output of a TV game or video camera.

7. DVD COAXIAL indicator - 

For DVD COAXIAL INPUT sound

use, press the SOURCE button till this lights or press the

COAXIAL button on your REMOTE control.

8. DVD OPTICAL indicator -

 For DVD OPTICAL INPUT sound

use, press the SOURCE button till this lights or press the

OPTICAL button on your REMOTE control.

4

1. FRONT RIGHT SPEAKER jacks - 

Connect the FRONT

RIGHT SPEAKER to the red and black terminals.

2. FRONT LEFT SPEAKER jacks - 

Connect the FRONT LEFT

SPEAKER to the red and black terminals.

3. CENTER SPEAKER jacks - 

Connect only the CENTER

SPEAKER to the blue and black terminals.

4. REAR RIGHT SPEAKER jacks - 

Connect the REAR RIGHT

SPEAKER to the grey and black terminals.

5. REAR LEFT SPEAKER jacks - 

Connect the REAR LEFT

SPEAKER to the grey and black terminals.

6. SUBWOOFER SPEAKER jacks - 

Connect the

SUBWOOFER SPEAKER to the green and black terminals.

7. AUX AUDIO INPUT jacks - 

Connect to the audio output of a

tape deck or other component.

  9. VIDEO OUT jack - 

Connect to your TV’s video input jack.

(If your TV has no VIDEO jack, you have to buy a VIDEO
RF MODULATOR.)

IMPORTANT:

 This jack is only used if you are connecting

a TV GAME or VIDEO CAMERA to the set.

10. DVD VIDEO INPUT jack - 

Connect to your DVD’s video

out jack.

11. DVD COAXIAL DIGITAL INPUT jack -

 Connect to the

COAXIAL digital audio output of a DVD player to have
Dolby Digital 5.1 channel surround sound.

12. DVD OPTICAL DIGITAL INPUT jack -

 Connect to the

OPTICAL digital audio output of a DVD Player to have
Dolby Digital 5.1 channel surround sound.

13. AC LINE CORD - 

Connect to a 120V/60Hz AC

standard wall outlet.

Summary of Contents for HT-395

Page 1: ...e Theater Just add your TV DVD player everything else is in the box Incredible surround sound perfect for DVD viewing enhanced TV game experience Front panel GAME INPUT jacks Dual DIGITAL inputs COAXIAL OPTICAL The Perfect Sound System for Your DVD Player Computer Compatible Also Turns Your Computer Into a Home Theater Cable Included ...

Page 2: ... from the apparatus 11 Only use attachments accessories specified by the manufacturer 12 Unplug this apparatus during lightning storms or when unused for long periods of time 13 Refer all servicing to qualified service personnel Servicing is required when the apparatus has been damaged in any way such as power supply cord or plug is damaged liquid has been spilled or objects have fallen into the a...

Page 3: ...imple as possible It begins with how to connect the speakers your TV and other optional devices It also includes instructions on how to position the speakers for the most natural surround sound If you follow the instructions carefully you can have the system set up in about an hour Basic Features Benefits of this Digital Home Theater System 2 1 Dolby Digital 5 1 channel audio decoder for real home...

Page 4: ... 13 TV VCR Connections 14 TV VCR Satellite Receiver Connections 15 TV TV Game Connections 16 TV Video Camera Connections 17 AUX IN Connections 18 Computer Connections 19 Amplifier General 20 TestTones 21 VolumeAdjustment 22 Listening Mode 23 Others EQ Mode Night Mode Center Rear Speaker Sound Delay 24 Trouble Shooting 25 Specifications 26 3 TABLE OF CONTENTS Manufactured under license from Dolby L...

Page 5: ...en Also this indicator will flash confirming that you pressed any button on the REMOTE CONTROL 4 VIDEO IN jack For connection of a video signal from a TV game or video camera see details on Page 16 17 5 AUDIO LEFT jack Connect to the left channel audio output of a TV game or video camera 6 AUDIO RIGHT jack Connect to the right channel audio output of a TV game or video camera 7 DVD COAXIAL indicat...

Page 6: ...o Logic 5 1 channel audio listening mode The sound will come out of all 6 speakers 12 TEST TONE button Press to activate the test tone noise function to check whether all your speakers are connected properly 13 EQ button Press to select different tone effects 14 FRONT LEFT UP DOWN VOLUME buttons Press to adjust the individual FRONT LEFT speaker s sound level 15 FRONT RIGHT UP DOWN VOLUME buttons P...

Page 7: ... Do not point bright lights at the REMOTE CONTROL SENSOR like laser pointers Do not place objects between the REMOTE CONTROL unit and the REMOTE CONTROL SENSOR Do not use this REMOTE CONTROL while simultaneously using the remote control unit of any other equipment the signals may mix Sometimes your TV s remote may cause an LED to flash you can ignore this Replace the door Reversing polarities will...

Page 8: ...ed Video included Audio included Antenna cable not included TV HOME THEATER only Page 15 Page 12 Page 13 Yellow Video cable included CONNECTIONS 7 Speaker Wires 6 sets are included and one set is attached to the back of the SUBWOOFER Red White Audio cables included most installations will need these Video special notincluded Audio special notincluded AM FM TUNER or other AUX DEVICE HOME THEATER Pa...

Page 9: ...erent colors a black one and a red blue or grey one The Subwoofer does not have spring type connecting tabs at the rear only a set of black green speaker wires from its back 8 NOTE In your package you will find 6 sets of colored speaker wire pairs for connecting your Home Theater to the 6 different speakers 1 green and black pair of wires for the subwoofer which comes out of the back of the subwoo...

Page 10: ...Follow the color codes of each speaker Stripped wires are touching each other due to excessive removal of insulation Do not allow the above to happen on your set or speakers Tips for connecting the speaker wires Push and hold the Speaker terminal tab down to insert each wire Release the tab to lock the wire into the terminal Make sure the wire is fully inserted but the insulation is not covering t...

Page 11: ...wires and the speaker terminals on the back of the main unit Refer to the connection diagram on page 8 Be sure you are using the correct satellite speaker in each location front rear and center Please follow the colors for best results For best surround sound effects all 5 of the satellite speakers should be approximately at the same distance from your usual listening position SPEAKER POSITIONING ...

Page 12: ...y above your ear level when you are seated in your normal listening position We have provided 2 keyhole openings on the backs of all the satellite speakers that allow the satellite speakers to be wall mounted in either a vertical or horizontal position The subwoofer will provide the most dramatic bass effects low frequency sounds like explosions and thunder when it is placed on the floor Do not pl...

Page 13: ... 5 speakers This is normal NOTE Some TVs may not allow the Home Theater to play all 5 speakers if the audio output level of the TV is too low 3 Insert the AC power cord into an AC outlet 4 Press the POWER button on the main unit not the REMOTE to turn on the main power of the set Next press the ON STANDBY button on the REMOTE to turn the set on or off 5 Press the SOURCE button on the main set seve...

Page 14: ... the back of your DVD player and into the VIDEO IN jack on the back of your HOME THEATER SYSTEM 3 Insert the video cable into the VIDEO IN jack on your TV and into the VIDEO OUT jack on the back of your HOME THEATER SYSTEM 4 Insert the AC power cord into an AC outlet 5 Press the POWER button on the main unit not the REMOTE to turn on the main power of the set Next press the ON STANDBY button on th...

Page 15: ... allow the Home Theater to play all 5 speakers if the audio output level of the VCR is too low 2 Connect your VCR to your TV using a coaxial antenna cable probably already connected your VCR s picture will go to your TV through the antenna connection 3 Connections of your other antenna cables are not changed when you add your HOME THEATER SYSTEM 4 Insert the AC power cord into an AC outlet 5 Press...

Page 16: ...o low 2 Connect your VCR to your TV using a coaxial antenna cable probably already connected your VCR s picture will go to your TV through your existing antenna connection 3 Use an antenna cable to connect the antenna output on the satellite receiver to the antenna input on the VCR the same as you have it connected now This audio HOME THEATER SYSTEM does not change any antenna connections 4 Insert...

Page 17: ...2 front speakers plus the subwoofer since the default setting for the sound output is the same as the audio source from the TV GAME 2 channel STEREO For Dolby Pro Logic 5 1 channel sound reproduction press the SURROUND button on the REMOTE The sound will come out of all 5 speakers plus the subwoofer NOTE Some TV GAME may not allow the Home Theater to play all 5 speakers if the audio output level o...

Page 18: ...he sound output is the same as the audio source from the VIDEO CAMERA 2 channel STEREO For Dolby Pro Logic 5 1 channel sound reproduction press the SURROUND button The sound will come out of all 5 speakers plus the subwoofer NOTE Some video cameras may not allow the Home Theater to play all 5 speakers if the audio output level of the video camera is too low 4 Insert the AC power cord into an AC ou...

Page 19: ...vice such as a CABLE SAT BOX or some STEREO TVs is not a true STEREO signal even though it has stereo output jacks when you press the SURROUND button the sound may not come out from all 5 speakers This is normal NOTE Some devices may not allow the Home Theater to play all 5 speakers if the audio output level of the device is too low 3 Press the POWER button on the main unit not the REMOTE to turn ...

Page 20: ...bwoofer since the default setting for the sound output is the same as the audio source from the computer 2 channel STEREO For Dolby Pro Logic 5 1 channel sound reproduction press the SURROUND button The sound will come out of all 5 speakers plus the subwoofer NOTE If the signal of your computer is not a true STEREO signal even though it has stereo output jack when you press the SURROUND button the...

Page 21: ...trol buttons 4 To select the listening mode press the SURROUND or STEREO button on the REMOTE CONTROL NOTE This set will decode and automatically play back whatever sound system was recorded on the DVD or audio disc For a Dolby Digital 5 1 channel audio source the sound will come out of all 5 speakers plus the subwoofer for a Dolby Digital 2 1 channel or other stereo audio source the sound will on...

Page 22: ...ndividual volume controls while playing any music or movie and then retest the levels if you like You may then adjust each speaker s volume level by pressing the VOLUME controls of the individual speakers so that from your center listening position they all have approximately the same sound level To restore all speaker levels to their factory defaults press the RESET button NOTE You can stop the t...

Page 23: ...ER NOTE 1 Every time you turn the set on the MASTER VOLUME will go back to the factory s default settings and whenever you press the SOURCE button on the main unit or one of the source buttons on the REMOTE control COAXIAL OPTICAL GAME TV VCR or AUX the MASTER VOLUME will go back to the factory s default settings This avoids sudden very loud sounds from startling you NOTE 2 Pressing the VOLUME CON...

Page 24: ... be on and sound will come out of 5 speakers plus the subwoofer For a Stereo DVD disc Dolby Digital 2 channel both the orange Dolby Digital and red stereo indicators will be on and the sound will only come out of the 2 front speakers plus the subwoofer For other stereo audio source the red STEREO indicator will be on and the sound will only come out of the 2 front speakers plus the subwoofer To ma...

Page 25: ...2 seconds NOTE Each type of equalizer setting is indicated by different indicators lighting up Some rooms will reproduce the sound effects of a theater if several of the speakers have a slight time delay This set allows you to adjust the time delay of the CENTER REAR speakers by using the remote control NOTE 1 millisecond 1 1000 of a second equals approximately 1 foot of sound travel To set the so...

Page 26: ...orded in Dolby Digital format Loud hum or noise is heard 1 Check that the speakers and components are connected securely 2 Insert all wires firmly follow the setup pages starting on Page 7 No sound is heard from the center speaker The left and right sounds are unbalanced or reversed 1 Check that the speakers and components are connected correctly and securely 2 Adjust front balance by pressing the...

Page 27: ...put Power requirements AC 120V 60Hz Power consumption 55W Main Unit Dimensions 14 1 8 x 10 1 2 x 2 1 8 inches 36 0 X 26 6 X 5 4 cm Weight 7 23 lbs 3 25 kg Speakers Subwoofer Dimensions 7 1 16 x 10 5 8 x 9 inches 180 X 270 X 245 mm Weight 6 13 lbs 2 78 kg Front Left Dimensions 4 1 4 x 3 1 2 x 4 3 8 inches 101 X 90 X 110 mm Weight 0 88 lb 0 4 kg Center Dimensions 4 1 4 x 3 1 2 x 4 3 8 inches 101 X 9...

Reviews: