

EN
EN
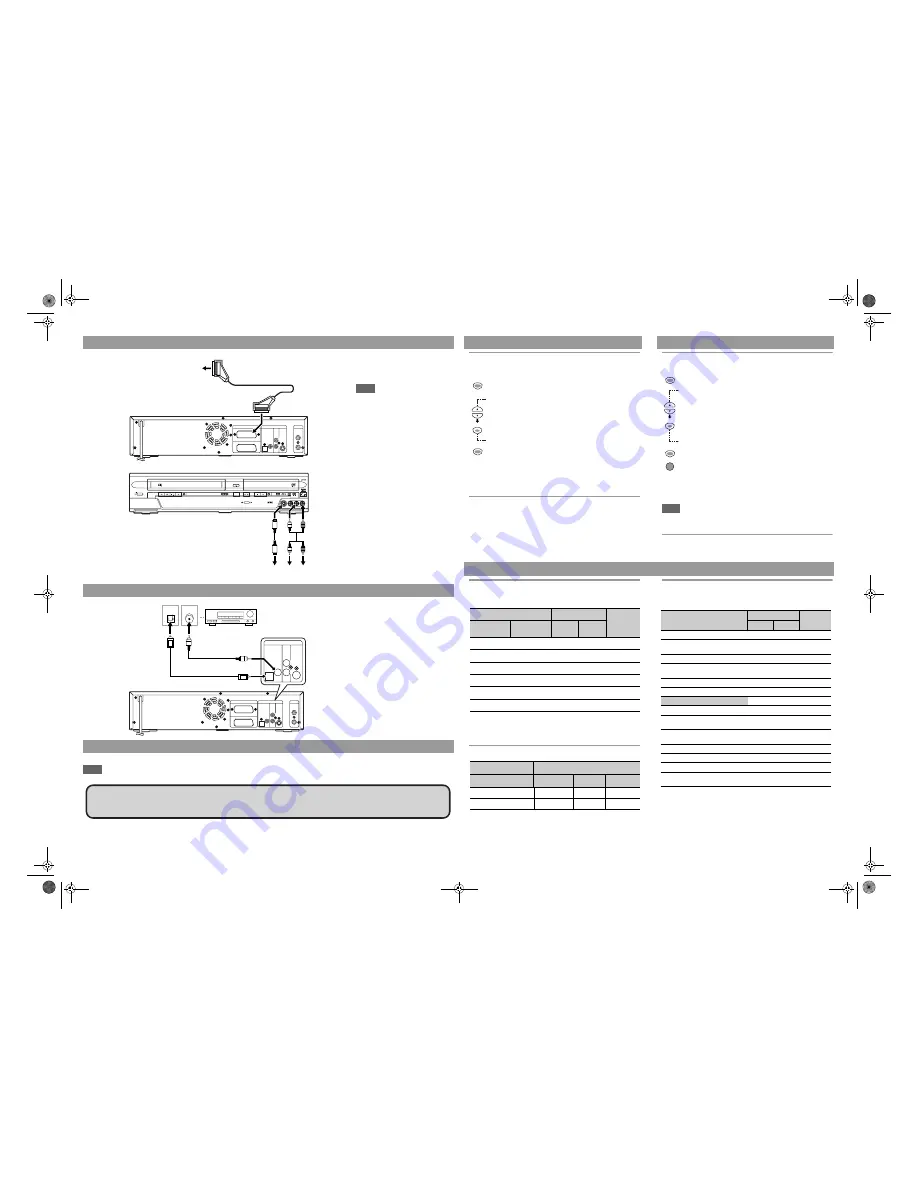
This unit has three input terminals, AV1 or AV2 on the rear panel and AV3 on the front panel. Be sure that all the units are off before making connections.
Switch the input selector on your TV to an appropriate external input channel. For details, refer to the Owner’s Manual of your TV.
Note
• Connect this unit directly to the TV. If the AV cables are connected to a VCR, pictures may be distorted due to the effects of the copy protection system.
Questions and Help on this products, please call
Help Line: 0845 300 7775 in UK.
Connecting to external equipment
Recording from a DVD player, VCR or
other Audio-Video equipment with a
Scart output jack (AV2)
Note
• If the external equipment connected to
the AV2 jack supplies control voltage to
this unit via Pin 8 of the Scart cable,
the display functions of the remote
control cannot be seen on the TV. In
this case, turn off the external
equipment to prevent control voltage,
or make sure to use a Scart cable
without Pin 8 for this connection.
Recording from a camcorder or other
Audio-Video equipment with no Scart
output jack (AV3)
If no S-Video input jack is available,
connect to VIDEO input jack on the front
panel using an RCA Video cable.
Change the setup when using S-VIDEO
input jack. See page 33 on the Owner’s
Manual for details.
Digital audio for better sound quality (only for DVD)
For clear digital sound quality, use the
DIGITAL AUDIO OUT (OPTICAL or
COAXIAL) jacks to connect your
digital audio equipment.
If the audio format of the digital output
does not match the capabilities of your
receiver, the receiver will produce a
strong, distorted sound or no sound at
all.
It may be necessary to change the setup
depending on the connecting device.
See page 17 on the Owner’s Manual for
details.
After you have completed connections
DIGITAL
AUDIO OUT
COAXIAL
OPTICAL
DVD/VCR
AV2(DECODER)
AUDIO
OUT
OUT
IN
L
R
S-VIDEO
OUT
AV1(TV)
DVD
ANTENNA
Scart cable (not supplied)
AV2 (DECODER)
AV output jack (Scart)
STANDBY-ON
REW
F.FWD STOP/EJECT PLAY RECORD
PROG.
DUBBING
SELECT
STOP
PLAY RECORD
SELECT
DVD
VCR
S-VIDEO
VIDEO
L(MONO)-AUDIO-R
OPEN/CLOSE
S-VIDEO
OUT
AUDIO
OUT
AV3 (Front)
S-Video cable
(not supplied)
Audio cable
(not supplied)
DIGITAL
AUDIO OUT
COAXIAL
OPTICAL
DVD/VCR
AV2(DECODER)
AUDIO
OUT
OUT
IN
L
R
S-VIDEO
OUT
AV1(TV)
DVD
ANTENNA
AUDIO
OUT
L
R
S-VIDEO
OUT
DVD
DIGITAL
AUDIO OUT
COAXIAL
OPTICAL
COAXIAL
OPTICAL
Dolby Digital decoder, DTS
decoder or MPEG decoder, etc.
Digital audio
input jacks
Optical cable
(not supplied)
Coaxial cable
(not supplied)
or
WARNING!
DO NOT change connections while power is on.
Before installation, plug off your TV and this unit.
Channel setting
Setting the clock
Auto tuning
Auto Clock Setting
Programme the tuner to scan only the channels you can receive in your
area.
1
In stop mode, press [SETUP].
Setup menu will appear.
2
Select “Channel” using [Cursor
U
/
D
], then
press [ENTER].
3
Select “Auto Tuning” using [Cursor
U
/
D
], then
press [ENTER].
The unit will start storing channels available in your area.
Wait for several minutes to finish channel storing.
4
Press [SETUP] to exit.
You can select only the channels memorized in this unit by
using
[PROG.
U
/
D
]
.
To select a channel
You can select a channel using
[PROG.
U
/
D
]
, or directly enter the
channel using
[the Number buttons]
on the remote control.
Tuning the channel manually
You can store channels manually. For details, see page 19 on the
Owner’s Manual.
Channel Tuning must be set before setting Auto Clock.
1
In stop mode, press [SETUP].
2
Select “Clock” using [Cursor
U
/
D
], then press
[ENTER].
3
Select “Auto Clock Setting” using [Cursor
U
/
D
],
then press [ENTER].
4
Select “ON” using [Cursor
U
/
D
], then press
[ENTER].
The current time will be set automatically.
5
Press [SETUP] to exit.
6
Press [STANDBY-ON] to turn off.
The Auto clock function is activated.
This unit will search for the time only when the power is off.
Leave this unit off for several minutes to give it to set the
clock.
To cancel the Auto clock function, select “OFF” at step 5.
Note
• To set the clock automatically, the channel assigned to “P01” must
receive the PDC signal.
Setting the clock manually
You can set the clock manually. For details, see page 21 on the Owner's
Manual.
Recording
Recording speed for DVD
You can select a recording speed from 6 options. The recording time will
vary depending on the recording speed you select as follows.
• This table is intended for a standard new singlesided 12 cm disc. The
recording times are estimates and actual recording time may differ.
• The audio and video quality becomes poorer as the recording time
gets longer.
Recording speed for video tape
• The desired recording speed is selected in SP (standard play) or LP
(long play) mode by pressing
[REC SPEED]
on the remote control.
Usable discs
✩✩✩
: Most suitable,
✩✩
: Can be used,
✩
: Some functions are limited,
−
: Cannot be used.
SETUP
SETUP
ENTER
SETUP
SETUP
STANDBY-ON
ENTER
Recording speed
Recording time
Video /
Sound
Quality
TV screen
Front Panel
Display
12 cm
8 cm
1H
XP
60 min
18 min
✩✩✩✩✩✩
2H
SP
120 min
36 min
✩✩✩✩✩
4H
LP
240 min
72 min
✩✩✩✩
6H
EP
360 min
108 min
✩✩✩
8H
SLP
480 min
144 min
✩✩
10H
SEP
600 min
180 min
✩
Tape speed
Recording / Playback Time
Type of tape
E60
E120
E180
SP mode
1 hour
2 hours
3 hours
LP mode
2 hours
4 hours
6 hours
* You can only play back DVD-RW disc recorded in VR mode on
VR-compatible discs.
Applications
DVD-RW
DVD-R
VR
VIDEO
Record TV programmes
✩✩✩
✩✩✩
✩✩
Reuse by deleting the current
contents
✩✩✩
✩✩
−
Edit the contents
✩✩✩
✩
✩
Edit / Record from external
equipment
✩✩✩
✩✩✩
✩✩✩
Copy discs for distribution
✩✩
*
✩✩✩
✩✩✩
Playback on other DVD equipment
✩✩
*
✩✩✩
✩✩✩
Features
Rewritable
Yes
Yes
No
Can create chapters at fixed intervals
(auto)
Yes
Yes
Yes
Can create chapters wherever you
like (manual)
Yes
No
No
Can record 16:9 size pictures
Yes
Yes
Yes
Can record Copy-Once programmes
Yes
No
No
Can perform basic editing functions
Yes
Yes
Yes
Can perform advanced editing
functions (Playlist edit)
Yes
No
No
E9B05BD_QSG_EN.fm Page 2 Wednesday, November 29, 2006 5:05 PM


