background image

Appendix 


EN-53 


Declaration of Conformity

This device complies with part 15 of the FCC rules. Operation is subject to the
following conditions:


This device may not cause harmful interference


This device must accept any interference received, including interference
that may cause undesired operation.

RF exposure warning

This equipment must be installed and operated in accordance with provided
instructions and must not be co-located or operating in conjunction with any
other antenna or transmitter. End-users and installers must be provided with
antenna installation instructions and transmitter operating conditions for
satisfying RF exposure compliance.
SAR Value: 1.187W/kg

This device is operation in 5.15 – 5.25GHz frequency range, then restricted in
indoor use only, Outdoor operations in the 5150~5250MHz is prohibit.

This device is slave equipment, the device is not radar detection and not ad-hoc
operation in the DFS band.

Note: Do not disassemble the bumper. Otherwise, the antenna may be damaged,
resulting in poor reception

.

Battery Disposal

THIS PRODUCT CONTAINS A LITHIUM-ION OR NICKEL-METAL HYDRIDE
BATTERY. IT MUST BE DISPOSED OF PROPERLY. CONTACT LOCAL
ENVIRONMENTAL AGENCIES FOR INFORMATION ON RECYCLING AND
DISPOSAL PLANS IN YOUR AREA.
 

WARNING EXPLOSION HAZARD 

Class I, Division 2, Groups A, B, C, D, T Code T5 
Class I, Zone 2, Groups IIC, T5 

WARNING - EXPLOSION HAZARD. DO NOT CONNECT OR REMOVE WHEN IN 
HAZARDOUS AREA. MAKE SURE ALL COVERS SECURED IN PLACE BEFORE USE. 

AVERTISSEMENT – RISQUE D’EXPLOSION. NE PAS CONNECTER OU RETIRER 
DANS UNE ZONE DANGEREUSE. S’ASSURER QUE TOUS LES CAPOTS SONT 
FIXÉS EN PLACE AVANT UTILISATION.


Main Battery: J.S. Power CO., LTD, P/N: X11BK-M 

Summary of Contents for U11

Page 1: ...EN 1 ...

Page 2: ...r 18 Using Battery Power 18 STARTING YOUR TABLET PC 19 Turning On Your Device 19 Turning Off Your Device 19 OPERATING YOUR TABLET PC 20 USING THE QUICK MENU 20 Quick Menu Overview 20 Viewing the Version Information 21 Viewing the Battery Charge Cycles 21 Configuring the Programmable Button P1 21 Configuring the Programmable Button P2 22 Assigning an Application the P2 Button 22 Configuring the Up ...

Page 3: ... CONNECTING USB DEVICES 36 CONNECTING TO EXTERNAL DISPLAY 37 CONNECTING TO WIRELESS CONNECTIONS 38 USING THE BIOS SETUP UTILITY 45 BIOS SETUP MENU 45 MAIN MENU 47 ADVANCED MENU 48 BOOT MENU 49 SECURITY MENU 50 SAVE EXIT MENU 51 APPENDIX 52 COPYRIGHT 52 REGULATORY STATEMENT 52 Federal Communications Commission Statement 52 Declaration of Conformity 53 RF exposure warning 53 Battery Disposal 53 WARN...

Page 4: ...ironments Before you begin using your tablet PC read this chapter to familiarize yourself with the main components installed in the system Package Contents If any of following items is damaged please contact your retailer Tablet PC AC adapter Power cord Capacitive stylus pen Digitizer pen for panel with DG function optional Keyboard dock optional Office dock optional Car adapter optional 8 bay bat...

Page 5: ... You Start EN 5 2 bay battery charger optional Folio case optional Rotate strap optional Soft handle optional Shoulder strap optional NOTE The pictures are for reference only actual items may slightly differ ...

Page 6: ...ng environment 3 Front camera Use for video conference 4 Status indicators Indicate the corresponding function status 5 Power button Press to turn your tablet PC on or off 6 Programmable buttons P1 Press to activate the assigned function Stealth mode button by default Night Vision button Disable no function P2 Press to activate the assigned function Scanner button if the barcode scanner is integra...

Page 7: ...ation Disable no function 7 Up Down buttons Press to activate the assigned function Increase the LCD panel brightness level by default Increase the volume level Disable no function Press to activate the assigned function Decrease the LCD panel brightness level by default Decrease the volume level Disable no function ...

Page 8: ...odule 4 Camera LED flash Provide additional lighting when taking pictures under low light environment 5 Rear camera Use to take pictures 6 Fingerprint scanner Scan the fingerprint for biometric identification 7 Battery compartment Contain the battery 8 Battery latch release button Press and hold the button to slide the battery latch to the unlock position ...

Page 9: ...cted model Connect a USB peripheral device 3 Barcode scanner for selected model Scan barcodes Bottom View No Item Description 1 RF Pass thru connector for selected model Use for the external WLAN antenna 2 Use for the external GNSS antenna 3 Use for the external WWAN antenna 4 Docking connector Connect the tablet PC to a docking station ...

Page 10: ...adapter 2 Mini DisplayPort Connect to an external display 3 USB 3 0 port Connect USB 3 0 peripheral devices 4 RJ 45 jack Connect to a local area network LAN using an Ethernet cable 5 Memory card slot Use to insert memory cards to transfer pictures music and data between your Tablet PC and flash compatible devices The card reader supports micro SDHC and micro SDXC 6 SIM card slot Use to insert a SI...

Page 11: ...n the system is running When the system is in sleep mode the LED blinks Battery Indicate the battery status Green when battery is fully charged 95 or above Orange when battery is charging Flashing orange charging error Red when battery capacity is lower than 10 Off when discharged Windows Airplane mode Indicate the airplane mode status Blue the airplane mode is disabled Off the airplane mode is ac...

Page 12: ... until the battery locks into place 3 Slide the battery latch to the lock position to secure the battery Charging the Battery The Lithium ion battery is not fully charged upon purchase To charge the battery follow the steps below 1 Install the battery to your tablet PC See procedures above 2 Connect the AC adapter to the DC in jack of your tablet PC 3 Connect the AC adapter to the power cord 4 Plu...

Page 13: ...me and usage We recommend you to replace your battery pack after 18 to 24 months of usage Removing the Battery To remove the battery follow the steps below 1 Press and hold the battery latch release button to slide the battery latch to the unlock position 2 Remove the battery out of the battery compartment ...

Page 14: ...Getting Started EN 14 Removing the SSD Kit To remove the SSD kit follow the steps below 1 Slide the SSD kit latch to the unlock position 2 Remove the SSD kit out of its compartment ...

Page 15: ...EN 15 Replacing the SSD Module To remove the SSD module follow the steps below 1 Remove the four screws securing the SSD module cover 2 Remove the SSD module cover 3 Detach the conductive tape to access the SSD module ...

Page 16: ...screws securing the SSD module and the memory adapter board 5 Remove the SSD module assembly 6 Pull to disconnect the SSD module from the memory adapter board connector NOTE To install a new SSD module reverse procedures step 1 through 6 above ...

Page 17: ...ing Started EN 17 Installing the SSD Kit To install the SSD kit follow the steps below 1 Align and insert the SSD kit to its compartment 2 Slide the SSD kit latch to the lock position to secure the SSD kit ...

Page 18: ...ter to the DC in jack of your tablet PC 2 Connect the AC adapter to the power cord 3 Plug the power cord to an electrical outlet Using Battery Power 1 Install a charged battery in the battery compartment 2 Remove the AC adapter if plugged Your tablet PC will automatically use the battery power NOTE If your tablet PC is connected to an electrical outlet and the battery is installed your tablet PC u...

Page 19: ... the Power LED lights up Turning Off Your Device It is important to properly shut down your tablet PC to avoid the loss of unsaved data To shut down your tablet PC do the following Tap Shut down Wait for your notebook to turn off power completely before removing the power source if necessary ...

Page 20: ...e your Tablet PC Using the Quick Menu To enter the Quick menu tap the arrow on the task bar to display hidden icons Then tap the Quick Menu icon You can also access the Quick menu in the All apps list Quick Menu Overview NOTE If the tab is green i e this indicates the current function is activated ...

Page 21: ...ction you can view the battery charge cycle and battery status Configuring the Programmable Button P1 On the P1 Button Setting section you can assign the function for the P1 button There are three available options Stealth Mode Turn off the LCD backlight LEDs speakers camera flash and RF devices Night Vision Mode Adjust the brightness of the LCD under 1 7 nits and turn off the LEDs and camera flas...

Page 22: ...de Launch Application Shortcut key for launching the specific application To assign the application refer to the Assigning an Application the P2 Button section The default application is Quick menu Barcode trigger Scan the barcode if the barcode scanner is integrated Off No function Assigning an Application the P2 Button Tap the P Key tab to assign an application to the P2 button Select the desire...

Page 23: ...ns There are three available options Brightness adjustment Adjust the LCD panel brightness level Volume adjustment Adjust the volume level Off No function Accessing the Mobility Center Tap the Mobility Center tab to adjust or configure the brightness volume level battery status screen orientation external display sync and presentation settings ...

Page 24: ...film when it gets worn out You can select the desired touch screen mode in the Quick menu Select one of the available options Select Finger Water if you are using your fingertips Select Glove if you are wearing gloves Select Stylus if you are using a stylus NOTE If the touch screen mode is set to Glove or Stylus and the touchscreen is wet i e spilled by liquid the touch function will not respond t...

Page 25: ...o enable disable the device to automatically switch to the external WWAN antenna when it is affixed on a docking station Tap the GPS Antenna tab to enable disable the device to automatically switch to the external GPS antenna when it is affixed on a docking station NOTE If the tab is green this indicates the current function is activated Configuring Adaptive Brightness Settings Tap the Adaptive Br...

Page 26: ...ing the Camera Using the Camera application you can use this tablet PC to take photos or videos Opening Camera App To access the Camera application do one the following a Tap Camera b In Cortana search box enter camera Then tap Camera ...

Page 27: ...Operating Your Tablet PC EN 27 Taking Photos Tap to capture a photo NOTE To switch between front and rear cameras tap ...

Page 28: ...Operating Your Tablet PC EN 28 Recording Videos 1 Tap to switch to Video mode 2 Press to start recording a video The recording time appears on the bottom on the screen 3 To stop recording the video tap ...

Page 29: ...EN 29 Adjusting Brightness 1 Tap to switch to Pro mode 2 Tap to display the brightness control slider 3 Do the following Tap and drag upwards to brighten your photo or video Tap and drag downwards to darken your photo or video ...

Page 30: ... self timer 5 second self timer 10 second self timer Configuring Camera Settings 1 Tap to enter the Settings menu 2 Select the desired menu option and setting Menu Option Description Press and hold camera button Set the action when you tap and hold the Camera button Video Tap and hold the Camera button to create a ...

Page 31: ...otos until the Camera button is pressed Video recording Set the video resolution Flicker reduction Select 50 Hz or 60 Hz to reduce the flickering that may occur when recording video under fluorescent light Related settings Select the related settings that can only be configured in Settings app Viewing Photos Videos After taking a photo or recording a video tap the thumbnail in the bottom right cor...

Page 32: ...our tablet PC Installing the Memory Card Your Tablet PC supports different types of memory cards to provide faster data transfer Supported types Micro SDHC Micro SDXC 1 Slide to the left to open the memory SIM card cover 2 Push the memory card into the memory card slot until it clicks into place 3 Close the memory SIM card cover ...

Page 33: ...lability of service and plan rates of data connection with your network service provider It is recommended turn off the tablet PC before you insert the SIM card 1 Slide to the left to open the memory SIM card cover 2 Push a valid SIM card into the SIM card slot until it clicks into place 3 Close the memory SIM card cover ...

Page 34: ... PC is equipped with a built in smart car make secure purchases store security information and provide identification and information using a smart card 1 Pull to open the smart card cover 2 Insert a smart card into the smart card slot 3 Close the smart card cover ...

Page 35: ...rophone To connect to a headset open the memory SIM card cover and plug the stereo headphone cable into the audio combo jack of your device To connect to a microphone open the memory SIM card cover and plug the microphone cable into the audio combo of your device NOTE The headset and microphone are not included in the package They are sold separately ...

Page 36: ...camera printer or an external hard disk drive 1 Slide to the right to open the I O port cover 2 Connect one end of the USB cable to the USB port of your device 3 Connect the other end of the cable to the USB device if necessary NOTE The USB cable is not included in the package It is sold separately or it may come with your USB device ...

Page 37: ...C using the mini DisplayPort cable 1 Slide to right to open the I O port cover 2 Connect one end of the mini DisplayPort cable to the mini DisplayPort of your device 3 Connect the other end of the cable to the external display NOTE The mini DisplayPort cable is not included in the package It is sold separately ...

Page 38: ...esulting in poor reception Connecting to a Bluetooth Device Your tablet PC can connect and communicate with other Bluetooth enabled devices By default the Bluetooth function is disabled To add a device follow the steps below 1 Tap on the system tray Then tap Bluetooth to enable the function 2 Tap the arrow icon on the system tray to display hidden icons 3 Tap the Bluetooth icon and select Add a Bl...

Page 39: ...5 Select the device you want to connect Verify the pairing code on the screen of your device and pairing device match then tap Connect to start pairing NOTE If the device that you want to add does not appear on the screen please check if the device is turned on and discoverable ...

Page 40: ...your tablet PC The PIN you enter on the tablet PC must be the same PIN to be entered on the other Bluetooth device Once a partnership has been created connecting to that device again will no longer require entering the PIN To disconnect from the Bluetooth enabled device select the device in the Bluetooth menu and tap Remove device ...

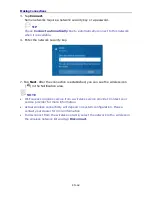
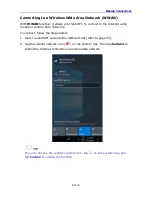
Page 41: ...e network is detected or by manually entering the settings information To connect follow the steps below 1 Tap the wireless network icon on the system tray TIP If you do not see the wireless network icon tap on the system tray and tap Wi Fi to enable the Wi Fi function 2 Available wireless network connections are displayed Tap the desired wireless network ...

Page 42: ...ter the connection is established you can see the wireless icon in the Notification area NOTE Wi Fi access requires service from a wireless service provider Contact your service provider for more information Actual wireless connectivity will depend on system configuration Please contact your dealer for more information To disconnect from the wireless network select the network in the wireless in t...

Page 43: ... cellular data networks To connect follow the steps below 1 Insert a valid SIM card into the SIM card slot refer to page 33 2 Tap the cellular network icon on the system tray Then tap Cellular to enable the Internet connection via mobile data network TIP If you do not see the cellular network icon tap on the system tray and tap Cellular to enable the function ...

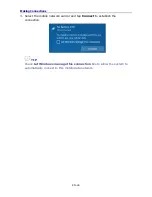
Page 44: ...ctions EN 44 3 Select the mobile network carrier and tap Connect to establish the connection TIP Check Let Windows manage this connection box to allow the system to automatically connect to this mobile data network ...

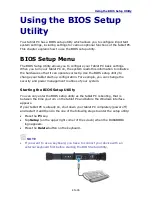
Page 45: ...ablet start up configuration For example you can change the security and power management routines of your system Starting the BIOS Setup Utility You can only enter the BIOS setup utility as the tablet PC is booting that is between the time you turn on the tablet PC and before the Windows interface appears If your tablet PC is already on shut down your tablet PC completely power off and restart it...

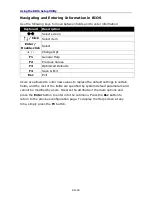
Page 46: ... Values F3 Optimized Defaults F4 Save Exit Esc Exit Users are allowed to enter new values to replace the default settings in certain fields and the rest of the fields are specified by system default parameters and cannot be modified by users Reverse the attribute of the main options and press the Enter button to enter into the submenu Press the Esc button to return to the previous configuration pa...

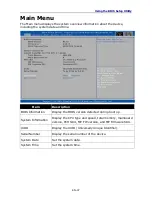
Page 47: ...ption BIOS Information Display the BIOS version detected during boot up System Information Display the CPU type and speed total memory mainboard version PCH SKU ME FW version and ME Firmware SKU UUID Display the UUID Universally Unique Identifier Serial Number Display the serial number of the device System Date Set the system date System Time Set the system time ...

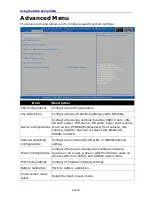
Page 48: ...HD audio finger print scanner touch screen PCMCIA ExpressCard front camera rear camera digitizer barcode wireless LAN Bluetooth WWAN and GPS Antenna Switching Configurations Configure the external WLAN GPS or WWAN antenna setting Power Configurations Configure the power management settings including resume on AC power wake on LAN from S3 S4 wake on wireless LAN from S3 S4 and USB3 0 power share TP...

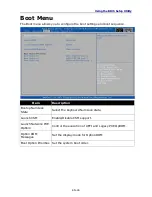
Page 49: ... boot sequence Item Description Bootup NumLock State Select the keyboard NumLock state Launch CSM Enable Disable CSM support Launch Network PXE OpRom Control the execution of UEFI and Legacy PXE OpROM Option ROM Messages Set the display mode for Option ROM Boot Option Priorities Set the system boot order ...

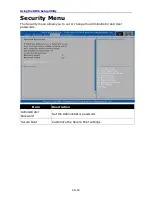
Page 50: ...lity EN 50 Security Menu The Security menu allows you to set or change the Administrator and User passwords Item Description Administrator Password Set the Administrator password Secure Boot Customize the Secure Boot settings ...

Page 51: ... restore the default values for all setup options before leaving the BIOS Setup Menu Item Description Save Changes and Reset Reset the system after saving the changes Discard Changes and Reset Reset the system setup without saving any changes Restore Defaults Restore the default values for all the setup options ...

Page 52: ...uctions may cause harmful interference to radio communications However there is no guarantee that interference will not occur in a particular installation If this equipment does cause harmful interference to radio or television reception which can be determined by turning the equipment off and on the user is encouraged to try to correct the interference by one or more of the following measures Reo...

Page 53: ...nge then restricted in indoor use only Outdoor operations in the 5150 5250MHz is prohibit This device is slave equipment the device is not radar detection and not ad hoc operation in the DFS band Note Do not disassemble the bumper Otherwise the antenna may be damaged resulting in poor reception Battery Disposal THIS PRODUCT CONTAINS A LITHIUM ION OR NICKEL METAL HYDRIDE BATTERY IT MUST BE DISPOSED...

Page 54: ...PRODUKT TO EN60825 ATTENTION CE PRODUIT CONTIENT UN SYSTÈME LASER ET EST CLASSÉ EN TANT QUE PRODUIT LASER DE CLASSE 1 POUR UTILISER CE MODÈLE CORRECTEMENT LISEZ LE MANUEL D INSTRUCTIONS ATTENTIVEMENT ET CONSERVEZ LE POUR RÉFÉRENCE FUTURE EN CAS DE PROBLÈMES AVEC CE MODÈLE VEUILLEZ CONTACTER VOTRE STATION DE SERVICE AUTORISÉE LA PLUS PROCHE POUR ÉVITER UNE EXPOSITION DIRECTE AUX FAISCEAUX LASER N E...

Page 55: ...MMENDED BY THE MANUFACTURER DISPOSE OF USED BATTERIES ACCORDING TO THE MANUFACTURER S INSTRUCTIONS SÉCURITÉ DES PILES DANGER D EXPLOSION SI LA PILE EST MAL REMPLACÉE REMPLACEZ LA PILE UNIQUEMENT PAR UNE AUTRE DU MÊME TYPE OU D UN TYPE ÉQUIVALENT CONSEILLÉ PAR LE FABRICANT REJETEZ LES PILES USÉES CONFORMÉMENT AUX INSTRUCTIONS DU FABRICANT CAUTION FOR RJ 45 The RJ 45 jack is not used for telephone l...

Page 56: ...ice away from any magnetic emitting devices as this may affect the quality of the wireless signal reception When using an AC adapter Place this device in a location that is close enough to an electrical outlet to accommodate the length of the power cord and in order to turn off the power conveniently Operate this device only with the type of power source indicated on the device marking label Disco...

Page 57: ...l à l écart des appareils émettant des ondes électromagnétiques car celles ci peuvent affecter la réception du signal sans fil Lors de l utilisation d un adaptateur secteur Placez l appareil à un emplacement suffisamment proche d une prise électrique pour prendre en charge la longueur du cordon d alimentation Utilisez uniquement cet appareil avec le type d alimentation électrique indiqué sur l éti...

Reviews: