DUO-FAST FloorMaster 200-C Operating Manual And Schematic Download Page 5

5

UNPACKING

When unpacking, check and make sure that all accessories are included. If anyone is
missing or broken, please contact your distributor. Refer to the following lists, 1 each:

 Hammer
 Nailer

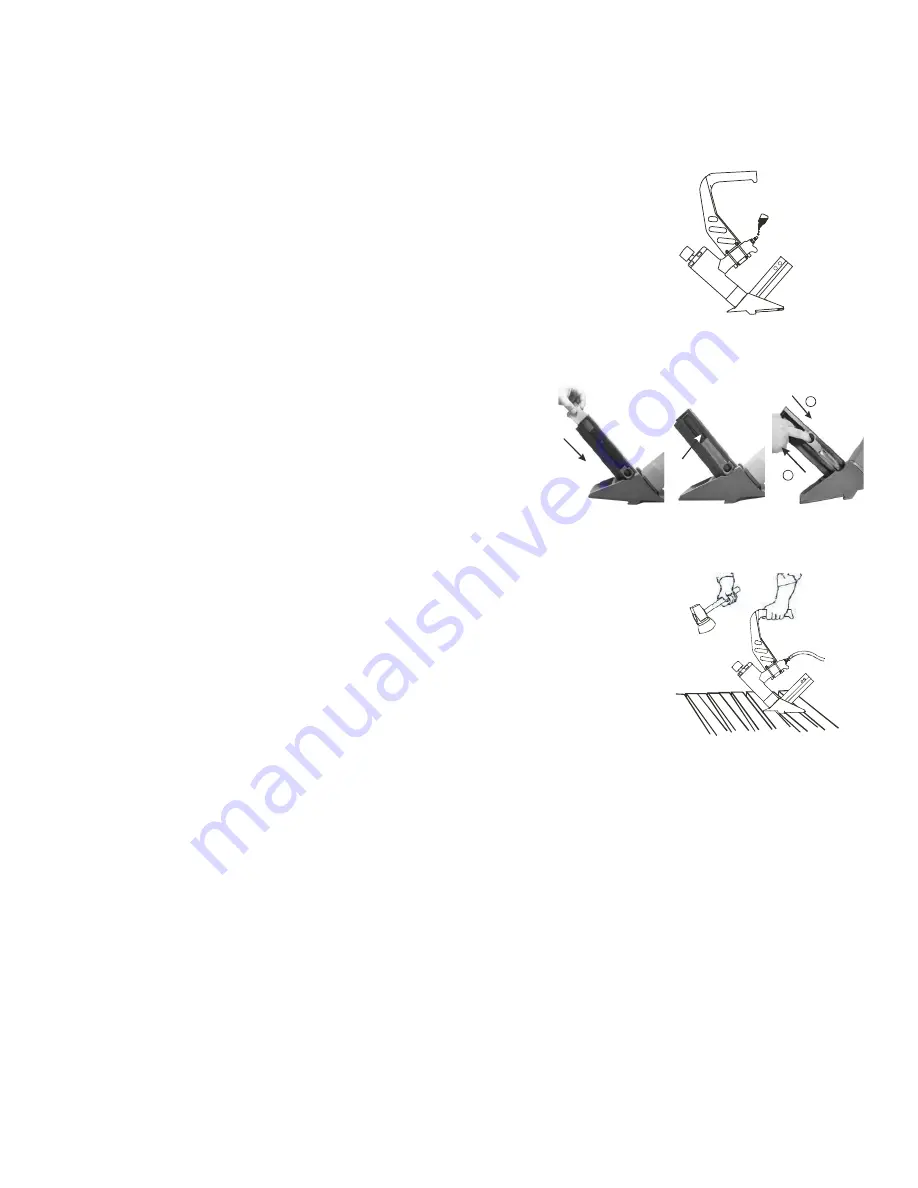
CONNECTING THE TOOL WITH THE AIR  SUPPLY

1. Determine if it is necessary to lubricate. If necessary, put 2 drops of oil
    into the AIR PLUG-Key 46 (Figure 1).
    If you are using an automatic in-line oiler, check and add oil if necessary.
2. Turn the air compressor on and adjust the regulator to a proper pressure
    for shooting suitable fastener.
3. Connect the tool to the air supply.

LOADING THE FASTENERS

1. Load one (1) strip or up to 100 fasteners into the “T” slot in the rear
    of the magazine (Figure 2A).
2. Slide the fasteners all the way forward (Figure 2B).
3. Pull the feeder shoe back behind the fasteners and allow it to slide
    forward pushing the fasteners to the front of the magazine (Figure 2C).

OPERATING THE TOOL

Test the driving depth in a sample piece of wood before using.
If the fasteners are being driven too far or not far enough, adjust the regulator to provide
less air pressure or more air pressure.
1. Connect the tool to the air supply. Make sure the air pressure is in correct range
    denoted in the section of Specifications.
2. Load fasteners as above the direction given in the section called Loading the Fasteners.
3. Hold the long arm and press the shoe to work surface and make
    sure the fastener connection position. Strike the hammer face with a hammer to
    drive the fastener out (Figure 3).
4. Lift the tool off the work piece.

REGULAR MAINTENANCE

1. Frequent but not excessive, lubrication is required for the best performance. Oil added
through the air inlet will lubricate internal parts. An automatic air line oiler is recommended
but oil may be added manually before every operation or after about 1 hour of continuous
use. Only a few drops of oil at a time is necessary. Too much oil will collect inside the tool
and be blown out during the exhaust cycle.
ONLY USE PNEUMATIC TOOL OIL. Do not use detergent oil or additives because these
lubricants will cause accelerated wear to the seal in the tool.
2. Use a small amount of oil on all moving surfaces and pivots.
3. Dirt and water in the air supply are major causes of pneumatic tool wear. Use a filter/oiler
for better performance and longer life. The filter must have adequate flow capacity for the
specific application. Consult the manufacturer’s instructions for the proper maintenance of
your filter.
4. Keep tools clean for better and safer performance. Use nonflammable cleaning solutions.
(Caution such solutions may damage O-ring and other tool parts ) only if necessary.
DO NOT SOAK.

S3 Hex key
S4 Hex key

S5 Hex key
Air tool oil

Operating instructions

Figure 1

Figure 3

2

1

Figure 2

2A

2B

2C

Summary of Contents for FloorMaster 200-C

Page 1: ...IMPORTANT DO NOT DESTROY It is the customer s responsibility to have all operators and service personnel read and understand this manual OPERATING MANUAL AND SCHEMATIC Cleat Nailer FloorMaster 200 C ...

Page 2: ...damage by accident misuse abuse modification repairs necessitated by service attempted by other than a DUO FAST authorized service technician or because of failure to follow the recommended tool use and maintenance instructions detailed in the Safety operation Instruction Manual THIS WARRANTY IS THE EXCLUSIVE REMEDY AGAINST DUO FAST and no other remedy including but not limited to incidental or co...

Page 3: ...he operating air pressure within this range for best tool performance DO NOT EXCEED THIS RECOMMENDED OPERATING PRESSURE CLEAT NAIL SIZES LENGTH 1 1 2 2 GAUGE HEAD 16ga L cleat TOOL AND FASTENER SPECIFICATIONS 3 TOOL AIR FITTINGS This tool uses a 1 4 N P T male plug The inside diameter should be 28 7mm or larger The fitting must be capable of discharging tool air pressure when disconnected from the...

Page 4: ...element to help prevent accidental firing Never tamper with disable or remove the work contacting element Do not use the tool unless the work contacting element is working properly The tool could fire unexpectedly DISCONNECT THE TOOL WHEN NOT IN USE Always disconnect the tool from the air line when it is not in use when you leave the work area or when moving the tool to a new location The tool must ...

Page 5: ... the section called Loading the Fasteners 3 Hold the long arm and press the shoe to work surface and make sure the fastener connection position Strike the hammer face with a hammer to drive the fastener out Figure 3 4 Lift the tool off the work piece REGULAR MAINTENANCE 1 Frequent but not excessive lubrication is required for the best performance Oil added through the air inlet will lubricate inte...

Page 6: ...0 48 47 46 45 L Cleat Nailer 502190 EXPLODED VIEW 18 26a 9 19 20 21 34 11 24 25 40 43 42 52 41 44 22a 22 35 WARNING All parts must be periodically inspected and replaced if worn or broken Failure to do this can affect the tool s operation and present a safety hazard 51 50 32 35 49 28 ...

Page 7: ...98 Poppet Actuator 17 501799 Gasket 18 501800 Body 19 501801 Bumper 20 502203 Nose 21 501803 Screw 22 502204 Blade Guide 22a 502205 Baffle Plate 23 502206 Spring Washer 24 502207 Spring Pin 25 502111 Shoe 26 501808 Spacer installed for 3 4 flooring PARTS LEGEND Key Part Description Key Part Description L Cleat Nailer 502190 7 DO NOT EXCEED MAXIMUM RECOMMENDED AIR PRESSURE 60 0 120 60 0 120 Always ...

Page 8: ...ir pressure is low C Exhaust is blocked A Damaged pusher spring B Wrong size of fastener C Magazine or wear plate is dirty A Driver channel is worn B Driver is broken worn C Bent fasteners Air leaking in cylinder cap Lack of power slow to cycle Poor power of driving and returning Shooting no fastener or intermittent feeding Fastener is jammed in tool A Tighten and recheck B Replace gasket A Drop l...

Reviews: