7
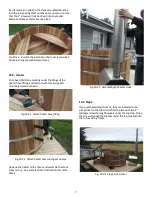
By trial and error, position the three assembled benches
into the tub, spacing them equally apart, until you’re sure
that the 2” screws will not be driven into any seams
between staves as this will cause a leak.
Fig. 10.1.4 Position the benches so that no screws will be
driven into any seams between staves.
10.2: Heater
Put a bead of silicone caulking under the flange of the
heater hose fitting, and fasten it with three supplied
mounting screws as shown.
Fig. 10.2.1 Fasten heater hose fitting
.
Fig. 10.2.2 Attach heater hoses with gear clamps
Hook up the heater to the hoses and assemble the stack
pipes on top. See manufacturer’s instructions for more
detail.
Fig. 10.2.3 Assembling the heater stack.
10.3 Steps:
If you purchased steps from us, they are intended to be
placed next to the tub and are held in place with two 2”
stainless screws through brackets under the top step. Drive
the screws through the bracket under the top step and into
the tub, avoiding cracks.
Fig. 10.3.1 Steps, Tub, Heater
Summary of Contents for Cedar Hot Tub
Page 11: ...11...


