Dukane ImagePro 8783 Operating Manual Download Page 47

47

Item

Description

SECURITY

(continued)

4. Using the Transition Detector Function

While the Transition Detector function is ON, when power switch is started to 

supply to the projector, it might react as below.

• Transition Detector alarm shown below might appear on screen, if the 

projector has been moved or re-installed.

• Transition Detector alarm might appear on screen, if the MIRROR setting 

has been changed.

• Keystone adjustment feature has been prohibited as long as the Transition 

Detector function is ON.
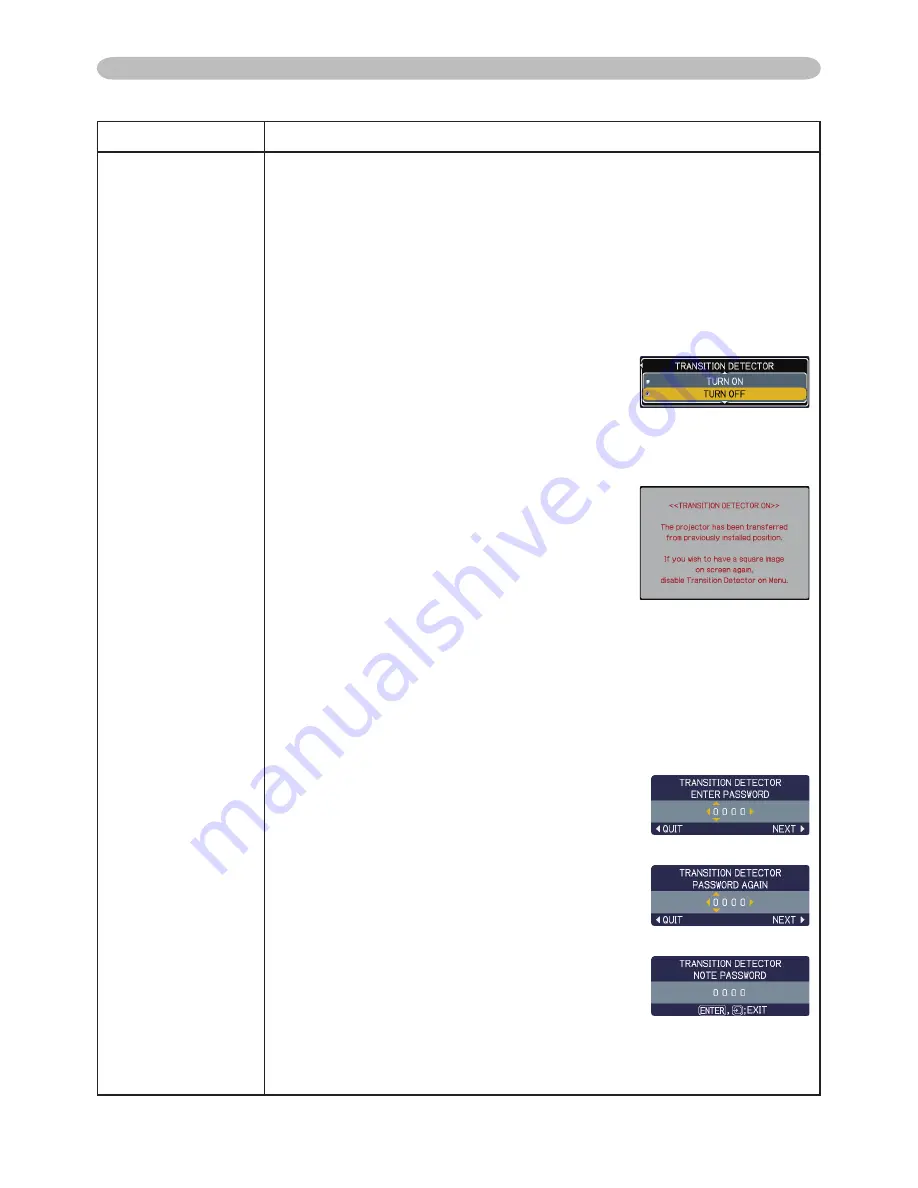
4.1 Turning On the 

Transition Detector

 Function

4.1-1  Use the ▲/▼ buttons on the SECURITY menu to 

select Transition Detector and press the ► or the 

ENTER button to display the Transition Detector 

on/off menu. 


Select TURN ON and the current angle and mirror 

setting will be recorded.

• 

This feature may not function properly if the projector is 

not in a stable position when TURN ON is selected.
4.1-2  If this function is set to TURN ON when the 

vertical angle of the projector or mirror setting 

at which the projector is turned on is different 

than the previously recorded the Transition 

Detector Alarm will be displayed and the 

projector will not display the input signal.

Set the Transition Detector off in the SECURITY menu to display the input signal.

If the Transition Detector ALARM is displayed for about 5 minutes the lamp will turn off. 

This function will activate only when the projector is started after the power 

switch was turned off.

4.2 Setting the 

Transition Detector

 PASSWORD

4.2-1  Use the ▲/▼ buttons on the SECURITY menu to select Transition 

Detector and press the ► or the ENTER button to display the 

Transition Detector on/off menu.

4.2-2  Use the ▲/▼ buttons on the Transition 

Detector on/off menu to select TURN ON. 

The ENTER PASSWORD BOX (small) will be 

displayed.

4.2-3  Use the ▲/▼/◄/► buttons to enter a 

PASSWORD. Move the cursor to the right side of 

the ENTER PASSWORD BOX (small) and press 

the ► button to display the CHECK PASSWORD 

BOX, enter the same PASSWORD again.

4.2-4  Move the cursor to the right side of the 

CHECK PASSWORD BOX and press the 

► button to display the PASSWORD for 

about 20 seconds, please make note of the 

PASSWORD during this time.

Pressing the ENTER button will return to the 

Transition Detector on/off menu.

• Please do not forget your Transition Detector PASSWORD.

OPTION Menu (continued)

OPTION Menu

(continued on next page)

Summary of Contents for ImagePro 8783

Page 1: ...in personal injury or physical damage due to incorrect handling Please refer to the pages written following this symbol NOTE The information in this manual is subject to change without notice The manu...

Page 2: ...ly blanking the screen 19 Using the menu function 20 Content Content EASY MENU 21 Aspect Auto keystone execute Keystone Picture mode Brightness Contrast Color Tint Sharpness Whisper Mirror Reset Filte...

Page 3: ...er with the enclosed filter cover for bottom up use to keep necessary ventilation space Please refer to the Air filter 54 for how to detach and attach a filter cover WARNING Consult with your dealer b...

Page 4: ...the lens or vents while the lamp is on since the strong light is not good for your eyes Do not handle the elevator knobs without holding the projector since the projector may drop down CAUTION Mainta...

Page 5: ...LUME button 12 14 16 KEYSTONE button 18 17 MY BUTTON 1 button 40 18 MY BUTTON 2 button 40 19 MUTE button 14 20 POSITION button 17 21 MENU button 20 22 cursor buttons 12 20 23 ENTER button 12 20 24 ESC...

Page 6: ...16 10 screen 4 3 screen B Projection distance C Screen height B Projection distance C Screen height min max min max inch m m inch m inch cm inch m inch m inch cm inch 30 0 8 0 9 37 1 1 45 40 16 1 1 42...

Page 7: ...ctor on metallic thing or anything weak in heat Do not place the projector on carpet cushions or bedding Do not place the projector in direct sunlight or near hot objects such as heaters Do not anythi...

Page 8: ...rn off all devices and unplug their power cords prior to connecting them to projector Connecting a live device to the projector may generate extremely loud noises or other abnormalities that may resul...

Page 9: ...es this projector may not display a proper picture or display any picture on screen For example automatic adjustment may not function correctly with some input signals An input signal of composite syn...

Page 10: ...tor If it is damaged contact your dealer to newly get correct one Only plug the power cord into an outlet rated for use with the power cord s specified voltage range The power outlet should be close t...

Page 11: ...short circuit solder or disassemble a battery Do not allow a battery in a fire or water Keep batteries in a dark cool and dry place If you observe a leakage of a battery wipe out the flower and then...

Page 12: ...jector with a PC having a built in pointing device e g track ball like a notebook PC open BIOS setup menu then select the external mouse and disable the built in pointing device because the built in p...

Page 13: ...off the projector after all of connected devices are powered off This projector has the function that can make the projector automatically turn on off Please refer to the AUTO ON 38 and AUTO OFF 39 i...

Page 14: ...e INPUT ENTER MENU LAMP TEMP POWER STANDBY ON INPUT ENTER Selecting an input signal 1 Press the INPUT ENTER button on the projector Each time you press the button the projector switches its input port...

Page 15: ...es not work when no proper signal is inputted The NORMAL mode keeps the original aspect ratio setting Performing the automatic adjustment initializes the aspect ratio setting VIDEO button SEARCH butto...

Page 16: ...ll the elevator knobs up to loose the elevator feet 2 Position the front side of the projector to the desired height 3 Release the elevator knobs in order to lock the elevator feet 4 After making sure...

Page 17: ...adjusted And the aspect ratio will be automatically set to default Make sure that the application window is set to its maximum size prior to attempting to use this feature A dark picture may still be...

Page 18: ...AUTO executes automatic vertical keystone correction 2 The MANUAL displays a dialog for keystone correction Use the buttons for adjustment To close the dialog and complete this operation press the KE...

Page 19: ...ndication will not appear when the TURN OFF is selected to the MESSAGE item of the SCREEN menu 36 and the projector will go into the FREEZE mode To exit the FREEZE mode and restore the screen to norma...

Page 20: ...ns to select an item to operate Then press the cursor button or the ENTER button to progress The operation menu of the selected item will appear 4 Use the cursor buttons to operate the item Some funct...

Page 21: ...OARD BLACK DAYTIME WHITEBOARD BOARD GREEN COLOR TEMP GAMMA NORMAL 2 MID DEFAULT 1 DEFAULT CINEMA 3 LOW DEFAULT 2 DEFAULT DYNAMIC 1 HIGH DEFAULT 3 DEFAULT BOARD BLACK 4 Hi BRIGHT 1 DEFAULT 4 DEFAULT BO...

Page 22: ...he buttons switches the mode for mirror status See the MIRROR item in SETUP menu 32 RESET Performing this item resets all of the EASY MENU items except the FILTER TIME and LANGUAGE A dialog is display...

Page 23: ...the pattern changes as below No pattern Gray scale of 9 steps Ramp Gray scale of 15 steps The eight equalizing bars correspond to eight tone levels of the test pattern except the darkest in the left...

Page 24: ...below No pattern Gray scale of 9 steps Ramp Gray scale of 15 steps When this function is performed lines or other distortion may appear COLOR Using the buttons adjusts the strength of whole color Str...

Page 25: ...ory has no data are skipped Remember that the current adjusted condition will be lost by loading data If you want to keep the current adjustment please save it before performing a LOAD function There...

Page 26: ...eset the vertical position to the default setting Pressing the RESET button when the V POSITION is selected will reset the V POSITION to the default setting When this function is performed on a video...

Page 27: ...be automatically adjusted And the aspect ratio will be automatically set to the default Make sure that the application window is set to its maximum size prior to attempting to use this feature A dark...

Page 28: ...ion mode HIGH MID LOW This function performs only for a video s video or component video of 525i 480i or 625i 576i signal When this function is excessive it may cause a certain degradation of the pict...

Page 29: ...rt 1 Use the buttons to select one of following ports COMPUTER IN 1 COMPUTER IN 2 HDMI QUIT 2 Use the buttons to turns the frame lock function on off TURN ON TURN OFF This item can be performed only o...

Page 30: ...esolution use the buttons to select the CUSTOM and the CUSTOM RESOLUTION box will be displayed Set the horizontal HORZ and vertical VERT resolutions using the buttons Although not all resolutions are...

Page 31: ...y be excessive This function should be used when the zoom adjustment is set to the full WIDE wide angle focus whenever possible When the projector is placed on the level about 0 this function may not...

Page 32: ...ion Detector is TURN ON and MIRROR status is changed Transition Detector Alarm 47 will be displayed when projector is restarted after the power switch is turned off STANDBY MODE Using buttons switches...

Page 33: ...buttons While QUIT is selected pressing the button returns to the previous menu 2 Select one of the audio input ports using buttons IN AUDIO IN H HDMI disables the audio output H is abbreviations of H...

Page 34: ...a screen for the temporarily blanking feature 19 It is displayed by pressing the BLANK button MyScreen ORIGINAL BLUE WHITE BLACK Feature MyScreen Screen can be registered by the MyScreen item 35 ORIG...

Page 35: ...to capture an image for use as a MyScreen image which can be used as the BLANK screen and START UP screen Display the image you want to capture before executing the following procedure 1 Selecting th...

Page 36: ...Screen This function cannot be selected when the TURN ON is selected to the MyScreen PASSWORD of SECURITY item in OPTION menu 44 MESSAGE Using the buttons turns on off the message function TURN ON TUR...

Page 37: ...imum of 16 characters 4 To change an already inserted character press the button while the cursor is on the A N row to move the cursor to the name displayed on the first line and use the buttons to se...

Page 38: ...eiling this feature will not function properly so select the TURN OFF This function will be unavailable when the Transition Detector is on 47 AUTO ON Using the buttons turns on off the AUTO ON functio...

Page 39: ...time counted after the last resetting It is shown in the OPTION menu as the usage time of the lamp Pressing the RESET button or the button displays a dialog To reset the lamp time select the RESET usi...

Page 40: ...dialogue 39 AV MUTE Turns the picture and audio on off TEMPLATE Makes the template pattern selected to the TEMPLATE item 37 appear or disappear MY SOURCE Using buttons selects the picture input port t...

Page 41: ...the buttons to disappear ghost FILTER MESSAGE Use the button to set the timer for the interval to show the message for cleaning up the air filter 50h 100h 200h 300h 400h 500h TURN OFF 800h 700h 600h...

Page 42: ...o be on If the remote control does not function correctly set this to either only 1 or only 2 12 Neither can be turned off at the same time INFORMATION Selecting this item displays a dialog titled INP...

Page 43: ...ut the ENTER PASSWORD BOX will be displayed again If incorrect PASSWORD is input 3 times the projector will turn off Afterwards the projector will turn off every time an incorrect PASSWORD is input 1...

Page 44: ...ed 2 Using the MyScreen PASSWORD Function The MyScreen PASSWORD function can be used to prohibit access to the MyScreen function and prevent the currently registered MyScreen image from being overwrit...

Page 45: ...ct TURN OFF to display the ENTER PASSWORD BOX large Enter the registered PASSWORD and the screen will return to the MyScreen on off menu If an incorrect PASSWORD is input the menu will close If necess...

Page 46: ...e is input The projector will also turn off if there is no key input for about 5 minutes while the PIN BOX is displayed This function will activate only when the projector is started after the power s...

Page 47: ...the Transition Detector Alarm will be displayed and the projector will not display the input signal Set the Transition Detector off in the SECURITY menu to display the input signal If the Transition...

Page 48: ...rrect PASSWORD is input the menu will close If necessary repeat the process from 4 3 1 4 4 If you have forgotten your PASSWORD 4 4 1 Follow the procedure in 4 1 1 to display the Transition Detector on...

Page 49: ...use the buttons to move the cursor on the character to be changed After pressing the ENTER or INPUT button the character is selected Then follow the same procedure as described at the item 2 above 4 T...

Page 50: ...ER button on the remote control or INPUT button on the projector will return to the MY TEXT PASSWORD on off menu When the PASSWORD is set for the MY TEXT The MY TEXT DISPLAY menu will be unavailable w...

Page 51: ...s not displayed when the OSD menu is active The Closed Caption is the function to display the dialogue narration and or sound effects of a television program or other video sources The Closed Caption...

Page 52: ...lamp by the handle It may make it easy to take the lamp out slightly toward the control panel of the projector 5 Insert the new lamp and retighten firmly the 2 screws of the lamp that are loosened in...

Page 53: ...the room well and make sure not to breathe the gas that comes out of the projector vents or get it in your eyes or mouth Before replacing the lamp turn the projector off and unplug the power cord the...

Page 54: ...shape cut part to the swelled part of the filter cover 5 Put the filter unit back into the projector 6 Turn the projector on and reset the filter time using the FILTER TIME item in the EASY MENU 1 Pr...

Page 55: ...wipe with gauze or a soft cloth If the projector is extremely dirty dip soft cloth in water or a neutral cleaner diluted in water and wipe lightly after wringing well Then wipe lightly with a soft dry...

Page 56: ...lease confirm the specs for your projector or the signal source specs The internal temperature is rising Please turn the power off and allow the projector to cool down at least 20 minutes After having...

Page 57: ...minutes After the projector has sufficiently cooled down please make confirmation of the following items and then turn the power on again Is there blockage of the air passage aperture Is the air filt...

Page 58: ...N Lighting In Green Alternative blinking in Red There is a possibility that the interior portion has become overcooled Please use the unit within the usage temperature parameters 5 C to 35 C After the...

Page 59: ...ounds nor pictures are outputted The signal cables are not correctly connected Correctly connect the connection cables 8 Signal source does not correctly work Correctly set up the signal source device...

Page 60: ...ging the COLOR TEMP COLOR TINT and or COLOR SPACE settings using the menu functions 21 24 28 COLOR SPACE setting is not suitable Change the COLOR SPACE setting to AUTO RGB SMPTE240 REC709 or REC601 28...

Page 61: ...20 240V 1 7A Power consumption 310 W Temperature range 5 35 C Operating Size 274 W x 59 H x 205 D mm Not including protruding parts Please refer to the following figure Weight mass approx 1 7 kg Ports...

Reviews: