background image

39

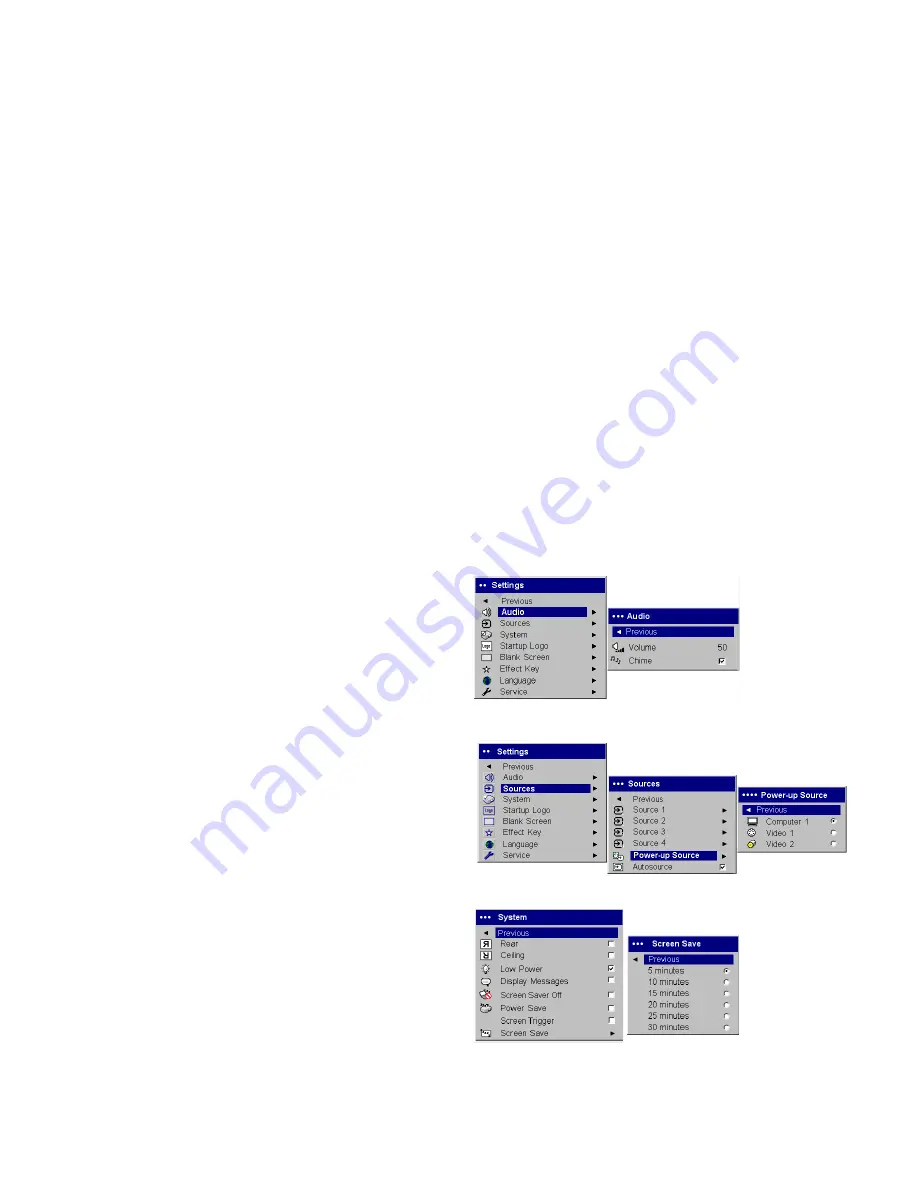
Settings menu

Audio: 

allows adjustments to Volume of the internal speaker and allows a 

chime to play when starting the projector. Adjustments can also be made 
from the projector’s keypad and the remote. 

Sources: Power-up Source 

determines which source the projector checks 

first for active video during power-up. When the 

Autosource

 feature is On, 

the projector automatically finds the active source, checking the selected 
Power-up Source first. The source options are Computer 1 for a computer, 
progressive DVD, or HDTV source, and Video 1 (for S-video connections), 
and Video 2 (for composite video connections) for video sources. When this 
feature is Off, the projector defaults to the source selected in Power-up 
Source. To display another source, you must manually select one by press-
ing the 

Computer

 or 

Video

 button on the remote or keypad.

System>Rear

: reverses the image so you can project from behind a translu-

cent screen. 

Ceiling

: turns the image upside down for ceiling-mounted pro-

jection.


Low Power

: toggles between on and off. Turn it on to lower the light 

output of the lamp. This also lowers the fan speed, making the projector 
quieter. 

Display Messages

: displays status messages (such as “Searching” or 

“Mute”) in the lower-left corner of the screen. 

Screen Saver Off

: prevents 

your computer from going into Screen Save mode. 

Power Save

: automati-

cally turns the lamp off after no signals are detected for 20 minutes. After 10 
additional minutes with no signal, the projector powers down. If an active 
signal is received before the projector powers down, the image will be dis-
played. After an additional 10 minutes with no signal, the projector powers 
down and can be toggled off. If an active signal is received before the projec-
tor powers down, the image will be displayed. When Power Save is 
enabled, Screen Save is disabled.

 Screen Trigger

 controls the 12 volt DC 

output switch on the connector panel. 

Screen Save

 automatically blanks 

the screen with a black color after no signals are detected for a preset num-
ber of minutes. The image returns when an active source is detected or a 
remote or keypad button is pressed. 

Settings menu

Audio

Power-up

Source

Sources

System menu

Screen Save

Summary of Contents for ImagePro 7300

Page 1: ...Projector USER S GUIDE USER S GUIDE PM Page 3...

Page 2: ...California to cause efects or other reproductive harm Wash hands after handling NG This product has a lamp which contains a very small amount of mercury Dispose of it as d by local state or federal or...

Page 3: ...o come file Adobe Acrobat pdf nelle seguenti lingue inglese francese tedesco italiano norvegese portoghese spagnolo russo giapponese coreano cinese tradizionale e cinese semplificato Prima di usare qu...

Page 4: ...esidential installation This equipment generates uses and can radiate radio frequency energy and if not installed and used in accordance with the instructions may cause harmful interference to radio c...

Page 5: ...mage 20 Shutting down the projector 22 Troubleshooting your setup 22 Using the remote control 30 Using the audio 31 Using the keypad buttons 32 Optimizing computer images 33 Presentation features 33 O...

Page 6: ...tup and shutdown procedures In the unlikely event of the lamp rupturing discard any edible items placed in the surrounding area and thoroughly clean the area along all sides of the projector Wash hand...

Page 7: ...and interlaced pro gressive DVD HDTV sources TV and satellite tuners camcorders video games and laser disc players IBM compatible computers including laptops up to 1024x768 resolu tion Apple Macintosh...

Page 8: ...t output while the projector is on It has numerous uses For exam ple if you connect your projection screen to the 12 volt DC output with the cable that came with your screen when you turn on the proje...

Page 9: ...rojector the desired distance from the screen The distance from the lens of the projector to the screen the zoom setting and the video format determine the size of the projected image The top illus tr...

Page 10: ...or setup information Video connections The first step for connecting video is deciding what type of output connector you want to connect to the projector If there is more than one output on your video...

Page 11: ...ction on page 18 S video connection on page 18 Not for progressive i e HDTV sources See page 11 Standard Video Camera NTSC PAL and SECAM formats Composite video or S video Composite video or S video C...

Page 12: ...age 19 M1 to Component adapter on page 19 Not for Component 480i Progressive DVD 1080i 720p Component 480p VGA Component video Computer In Computer In via optional M1 to Com ponent adapter VGA connect...

Page 13: ...stalled to use the USB feature For more information see page 16 Connect the black power cord to the Power connector on the side of the pro jector and to your electrical outlet NOTE Always use the powe...

Page 14: ...m see Using the projector with Windows 98 for the first time on page 15 regarding the driver setup process Make sure your laptop s external video port is active Many laptops do not automatically turn...

Page 15: ...See page 45 for a table listing screen sizes and distances Adjust the zoom or focus If the image is not square adjust the keystone using the buttons on the key pad Press the top Keystone button to re...

Page 16: ...alled with your Windows operating system If you are running Windows 2000 or Windows ME skip these steps and go to Adjusting the image on page 14 a Click Next to begin searching for the driver b Make s...

Page 17: ...vers must be installed to use the USB functionality The Wizard launches three times The first time it detects a USB Composite Device The second time a USB Human Interface Device for the keyboard The t...

Page 18: ...pect Ratio setting is accessed through the projector s Picture Menu See page 36 for more information What is Aspect Ratio Aspect ratio is the ratio of the image width to image height TV screens are us...

Page 19: ...or and plug the remaining red connector into the red audio in connector on the projector Keep in mind that video output from composite connections are not as high quality as S video S video connection...

Page 20: ...nnectors as described on the previous page the yellow connectors on the A V cable are not used M1 to Component adapter To connect a progressive scan DVD or HD source use an M1 to Component adapter ava...

Page 21: ...on the projection screen If it doesn t press the Video button on the keypad No image Try pressing the Source or Auto Image Get help on page 23 Adjusting the image Adjust the height of the projector b...

Page 22: ...keypad or remote Adjust the Contrast Brightness Color Tint or Aspect Ratio in the Picture menu See page 36 for help with the menus and these adjustments For Aspect Ratio keep in mind that DVD players...

Page 23: ...the projector toggle the power switch to the off position NOTE Once the projector has been toggled off you must wait for one 1 minute before turning the projector on again This allows the lamp to prop...

Page 24: ...projector s left side remove lens cap toggle power switch correct image only start up screen appears press the Computer button activate laptop s external port computer image projected toggle power sw...

Page 25: ...tton on keypad computer image projected A Signal out of range Panel Display Settings Advanced Adapter location varies by operating system you may also need to set a different resolution on your comput...

Page 26: ...rojector Start Settings Control Panel Display Settings tab select 800x600 image clear and not cropped image not centered on screen move projector adjust zoom adjust height correct image A A A For a la...

Page 27: ...ystone on keypad square image image not sharp adjust Sharpness video sources only in the Picture Advanced menu correct image image does not fit 4 3 or 16 9 screen change aspect ratio to 4 3 or 16 9 in...

Page 28: ...n Settings System menu correct image image reversed left to right turn off rear in Settings System menu correct image projected colors don t match source adjust color tint color temperature brightness...

Page 29: ...oes not play on the screen Turn off the internal LCD display on your laptop Embedded video plays correctly lamp won t turn on LED blinking red make sure vents aren t blocked turn off the projector and...

Page 30: ...29 Problem Solution Result Change lamp message appears at startup or lamp won t turn on and LED blinking red lamp must be replaced see page 42 lamp turns on LED replace lamp Startup Screen...

Page 31: ...tures and adjust values in the menus See page 35 for more info on the menus The remote also has Volume and Mute buttons to control the sound and Video and Computer buttons to switch between sources Tw...

Page 32: ...dio cable is connected Make sure mute is not active press the Mute button on the remote Make sure the volume is turned up enough Press the Volume button on the keypad or remote Make sure the correct s...

Page 33: ...ct confirms choices made in the menus page 35 Up Down arrows navigates to and adjusts settings in the menus page 35 Auto Image resets the projector to the source Presets cycles through the available p...

Page 34: ...ntations easier Here is an overview details are found in the menu section The Effect button on the remote allows you to assign various features to the button The default effect is About which displays...

Page 35: ...ect a Sharpness setting page 38 Use the Color Control to adjust the color gain page 38 Adjust the Color Temperature Select a listed warmth value page 38 Turn on Overscan to remove noise on the edges o...

Page 36: ...ose the menus Dots appears before the menu name The number of dots indicate menu s level ranging from one the Main menu to four the most nested menus The menus are grouped by usage The Picture menu pr...

Page 37: ...ensity of the image Color adjusts a video image from black and white to fully saturated color The color setting applies to video sources only Tint adjusts the red green color balance in the image of N...

Page 38: ...u can use the preset as a starting point then further cus tomize the settings for each source The settings you customize are saved in the preset for each source To restore the factory default settings...

Page 39: ...ttempts to automati cally pick the video standard based on the input signal it receives The video standard options may vary depending on your region of the world If the projector is unable to detect t...

Page 40: ...Low Power toggles between on and off Turn it on to lower the light output of the lamp This also lowers the fan speed making the projector quieter Display Messages displays status messages such as Sea...

Page 41: ...easily use the effect Highlight an effect and press Select to choose a different one Blank displays an empty screen Mute turns off all sound Aspect Ratio toggles among 4 3 16 9 and Native see page 17...

Page 42: ...gs to their default Lamp Reset resets the lamp hours used counter in the About menu to zero Do this only after changing the lamp Service Code only used by authorized service personnel About provides i...

Page 43: ...tartup If the maximum lamp time is exceeded the lamp will not light In this case after replacing the lamp you must reset the lamp hours by simultaneously pressing both Volume buttons on the keypad and...

Page 44: ...ompartment and dispose of cleaning materials Wash hands after lamp replacement This prod uct has a lamp which contains a very small amount of mercury Dis pose of it as required by local state or feder...

Page 45: ...creen every 250 hours 1 Remove the lamp housing 2 Examine the dust filter screens on the lamp housing If necessary use a vacuum cleaner set on low power to clean the screens Be careful not to disturb...

Page 46: ...Explanation One 1 blink The lamp won t strike after five 5 attempts Check the lamp and lamp door installations for loose connections Two 2 blinks The lamp counter hours have exceeded lamp life hours R...

Page 47: ...mperature 38 compatibility IBM compatible 6 Macintosh 6 video devices 6 Computer In connector 12 connecting video device 17 connector panel 7 connectors on projector 10 11 Contrast 36 customizing the...

Page 48: ...es 33 Presets 37 projection distance 8 projector connecting video devices 17 connector panel 7 customization 34 keypad buttons 32 maintenance 42 positioning 8 setting up 8 troubleshooting problems 22...

Page 49: ...ting 22 turning off projector 22 TV tuner 17 U USB connecting 12 Using 30 V Vertical 38 video optimizing 34 Video Standard 38 volume adjustment 21 Volume button 31 W Windows 2000 16 Windows 98 15 Wind...

Reviews: