background image


English- 

35


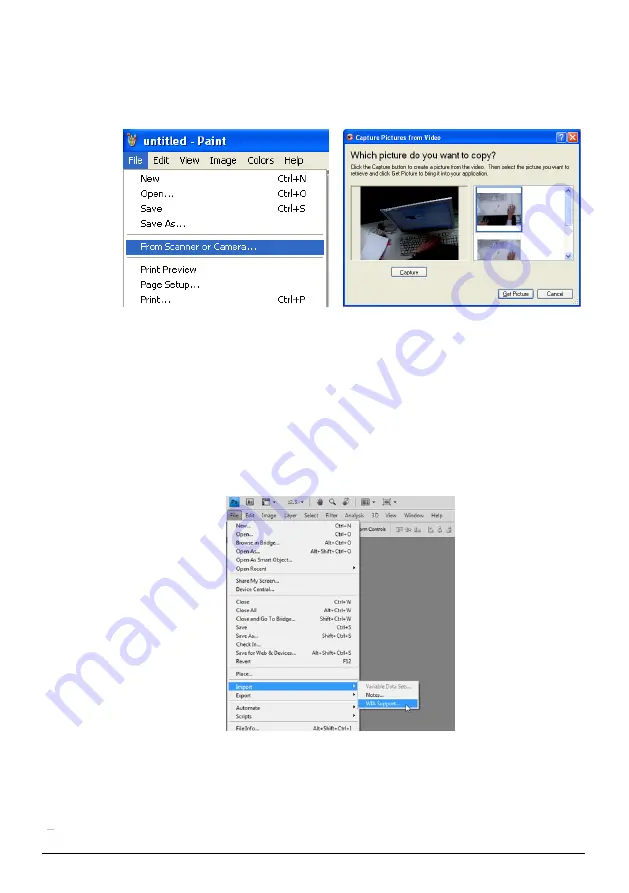
7.26.1  I would like to insert a photo in MS-Paint 

1.  Click [File/From Scanner or Camera]


in MS-Paint as shown in the 

bottom left figure. 


2.  Click [Capture] to get the live images, as shown in the top right figure. 

3.  Click the image as shown in the right side of the top right figure. 

4.  Click [Get Picture]. It will capture the photo of live image. 

<Remark> Support Windows XP Operation System only. 


7.26.2  I would like to insert photos in Photoshop 

1. Click [File/Read-in/WIA-USB Video Device] in 

Photoshop


2. Click [Capture], and click the image as shown in the right side of the 

figure below. Then click [Get Picture]. 

Summary of Contents for DVP510B

Page 1: ...Document Camera User Manual DVP510B VISUAL PRESENTER DVP510B User Manual ...

Page 2: ... Computer or DVD 10 4 6 Connecting to a computer projector and monitor simultaneously 11 4 7 Connecting to Audio Input and Output 11 4 8 Connecting to a computer with RS232 12 4 9 Connecting to a TV 12 4 10 Installing application software 13 Chapter 5 Start Using 14 Chapter 6 Control Panel Remote Control and Setting Menu 16 6 1 Functions of control panel and remote control 16 6 2 Setting menu 18 C...

Page 3: ...elete the stored images whenever it is turned off Auto Erase 29 7 18 I would like to enlarge a part of the image PAN 29 7 19 I would like to use the MASK and Spotlight function 30 7 20 I would like to play the slides Slide Show 31 7 21 I would like to compare images compare live images with stored image files PIP 32 7 22 I would like to reduce the image noise Projector Type 32 7 23 I would like to...

Page 4: ...ithout prior notice The information in this file is subject to change without prior notice To fully explain or describe how this product should be used this manual may refer to names of other products or companies without any intention of infringement Disclaimer of warranties Dukane is neither responsible for any possible technological editorial errors or omissions nor responsible for any incident...

Page 5: ...a damp cloth for cleaning Do not use liquid or aerosol cleaners 11 Do not block the slots and openings in the Document Camera case They provide ventilation and prevent the Document Camera from overheating Do not place the Document Camera on a sofa rug or other soft surface or in a built in installation unless proper ventilation is provided 12 Never push objects of any kind through cabinet slots Ne...

Page 6: ... cause electric shock This symbol indicates that there are important operating and maintenance instructions in this User Manual with this unit FCC Warning This Document Camera has been tested and found to comply with the limits for a Class A computer device pursuant to Article 15 J of FCC Rules These limits are designed to provide reasonable protection against harmful interference in a commercial ...

Page 7: ...2 Package Contents DVP510B Quick Start Guide Remote control Remote Control Holder Power Adapter Power cord USB cable VGA cable Appearance may vary depending on country region Audio Cable C Video Cable Microscope Adapter ...

Page 8: ...w 3 1 Relative Operation Position 1 Lens 2 Remote sensor 3 Remote Control Holder 4 Camera arm 5 Auxiliary floodlight and lamp arm 6 DIP switch setting 7 Input output port 8 Backlight 9 Control panel Projector Computer 5 1 5 8 6 4 7 3 9 2 ...

Page 9: ...English 8 Chapter 4 Installation and Connections 4 1 System diagram Computer Projector or monitor HDTV TV Projector or monitor 或營幕 Speaker Computer Computer Computer DVD or Computer 或營幕 ...

Page 10: ...ecting to a projector or monitor 4 4 Connecting to a Computer and Use Dukane Software or an Interactive Whiteboard IWB The driver and software can be downloaded from Dukane website Power Adapter AC outlet Computer Projector USB cable Power cord VGA cable Power Adapter USB cable Power cord AC outlet VGA cable Monitor or projector ...

Page 11: ...nglish 10 4 5 Connecting to an HDTV 4 6 For connection to Computer or DVD HDTV Power cord AC outlet HDMI cable Power Adapter HDTV Power cord AC outlet HDMI cable Power Adapter HDMI cable DVD or Computer ...

Page 12: ... VGA 1 setting refer to 7 2 I would like to switch image sources For VGA 2 setting refer to 7 3 I would like to set the image source of VGA OUT2 4 8 Connecting to Audio Input and Output VGA cable Computer Monitor Projector VGA cable Power cord AC outlet VGA cable Power Adapter Speaker Computer Power cord AC outlet Power Adapter ...

Page 13: ...DVP510B 4 10 Connecting to a TV NTSC USA Canada Mexico Panama Chile Japan Taiwan Korea and Philippines PAL Countries regions not listed above Note You should unplug and reconnect the power cord and then RS232 Cable Computer Power cord AC outlet Power Adapter DIP switch setting C Video Cable Power cord AC outlet Power Adapter ...

Page 14: ...n C Video output mode 4 11 Installing application software The application software installed on the computer enables you to Control the DVP510B Capture and record images Annotate the image highlight important details and save it Support the full screen function Note Please refer to Podium View software user manual for installation steps and software operation ...

Page 15: ...e lamp arm to a proper position 3 Place an object to be displayed under the camera 4 Press POWER on the remote control or control panel to power on 5 Press control panel AUTO TUNE button to optimize the image You are ready to present 6 Each time the camera head is moved press AUTO TUNE on the remote control or control panel to refocus the lens Note According to your request you can adjust the came...

Page 16: ...ote control aim at the remote sensor on the DVP510B and press the power button Once DVP510B is turned on the LED on the control panel will flash a few times and stay lit Please contact your distributor if the LED does not light up ...

Page 17: ...s of the image Remote control Control panel CAPTURE DEL Capture and save images to USB disk priority or internal memory while displaying live images Delete files from the USB disk priority or internal memory while reading the stored files in Playback mode Remote control Control panel ENTER Activate Enter functions Remote control Control panel FREEZE Freeze the current image to remain temporarily o...

Page 18: ...s to USB disk and press Record again to stop recording Remote control Control panel ROTATE Screen rotation 0 180 Flip Mirror Remote control SOURCE 1 Switch between different image sources of VGA OUT 1 and HDMI OUT 1 Live images default 2 VGA IN HDMI IN Remote control Control panel SOURCE 2 Switch between different image sources of VGA OUT 2 VGA Out VGA OUT 1 VGA IN Control panel ZOOM Increase or d...

Page 19: ... or internal memory in slide mode PAN Enable Disable the partial enlarged mode Manual Focus Manual Focus LAMP Lamp mode toggle switch Rotate Screen rotation 0 180 Flip Mirror PIP Image comparison to compare live images with stored image files Settings Set up various functions Brightness Adjust the brightness of the image Photo Text Select Photo Text Gray Mode Mask Activate the mask mode Zoom Incre...

Page 20: ...ge Quality 1 High 2 Medium 3 Low Use the left and right arrow keys to select the image quality for the captured images and recorded videos Storage Slide Show Enter Show the photos or videos stored in the USB disk priority or internal memory in slide mode Delay 1 0 5 sec 2 1 sec 3 3 sec 4 5 sec 5 10 sec 6 Manual Use the left and right arrow keys to select the delay time Select manual mode to switch...

Page 21: ...educe image noise Digital Zoom On Off Use the left and right arrow keys to turn on off digital zoom Advanced Language 1 English 2 繁體中文 3 简体中文 4 Deutsch 5 Français 6 Español 7 Русский 8 Nederlands 9 Suomi 10 Polski 11 Italiano 12 Português 13 Svenska 14 dansk 15 ČESKY 16 العربية 17 日本語 18 한국의 19 ελληνικά English Traditional Chinese Simplified Chinese German French Spanish Russian Dutch Finnish Poli...

Page 22: ...left and right arrow keys to select and then confirm by pressing ENTER to restore the factory defaults Firmware Version NA Display FW version 6 2 3Mask mode setting menu 2 nd Level Major Items 3rd Level Minor Items 4 th Level Adjustment Values Function Descriptions MASK Mode Live Enter Press ENTER to return to live image Transparency 0 2 3 Use the left and right arrow keys to adjust the transparen...

Page 23: ... Use the left and right arrow keys to adjust the height of the spotlight zone H Size 0 A Max Use the left and right arrow keys to adjust the width of the spotlight zone Exit Enter Press ENTER to confirm your selection and exit the spotlight mode setting menu 6 2 5Splash Screen Setting 2 nd Level Major Items 3rd Level Minor Items 4 th Level Adjustment Values Function Descriptions Splash Screen Sett...

Page 24: ...menu of the annotation tool 2 nd Level Major Items 3rd Level Minor Items 4 th Level Adjustment Values Function Descriptions Tools Select Pen Line Ellipse Rectangle Select an annotation tool Color Select Red Blue Black Green Pink Whit e Cyan Yellow Select the pen color Line Width 1 3 10 Select the line width Tools Select Pen Line Ellipse Rectangle Select an annotation tool Color Select Red Blue Bla...

Page 25: ...source of VGA OUT2 The default of image source is based on VGA OUT 1 Press SOURCE 2 on the control panel to have DVP510B switch among the following images sources 1 VGA OUT 1 2 VGA IN 7 4 I would like to switch the image mode Use the remote control or control panel 1 Press MENU to activate the setting menu 2 Press or to select Image Mode 3 Press or to the Normal Film Slide Microscope 4 Press MENU ...

Page 26: ...would like to zoom in out images 1 Press ZOOM on the remote control or control panel to zoom in images 2 Press ZOOM on the remote control or control panel to zoom out images 7 7 I would like to use the manual focus Use the remote control or control panel 1 Press MENU to activate the setting menu 2 Press or to select Manual Focus 3 Press MENU to exit 7 8 I would like to adjust the brightness If you...

Page 27: ...xit 7 12I would like to capture images 7 12 1 Capture and save images 1 Press CAPTURE DEL on the remote control or control panel to capture and save images You cannot capture images when the capture mode is set to Disable If it is set to Continuous you can capture images continuously Press CAPTURE DEL to start capturing continuously or press CAPTURE DEL again to exit To change the quality of captu...

Page 28: ...re Interval Press or to set interval time 9 Press MENU to exit 7 13I would like to record images Note Connect USB disk to DVP510B to start recording images 7 13 1 Recording motion images Remark You may not be able to capture or record images when Capture Image mode is set to Disable Use the remote control or control panel 1 Press RECORD on the remote control to start recording images 2 Record soun...

Page 29: ...is changed to image recording 7 13 4 Playing images For playing videos please refer to 7 14 I would like to view captured recorded images 7 14I would like to view captured recorded images 1 Press PLAYBACK on the remote control or control panel to display thumbnails of all stored files 2 Press or to select the thumbnail you want to play 3 Press ENTER to play 4 When the video is played press FREEZE ...

Page 30: ...quipment only Adjust the volume of the video 1 In PLAYBACK mode Press or to adjust the volume of the video 7 17I would like to automatically delete the stored images whenever it is turned off Auto Erase Use the remote control or control panel 1 Press MENU to activate the setting menu 2 Press or to select Setting 3 Press ENTER to activate 4 Press or to the Advanced menu 5 Press or to Auto Erase 6 P...

Page 31: ...again to return to live image Use control panel 1 Press MENU to activate the setting menu 2 Press or to select Mask Press ENTER to activate mask mode or select Spotlight and press ENTER to activate spotlight mode 3 Press or to move the zone position 4 Press MENU to activate the image OSD menu 5 Press or to select Live Image 6 Press ENTER to return to live image 7 19 2 I would like to set the size ...

Page 32: ...ide Show 7 20 1 Setting delay time 1 Press MENU on the remote control or control panel to activate the setting menu 2 Press or to select Setting 3 Press ENTER to activate 4 Press or to the Storage menu 5 Press to find Delay 6 Press or to select the delay time between 0 5 sec 1 sec 3 sec 5 sec 10 sec Manual 7 Press MENU to exit 7 20 2 Playing Pausing Stopping the slide show Note Upper limit The max...

Page 33: ...exit Control panel 1 Press MENU to activate the setting menu 2 Press or to select PIP 3 Press ENTER to activate image comparison 4 Press or to move the live image 5 Press MENU to exit 7 22I would like to reduce the image noise Projector Type 1 This function enables Document Camera to automatically clear image noise The noise is especially obvious when Document Camera is connected to a DLP projecto...

Page 34: ...EG format 1 Press MENU on the remote control or control panel to activate the setting menu 2 Press or to select Setting 3 Press ENTER to activate 4 Press or to select Advanced menu 5 Press to select Power On Image Setting 6 Press ENTER to activate 7 Press or to select Power On Image Setting and press or to select Default Customer 8 Press or to select Power On Logo Show time and press or to set up ...

Page 35: ...setting menu 2 Press or to select Setting 3 Press ENTER to activate 4 Press or to select Advanced menu 5 Press to select Factory Reset 6 Press or to select Yes 7 Press ENTER to execute 7 25 2 Use Compound Key 1 Use the control panel and press ENTER MENU simultaneously to restore the initial value Note Before using the compound keys please remove all VGA IN devices 7 26Computer related functions En...

Page 36: ...p right figure 3 Click the image as shown in the right side of the top right figure 4 Click Get Picture It will capture the photo of live image Remark Support Windows XP Operation System only 7 26 2 I would like to insert photos in Photoshop 1 Click File Read in WIA USB Video Device in Photoshop 2 Click Capture and click the image as shown in the right side of the figure below Then click Get Pictu...

Page 37: ...English 36 ...

Page 38: ...cope adapter accessories are applicable to eyepieces of Ø 28 mm Ø 31 mm Ø 33 mm and Ø 34 mm 2 The lens of DVP510B connects with the microscope adapter For eyepieces of Ø 33 mm or Ø 34 mm only fit one microscope adapter with the greatest diameter For eyepieces of Ø 28 mm or Ø 31 mm fit one microscope adapter with the greatest diameter along with another appropriate one ...

Page 39: ...e control panel to activate the auto focus 5 Digital zoom 5 1 If you use the remote control or the control panel 5 1 1 Press MENU to enter the setting menu 5 1 2 Press or to the Control 5 1 3 Press to select Digital Zoom 5 1 4 Press or to the On 5 1 5 Press ZOOM ZOOM Note Please reset to normal mode after using the microscope otherwise you are unable to use zoom in out function 1 Press MENU on the...

Page 40: ... the remote control back to the holder 2 Fold back the camera head to align with the arm 3 Turn the two lamp arms and the arm of camera head down and adjust them to be parallel with the platform 4 Finally fold the machine as in the following figure ...

Page 41: ...and then restart the DVP510B for all DIP switch settings to take effect 10 1 Connecting to a projector or monitor 10 1 1 XGA 60 Hz output default values XGA 50 Hz output 10 1 2 SXGA 60Hz output SXGA 50Hz output 10 1 3 WXGA 60Hz output WXGA 50Hz output 10 1 4 1080P 60Hz output 1080P 50Hz output ...

Page 42: ...Connecting to a TV DVD 10 2 1 NTSC USA Taiwan Panama Philippines Canada Chile Japan Korea and Mexico 60Hz 50Hz 10 2 2 PAL Countries regions not listed above 60Hz 50Hz Remark VGA is not supported once C VIDEO is enabled ...

Page 43: ...on the remote control or control panel Or pull away the distance between document and lens then press AUTO TUNE to activate auto focus 4 The image is incomplete Check the Auto Image setting of your projector Please refer to the user manual of the projector or check for the DIP switch setting 5 Dukane Document Camera B Works 2 and other applications cannot be used simultaneously Dukane Document Cam...

Page 44: ...of your machine is up to date 1 Please go to Dukane s official website to check whether the latest version is available for update www dukane com av 2 The steps to check the FW version are as below 2 1 Press MENU on the remote control or control panel to activate the setting menu 2 2 Press or to select Setting 2 3 Press ENTER to activate 2 4 Press or to select Advanced menu 2 5 View Firmware Versi...

Page 45: ... not available through USB 13 The output image is not clear with water ripples Please refer to the Appendix 1 in the manual to confirm the applicable voltage frequency and reset it according to the instruction in Chapter 10 DIP Switch Setting ...

Page 46: ...Salvador 60 Iran 50 Bolivia 50 Equatorial Guinea 50 Iraq 50 Botswana 50 Ethiopia 50 Ireland 50 Brazil 50 60 Faeroe Island 50 Isle of Man 50 Bulgaria 50 Fiji 50 Israel 50 Burma 50 Finland 50 Italy 50 Burundi 50 France 50 Ivory Coast 50 Cambodia 50 French Guiana 50 Jamaica 50 Cameroon 50 Gabon 50 Japan 50 60 Canada 60 Gambia 50 Jordan 50 CanaryIslan d 50 Germany 50 Kenya 50 Central Africa Rep 50 Gha...

Page 47: ...a 50 60 USSR 50 Monaco 50 Scotland 50 United Kingdom 50 Montserrat 60 Senegal 50 Upper Volta 50 Morocco 50 Sierra Leone 50 Uruguay 50 Mozambique 50 Singapore 50 Venezuela 60 Nepal 50 Somalia 50 Viet Nam 50 Netherlands 50 South Africa Rep 50 Virgin Island 60 New Caledonia 50 Spain 50 Western Samoa 50 New Zealand 50 Sri Lanka 50 Yeman Aden 50 Nicaragua 60 Sudan 50 Yemen Arab 50 Niger 50 Surinam 60 Y...

Reviews: