5
LED signals
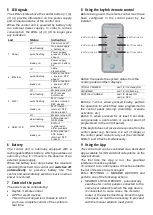
The LEDs visible above the central button (1) (2)
(3) (4) provide information on the power supply
and connection status of the control unit.
When the control unit is powered by battery only
(no external power supply), in order to reduce
consumption, the LEDs (2) (3) (4) no longer give
any indication.
Led
Status
Indication
1 Power
off
Panel turned off
slow flashing
No power supply
+ battery ok
quick flashing
Power supply
p battery
absent
steady on
Power supply
p battery
ok
2 Ethernet
off
cable
disconnected
quick flashing
cable connected
+ internet / P2P
absent
steady on
cable connected
+ internet / P2P
present
3 Wi-Fi
off
Module turned off
slow flashing
Wi-Fi access
point mode
quick flashing
Wi-Fi router
mode + internet /
P2P absent
steady on
Wi-Fi
internet / P2P
mode present
4 GSM / LTE
off
Module turned off
slow flashing
SIM registered /
GSM mode
quick flashing
SIM not
registered or
other problems
steady on
SIM registered /
LTE mode +
internet / P2P
present
6
Battery
The control unit is internally equipped with a
rechargeable lithium battery, which guarantees an
autonomy of up to 15 hours in the absence of an
external power supply.
When the battery level drops below the minimum
operating threshold, the control unit
switches off
automatically
, to preserve battery life. The
control unit automatically switches back on when
power is restored.
7
Control of the panel
The panel can be controlled by:
•
Keyfob / remote control
•
APP for smart devices
This is the privileged tool, thanks to which
you have complete control of the system in
real time.
8
Using the keyfob /remote control
Before being used, the remote control must have
been configured in the control panel by the
installer.
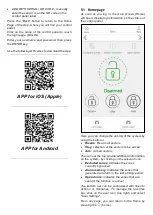
Button 6 requests the system status from the
control panel and then displays:
TOTALLY ARMED
Led 1/2/3/4 steady ON
DISARMED
Led 1/2/3/4 flashing
PARTIALLY ARMED
Led 1/2 steady ON
Led 3/4 OFF
Buttons 1-2-3-4, when pressed briefly, perform
the operation for which they were programmed in
the control panel (arming, disarming, scenario
activation, etc)
Button 5, when pressed for at least 5 seconds,
can generate a panic alarm or a silent alarm (if
programmed in the control panel)
If the keyfob does not receive a response from the
control panel (e.g. because it is out of range) or
the control panel cannot carry out the command,
LEDs 5 and 6 flash simultaneously
9
Using the App
The control unit can be controlled via a dedicated
App available for IOS and Android systems on the
relevant stores.
The first time the App is run, the graphical
interfaces must be updated.
To connect to a control panel, it must be added to
the list of devices to be managed.
Enter SETTINGS -> MANAGE DEVICES and
perform one of the following actions:
•
SEARCH LOCAL DEVICES - automatically
searches for control panels connected to the
same local network to which the App device
is connected. In some cases, the modem /
router or the device itself may block this type
of request, so it will be necessary to proceed
with the manual addition (next point)
LED 1
LED 3
LED 5
LED 2
LED 4
LED 6


