Contatto
ModDALI
Groups
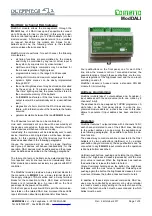
This tab features a grid where each ballast, on the selected
line, can be assigned to one or more groups. This choice
can be done by clicking on each cell located at the inter-
section between the desired ballast (the columns) and the
desired group (the rows). A X
symbol will be shown in the
related cell.
In the example of the figure
on this side, the group 1 con-
tains the ballasts 1-2-5, the
group 2 the ballasts 1-3 and
the group 3 the ballasts 2-4-5.
The button Deselect remove all the X symbols on the grid.
The execution of the assignment of the groups (clicking on
the button Start) will take in account only the ballast dese-
lected by the X symbol. A timer icon will inform that the op-
eration is running. At the end of the procedure, the normal
mouse icon will be restored.
The time required by this procedure is about:
T = 8sec + (0,5sec x “nr. of X in the window”)
If the procedure has not been successfully executed, a
warning message will be shown; in this case the procedure
has to be repeated.
The correctness of the changes made can be checked by
switching on and off the ballasts using the buttons identified
as 0 (off) and I (on); the buttons on the top side act on the
single ballast, the buttons on the left side act on the groups
and the two big buttons 0 and I switch off and on all the bal-
last on that line.
The buttons From File and To File allow to store and recall
the settings of the groups; take in account that it is not pos-
sible to read, from ModDALI module, the current settings of
the groups, therefore it is strongly recommended to save
them into a file for future modifications.
Global Settings
In this tab it is possible to set, for all ballasts on the select-
ed line, the following parameters:
MIN
: minimum brightness value (0-100%); enabling the Re-
set check box, the default value will be restored (1%).
MAX
: maximum brightness value (0-100%); enabling the
Reset check box, the default value will be restored (100%).
BUS F.
: the brightness value (0-100%) to be recalled by
ballasts during bus failure conditions on
Contatto
and/or
DALI bus; the value 101 means that the outputs will keep
the last value .
Ramp
: the ramp value in seconds.
Pwr On
: the brightness value (0-100%) to be recalled by
ballasts at their power up; the value 101 means that the
value outputted before the power off will be recalled.
Preset
: writing a value (0 to 100) and clicking on the button
on the right side, the brightness will be forced to that value.
M1
¸
M16
: the value to be loaded into the 16 presets; the
button on the right side allows to recall the related preset
stored into the ballast.
Enter in this tab the desired parameters and then click on
Start to send the configuration. A timer icon will inform that
the operation is running. The time required by this proce-
dure is about 15 seconds. If the procedure has not been
successfully executed, a warning message will be shown;
in this case the procedure has to be repeated.
Status
DUEMMEGI
s.r.l. - Via Longhena, 4 - 20139 MILANO
Tel. 02/57300377 - Fax 02/55213686 –
www.duemmegi.it
Rel.: 2.4 October 2017
Page 7 of 9


