background image

4. USE OF YOUR PRODUCT

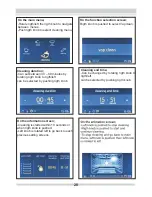
On the animation screen;

-Left knob is pushed to stop cooking
-Rigth knob is pushed to start and continue cooking.
To stop cooking and go back to main menu, left knob is pushed, then left knob is rotated
 to left.       

Favorites :

At the end of the cooking in the manuel cooking menu where cooking duration is set by 
user, a question as “save to favories” is displayed on the screen. With the help of this, 
user can save her/his own cooking settings and repeat the same cooking at any time.

To create the any favorite cooking setting, edit function beneath the favorites menu can 
be used.

To start any favorite function which is set by user, below listed steps should be followed.

On the main menu;

-Rotate rigth/left the rigth knob to
navigate between menus.
-Push rigth knob to select menu. 

Favorites;

-Can be changed by rotating rigth knob to
rigth/left.
-Can be selected by pushing rigth knob. 
-Ýnformation about settings of the selected
favorite is displayed at the below list.

16

Summary of Contents for OE-V01RC

Page 1: ...INSTALLATION USER INSTRUCTIONS READY COOK BUILT IN OVEN OE V02RC OE V02RC OE V01RC OE V01RC ...

Page 2: ...uality Your manual is prepared in order to help you to use your appliance that is manufactured by the most recent technology with confidence and maximum efficiency Before use of your appliance carefully read this guide that includes the basic information for right and safe installation maintenance and use Contact to the nearest Authorized Service for mounting of your product ...

Page 3: ...Contents 1 Presentation and size of product 2 Warnings 3 Preparation for installation and use 4 Using the oven 5 Cleaning and maintenance of your product 6 Service and Transport ...

Page 4: ... panel 2 Handle 3 Oven Door 4 Child Lock 5 Tray 6 Lower Heating Element behind the plate 7 Upper Heating Element behind the plate 8 Wire Grill 9 Racks 10 Oven Light 11 Turbo Heating Element behind the plate 12 Fan behind the plate 13 Air Outlet Shutters Built In Oven 1 ...

Page 5: ...xperience and knowledge if they have been given supervision or instruction concerning use of the appliance in a safe way and understand the hazards involved Children shall not play with the appliance Cleaning and user maintenance shall not be made by children without supervision WARNING The appliance and its accessible parts become hot during use Care should be taken to avoid touching heating elem...

Page 6: ... be made only by authorized service technicians Installation and repair work that is carried out by unauthorized technicians may endanger you It is dangerous to alter or modify the specifications of the appliance in any way Prior to installation ensure that the local distribution conditions nature of the gas and gas pressure or electricity voltage and frequency and the requirements of the applianc...

Page 7: ... oven get hot While opening the oven door step back to avoid the hot steam coming out of the oven There may be a risk of burns Do not put flammable or combustible materials in or near the appliance when it is operating Always use oven gloves to remove and replace food in the oven Do not leave the cooker while cooking with solid or liquid oils They may catch fire on condition of extreme heating Nev...

Page 8: ...o pay attention to when choosing a place for your oven Make sure to take into account our recommendations below in order to prevent any problems and dangerous situations which might occur later When choosing a place for the oven attention should be paid that there are no flammable or combustible materials in the close vicinity such as curtains oil cloth etc which quickly catch fire Furnitures surr...

Page 9: ...3 2 INSTALLATION OF BUILT_IN OVEN 6 ...

Page 10: ... cable must be connected via the screw with the earthing mark Supply cable connection must be as shown in Figure 6 If there is no earthed outlet conforming to regulations in the installation environment call theAuthorized Service immediately The earthed outlet must be in close vicinity of the appliance Never use an extension cord The supply cable should not contact the product s hot surface In cas...

Page 11: ...trong 10 phút trước khi nướng và tốt nhất để thực phẩm chín đều khi dùng chức năng này ta nên nướng 1 khay Nướng bề mặt trên dưới Dùng để rãđông thịt lợn thịt gia cầm bánh mỳ vàbánh ngọt Quạt bên trong lò giúp đưa nhiệt đồng đều xung quanh thực phẩm Để sử dụng chức năng rãđông lấy thức ăn đông lạnh vàđặt nó trong ngăn lò ở khay thứ 3 từ dưới lên Nên đặt một khay nướng dưới thực phẩm rãđông Chức nă...

Page 12: ...id Always place a tray beneath to catch any drips of oil or fat It is recommended to pre heat the oven about 10 minutes Warning When grilling the oven door must be closed and the oven temperature should be adjusted 0 to190 C Grill Fonksiyonu Faster Grilling Function The oven s thermostat and warning lights will be turned on the grill and upper heating elementswillstartoperating The function is use...

Page 13: ...f oven Lightly brush the wire grid with oil to stop foods sticking and place foods in the center of the grid Always place a tray beneath to catch any drips of oil or fat It is recommendedtopre heattheovenabout10minutes Warning When grilling the oven door must be closed and the oven temperature should be 0 adjustedto190 C Vap Clean Function Using a lid will reduce cooking times Minimize the amount ...

Page 14: ...4 1 Ready Cook Knob Controls 11 ...

Page 15: ...an be changed by rotating rigth knob to rigth left Can be selected by pushing rigth knob Temperature Can be changed by rotating rigth knob to rigth left Can be selected by pushing rigth knob Boost Can be activated or inactivated by rotating rigth knob to rigth left Can be set by pushing rigth knob 4 USE OF YOUR PRODUCT 12 ...

Page 16: ... stops manualy Cooking end time Can be changed by rotating rigth knob to rigth left Can be selected by pushing rigth knob On the information screen Cooking is started within 10 seconds or when rigth knob is pushed Left knob is rotated left to go back to each previous setting screen On the animation screen Cooking time Temperature Cooking start end time Cooking function information is displayed 13 ...

Page 17: ... by user every cooking settings like cooking function duration temperature is set by Ready cook automaticaly To perform cooking with auto cooking menu below mentioned steps should be followed On the main menu Rotate rigth left the rigth knob to navigate between menus Push rigth knob to select menu Food categories Can be changed by rotating rigth knob to rigth left Can be selected by pushing rigth ...

Page 18: ...ft Can be selected by pushing rigth knob Cooking end time Can be changed by rotating rigth knob to rigth left Can be selected by pushing rigth knob On the information screen Cooking is started within 10 seconds or when rigth knob is pushed Left knob is rotated left to go back to each previous setting screens To achive best cooking performance tray should placed to displayed shelf 15 ...

Page 19: ...en With the help of this user can save her his own cooking settings and repeat the same cooking at any time To create the any favorite cooking setting edit function beneath the favorites menu can be used To start any favorite function which is set by user below listed steps should be followed On the main menu Rotate rigth left the rigth knob to navigate between menus Push rigth knob to select menu...

Page 20: ...th knob On the information screen Cooking is started within 10 seconds or when rigth knob is pushed Left knob is rotated left to go back to each previous setting screens To achive best cooking performance tray should placed to displayed shelf On the animation screen Left knob is pushed to stop cooking Rigth knob is pushed to start and continue cooking To stop cooking and go back to main menu left ...

Page 21: ... rotating rigth knob to rigth left run edit can be navigated Edit can be selected by pushing rigth knob Oven function Can be changed by rotating rigth knob to rigth left Can be selected by pushing rigth knob Temperature Can be changed by rotating rigth knob to rigth left Can be selected by pushing rigth knob Boost Can be activated or inactivated by rotating rigth knob to rigth left can be set by p...

Page 22: ...ted by pushing rigth knob Oven shelf Can be changed by rotating rigth knob to rigth left Can be selected by pushing rigth knob To achive smae cooking performance at each cooking oven shelf information is important Cleaning With Vapclean function dried food leftovers inside the oven cavity is softened with vapor To perform Vapclean a glass of vater is poured into the oven shelf which will be placed...

Page 23: ...gth left can be selected by pushing rigth knob Cleaning end time Can be changed by rotating rigth knob to rigth left can be selected by pushing rigth knob On the function selection screen Rigth knob is pushed to select Vapclean On the information screen Cleaning is started within 10 seconds or when rigth knob is pushed Left knob is rotated left to go back to each previous setting screens 20 ...

Page 24: ...he settings menu date time screen brigthness buzzer tone language options can be set On the main menu Rotate rigth left the rigth knob to navigate between menus Push rigth knob to select settings menu On the date menu Date can be changed by rotating rigth knob Date can be set by pushing rigth knob Date is set in order of month day year On clock menu Can be navigated by roatating rigth knob Time ca...

Page 25: ...On the software version menu Only software version is displayed as information 22 ...

Page 26: ...or to avoid changing settings of the oven unintentionally To activate or inactivate the key lock left knob is rotated left for 3 seconds When key lock is activated only ON OFF button can be activated but other buttons are not 23 ...

Page 27: ...ity and make sure that it completely leans on the frame and fits in motor shaft To do this first you have to turn the lid to the side which is found in front of the skewer insertion hole as shown in the figure After that fit the skewer fit the skewer onto the skewer grid which you will place on the third rack Remove the handle from skewer if it is installed and close the oven door The handle must ...

Page 28: ...WARNING Fit the grid correctly into any correspondent rack in the oven cavity and push it to the end Telescopic rails Removal of wire shelf 1 2 Removal of catalitic panel 25 ...

Page 29: ...re to unplug the oven before starting to clean it You will obtain best results if you clean the oven interior while the oven is slightly warm Wipe your oven with a soft piece of cloth dampened with soap water after each use Then wipe it again this time with a wetted cloth and wipe it dry A complete cleaning using dry and powder type cleaners For product with catalytic enamel frames the rear and si...

Page 30: ...you still have any problem with your product please call to the Authorized Service 6 2 INFORMATION RELATED TO TRANSPORT If you need any transport Keep the original case of product and carry it with its original case when need to be carried Follow the transport signs on case Tape the cooker on upper parts hats and heads and saucepan carriers to the cooking panels Place a paper between the upper cov...

Page 31: ...entional kWh cycle 0 98 Energy consumption electricity fan forced kWh cycle 0 87 Number of cavities 1 Heat Source ELECTRIC Volume l 65 This oven complies with EN 60350 1 Energy Saving Tips Oven Cook the meals together if possible Keep the pre heating time short Do not elongate cooking time Do not forget to turn off the oven at the end of cooking Do not open oven door during cooking period ...

Page 32: ...entional kWh cycle 0 98 Energy consumption electricity fan forced kWh cycle 0 87 Number of cavities 1 Heat Source ELECTRIC Volume l 65 This oven complies with EN 60350 1 Energy Saving Tips Oven Cook the meals together if possible Keep the pre heating time short Do not elongate cooking time Do not forget to turn off the oven at the end of cooking Do not open oven door during cooking period ...

Page 33: ...ential negative consequences for the environment and human health which could otherwise be caused by inappropriate waste handling of this product For more detailed information about recycling of this product please contact your local city office your household waste disposal service or the shop where you purchased the product 52204699 Declaration of conformity We declare that our products meet the...

Reviews: