Dual XDVD9101 Installation & Owner'S Manual Download Page 36

XDVD9101

 OPERATION

35

DVD Setup - Touch Screen Controls

There are several hidden TOUCH SCREEN areas as outlined below:

"A" area can be used in DVD, AUX 1 and AUX 2 modes to access MAIN menu.

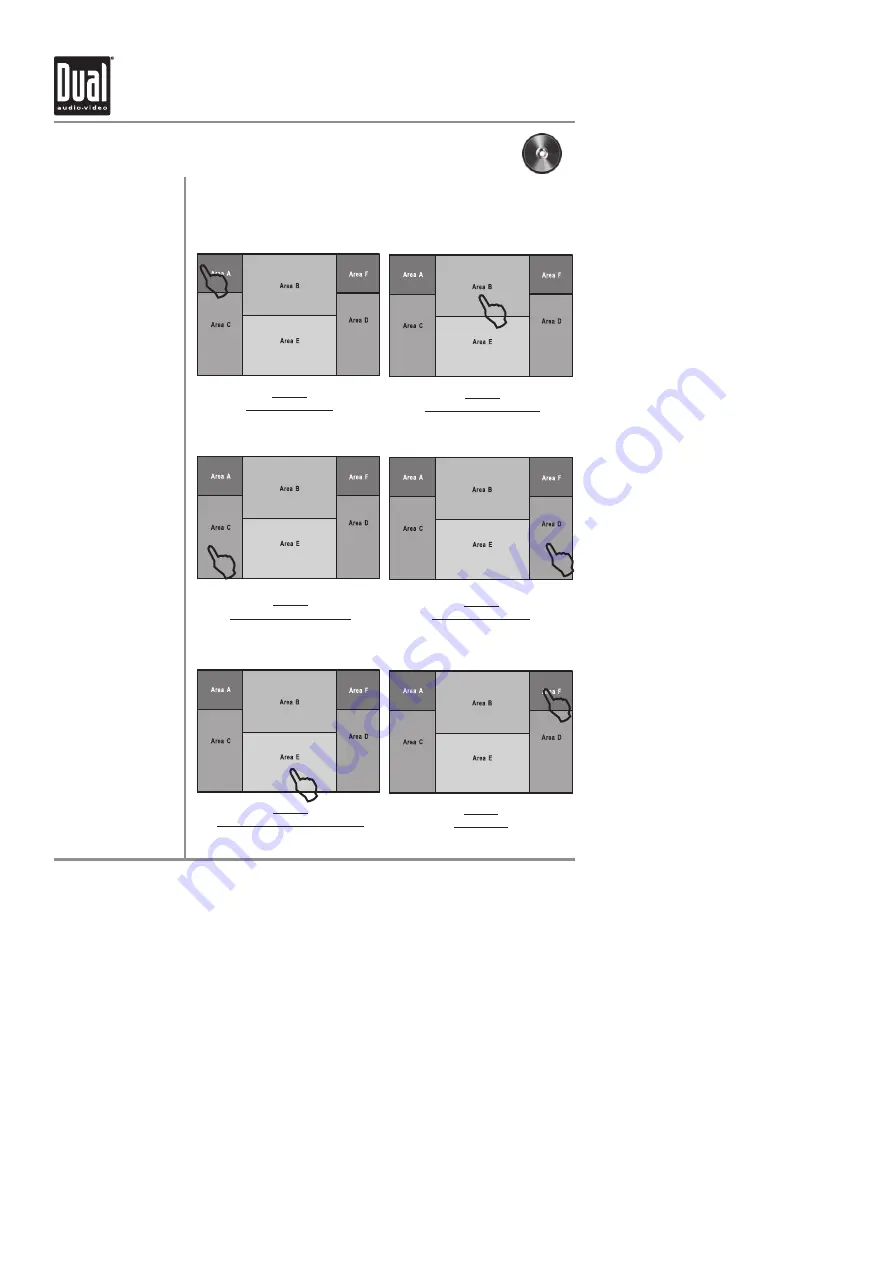
Hidden Touch Screen areas

while in DVD mode

Using the hidden 

 Touch Screen Controls

A - Displays MAIN menu 
B - Displays DVD disc 

information

C - Selects PREVIOUS 

chapter

D - Selects NEXT chapter
E - Displays the DVD 

transport controls

F - Displays search menu

L

L

L

L

L

L

AREA A

Access MAIN Menu

AREA B

Displays Disc Information

AREA C

Selects PREVIOUS Chapter

AREA D

Selects NEXT Chapter

AREA E

Displays DVD Transport Controls

AREA F

DVD Search

Note:  
A DVD disc must be 
inserted to access these 
functions and features.

All manuals and user guides at all-guides.com

all-guides.com

Summary of Contents for XDVD9101

Page 1: ...the vehicle is moving This is a safety feature to prevent driver distraction In dash DVD video functions will only operate when vehicle is in Park and the parking brake is engaged It is illegal in mo...

Page 2: ...se from Dolby Laboratories Dolby and the double D symbol are trademarks of Dolby Laboratories Windows Media and the Windows logo are trademarks or registered trademarks of Microsoft Corporation in the...

Page 3: ...Closed Control Locations Monitor Open Control Locations Remote General Operation Main Setup Menu Screen Setup Menu AM FM Tuner Operation Warning Statement DVD Setup DVD Operation CD Operation MP3 WMA...

Page 4: ...ke is not fully engaged When installing this unit the installer must connect the parking brake detect wire Yellow Blue Lead to the parking brake mechanism in order to make the parking brake lock out f...

Page 5: ...vehicle is moving Find a safe place to park and engage the parking brake 9 If you experience problems during installation consult your nearest DUAL dealer 10 If the unit malfunctions reset the unit as...

Page 6: ...as shown and slide the unit out of the mounting sleeve Install mounting sleeve into opening bending tabs to secure Connect wiring harness and antenna as shown on pages 6 7 Consult a qualified technici...

Page 7: ...e connected to an external amplifier Rear view camera A rear view camera not included can be used with the CAMERA input Refer to page 64 for details Need help Call our Technical Service Hotline 1 866...

Page 8: ...7 Wiring Diagram Optional A V Connections XDVD9101 INSTALLATION All manuals and user guides at all guides com...

Page 9: ...rol you must first pull the battery insulation tape out To insert or replace the battery Remove the battery holder Remove the battery from the battery holder Install the new battery Make sure to keep...

Page 10: ...wn Fast Reverse Disc In Indicator Infrared Sensor Band Disc Stop Mode Mute Loudness Power Volume EQ Eject 8 9 10 11 12 13 14 Control Locations Monitor Closed 15 16 EQ indicator Loudness indicator Dist...

Page 11: ...disc mode press once for PAUSE and PAUSE will appear in the display Press again to resume PLAY Press to select the previous channel chapter track for playback Press and hold to manual tune down or fa...

Page 12: ...me knob momentarily to select between Flat Classic Pop Rock or User EQ presets Due to its highly technological design the XDVD9101 faceplate is NOT removable Do not attempt to remove the faceplate Upo...

Page 13: ...ss momentarily to adjust the angle of the screen upwards Press and hold to slide the monitor inwards Press to adjust the angle of the screen downwards Press and hold to slide the monitor outwards The...

Page 14: ...itle Operation of iPod Video 31 32 33 34 35 36 37 38 39 40 4 3 2 1 The remote control uses one 3 volt Lithium CR2025 battery For best performance replace only with CR2025 or equivalent Control Locatio...

Page 15: ...rent menu Search function in Disc and operation of iPod modes Enter AUDIO Setup mode Enter the MAIN system menu Navigating system and DVD menus Press to pause begin playback Press to increment BAND or...

Page 16: ...ry or use the volume or to adjust the volume level lower or higher 0 46 The current volume level will be displayed on the secondary LCD when the monitor is closed or on the LCD to the right of the vol...

Page 17: ...urn the rotary Q or P to adjust the sharpness 0 minimum 15 maximum Turn the rotary Q or P to adjust the color 0 minimum 20 maximum Turn the rotary Q or P to adjust the contrast 0 minimum 20 maximum Tu...

Page 18: ...d Current time is displayed Touch to access AUXILIARY A V2 INPUT mode Touch to access AUXILIARY A V1 INPUT mode Touch to access USB mode optional USB flash drive must be inserted Touch to access CAMER...

Page 19: ...ix page 1 Main Setup Menu Page 1 Settings Default Options Function Tuner USA USA Select appropriate tuner frequency spacing for your area S Amer1 S Amer2 Europe Clock 00 00 00 00 See adjusting the clo...

Page 20: ...ns Function TFT Auto Open Off On TFT panel will automatically open when ACC is turned on Off TFT panel will not auto open when ACC is turned on Manual TFT will only open close when OPEN button is pres...

Page 21: ...h MAIN SETUP icon Touch USA Touch the setting for your region Touch RETURN to exit Main Setup Adjusting Radio Frequency Adjusting Radio Frequency Step 1 Step 2 Step 3 Step 4 Step 5 L 1 L 2 L 3 L L 4 5...

Page 22: ...left corner of screen Touch MAIN SETUP icon 3 Touch 00 00 area in the CLOCK row 4 When keypad appears enter HOURS followed by MINUTES 5 When finished touch OK 6 Touch RETURN to exit For 24Hr format s...

Page 23: ...ote It is recommended that you choose your own 4 digit password carefully write it down somewhere and keep in a safe location In the event you ever lose or forget your password call our technical supp...

Page 24: ...atrix Screen Setup Menu Settings Default Options Function Brightness 10 OSD 0 20 OSD Press or on the remote then press ENTER to adjust the Brightness to the desired setting Brightness can also be adju...

Page 25: ...he front TFT panel for more than 3 seconds then turning the rotary to adjust brightness level Step 1 Step 2 Step 3 Step 4 Step 5 1 Touch MENU at the top left corner of screen 2 Touch SCREEN SETUP icon...

Page 26: ...2 Step 3 Step 4 Step 5 1 Touch MENU at the top left corner of screen 2 Touch SCREEN SETUP icon 3 Touch to decrease the screen angle 4 Touch to increase the screen angle 1 4 is possible Default 1 5 To...

Page 27: ...s as described Step 1 Step 2 Step 3 4 Step 4 5 1 Touch MENU at the top left corner of screen 2 Touch SCREEN SETUP icon 3 Touch Calibration in TS Calibration row 4 Touch the pointers as indicated on th...

Page 28: ...an Scan tuning etc Preset Number List Display Shows the preset list by preset number Touch preset number to select a preset Touch and hold preset number to store presets Preset Station List Display Sh...

Page 29: ...so be performed by pressing the corresponding key on the front panel or remote control Tuner Scan Touch this icon to scan through all available stations in the current band Touch again to disable Pres...

Page 30: ...on the screen to continue tuning across multiple stations From the remote control Touch or to perform manual tuning Touch to tune to the next higher strong station Touch to tune to the next lower str...

Page 31: ...When the correct preset is highlighted press OK Touch SCAN on the screen and it will tune you to all stations available with good reception for 10 seconds at a time Touch SCAN again to disable Local...

Page 32: ...nd or the parking brake is not fully engaged When installing this unit the installer must connect the parking brake detect wire Yellow Blue Lead to the parking brake mechanism in order to make the par...

Page 33: ...motion without engaging the parking brake Follow these two initialization procedures carefully to allow video playback on on the XDVD9101 front monitor There are two situations to initiate the PARKIN...

Page 34: ...region areas than the region areas for which it has been designed The XDVD9101 will play discs labeled Region 1 or All DVD region codes 1 USA Canada 2 Japan Europe South Africa Middle East 3 Rep of K...

Page 35: ...or other features Note If PARENTAL Lock is activated and the disc inserted is not authorized a 4 digit code must be entered and or the disc be authorized See RATING MENU on page 38 Note Only one disc...

Page 36: ...AIN menu B Displays DVD disc information C Selects PREVIOUS chapter D Selects NEXT chapter E Displays the DVD transport controls F Displays search menu L L L L L L AREA A Access MAIN Menu AREA B Displ...

Page 37: ...yed Press the current selection to select desired disc subtitle language English French Spanish Auto Off DEFAULT Press the current selection to select desired disc audio language English DEFAULT Frenc...

Page 38: ...ess the DVD setup menu The LANGUAGE setup menu will automatically be displayed Press the VIDEO icon 3 to display the VIDEO setup menu Press to select desired TV shape Select On to activate angle mark...

Page 39: ...ayed Press the RATING icon 3 to display the RATING setup menu Touch the current rating select desired rating then input password Default password is 0000 1 Touch enter current password then press OK 2...

Page 40: ...Each touch changes speed from 2x to 4x to 8x to 16x to 32x then back to 1x play Fast Forward Touch the icon to fast forward at 2x speed Each touch changes speed from 2x to 4x to 8x to 16x to 32x then...

Page 41: ...Once the Time search window is open use the keyboard to enter a specific time on the disc then touch OK For example to skip to 1 hour 12 minutes and 19 seconds into the DVD touch 0 1 1 2 1 9 OK Once...

Page 42: ...USE on the front panel to temporarily stop playback of the DVD Touching it again will resume playback From the remote control Press PLAY to temporarily stop and resume playback Touch to stop playback...

Page 43: ...e INFO button to bring up the DVD Disc Information From the remote control Press the ZOOM button to activate Zoom Mode Each subsequent press of the button will change the magnification from normal to...

Page 44: ...disc Track Time Indicator Shows the elapsed time of the current track Track Title List Displays up to 6 tracks on the disc in order with track number Clock Displays the current time Scroll bar Indicat...

Page 45: ...ume or on screen to adjust the volume level lower or higher 0 46 Loudness Indicator Touch LOUD to turn the Loudness feature On or Off Direct Select Keyboard Touch DIR to display a numeric keyboard Ent...

Page 46: ...Use the numeric keypad to enter the desired track number Use the Fast Forward or Fast Reverse on screen buttons to speed up the playback of a track Each subsequent press of the button will change the...

Page 47: ...point to the end point until A B is pressed again Press PLAY PAUSE to temporarily stop playback of the current track Touching it again will resume playback From the remote control Press PLAY to tempor...

Page 48: ...tch from viewing sound files to image files Folder Name Displays the name of the currently selected folder Playlist Displays up to 6 files in order with filename Clock Displays the current time File T...

Page 49: ...olume level Turn the rotary or use the volume or on screen to adjust volume level lower or higher 0 46 Next Folder Touch the icon to select the next available folder Loudness Indicator Touch LOUD to t...

Page 50: ...e correct file name is highlighted press OK To navigate forwards or backwards through all tracks press or on the screen front panel or remote control Press to skip to the next track Press to skip to t...

Page 51: ...ed Touch RDM again to exit Random Mode From the remote control Press to select between Repeat Folder Repeat and Repeat Off modes Note Shuffle and Repeat modes can not be used simultaneously and engagi...

Page 52: ...Time Indicator Shows the elapsed time of the current song Sound to Image Indicator Press to switch from viewing sound files to image files Folder Name Displays the name of the currently selected fold...

Page 53: ...Adjustment Indicates current volume level Turn the rotary or use the volume or on screen to adjust volume level lower or higher 0 46 Next Folder Touch the icon to select the next available folder Lou...

Page 54: ...ress or to scroll through the files When the correct file name is highlighted press OK To navigate forwards or backwards through all tracks press or on the screen front panel or remote control Press t...

Page 55: ...while this feature is activated Touch RDM again to exit Random Mode From the remote control Press to select between Repeat Folder Repeat and Repeat Off modes Note Shuffle and Repeat modes can not be...

Page 56: ...2 16 22 05 24 32 44 1 48kHz MPEG 2 X 32 44 1 48kHz MPEG 2 5 X 8 11 025 12 16 22 05 24 32 44 1 48kHz WMA 22 05 32 44 1 48kHz X Bitrate MPEG 1 X 8 320kbps MPEG 2 X 64 912kbps MPEG 2 5 X 8 320kbps WMA 32...

Page 57: ...8 320kbps WMA 32 192kbps X Other Information Directory Depth Unlimited Unlimited File Name Length 23 bytes 23 bytes Total File Number 3000 files 3000 files Total Folder Number 256 folders 256 folders...

Page 58: ...oftware s user s manual for more information ISO9660 standards Maximum nested folder depth is 8 including the root folder Valid characters for folder file names are letters A Z all caps numbers 0 9 an...

Page 59: ...lays current song number and total number of songs Elapsed Time Indicator Shows the elapsed time of the current song Artist Information Displays the artist information for the currently selected song...

Page 60: ...el Turn the rotary or use the volume or on screen to adjust volume level lower or higher 0 46 Return Back Touch to return to the previous group menu Loudness Indicator Touch LOUD to turn the Loudness...

Page 61: ...creen buttons can be used to see the rest of the songs in the current group Then use the Direct Select method to play a song from that group The Page Up and Page Down on screen buttons can be used to...

Page 62: ...huffle the songs in the current group Random will appear next to the MENU button while this feature is activated Touch RDM again to exit Random Mode Touch RPT to repeat a song Repeat will appear next...

Page 63: ...o prevent driver distraction Video photo functions will only operate when vehicle is in Park and the parking brake is engaged as described on page 32 Touch VID icon to exit operation of iPod audio and...

Page 64: ...y alphanumeric characters can be displayed ASCII type Artist Name and Album name will only be displayed if included with the song Compatible with iPod touch 2nd generation iPod nano 4th generation iPo...

Page 65: ...dio Engage parking brake as described on page 32 to watch video Connect an optional rear camera to the Camera Input Black RCA connector Refer to page 6 for details The camera image can be reversed if...

Page 66: ...c license conditions and copyright notices for the software can be found via www dualav com What to do 1 Before you call for service check the troubleshooting guide in your owner s manual A slight adj...

Page 67: ...eft right 30 60 60 60 Resolution 480 W x 234 H Brightness cd m2 350 Contrast ratio 350 1 Elements 336 960 Operating voltage 11 16 VDC negative ground Speaker output impedance 4 8 ohms Line output volt...

Page 68: ...arking brake safety circuit not connected Parking brake not applied Check connections at parking brake Apply parking brake as described on page 32 No video display when in reverse Reverse circuit not...

Page 69: ...XDVD9101 OPERATION 68 Notes All manuals and user guides at all guides com...

Page 70: ...XDVD9101 OPERATION 69 Notes All manuals and user guides at all guides com...

Page 71: ...XDVD9101 OPERATION 70 Notes All manuals and user guides at all guides com a l l g u i d e s c o m...

Page 72: ...Dual Electronics Corp Toll Free 1 866 382 5476 www dualav com 2009 Dual Electronics Corp All rights reserved NSA1209 V03 Printed in China All manuals and user guides at all guides com...

Reviews: