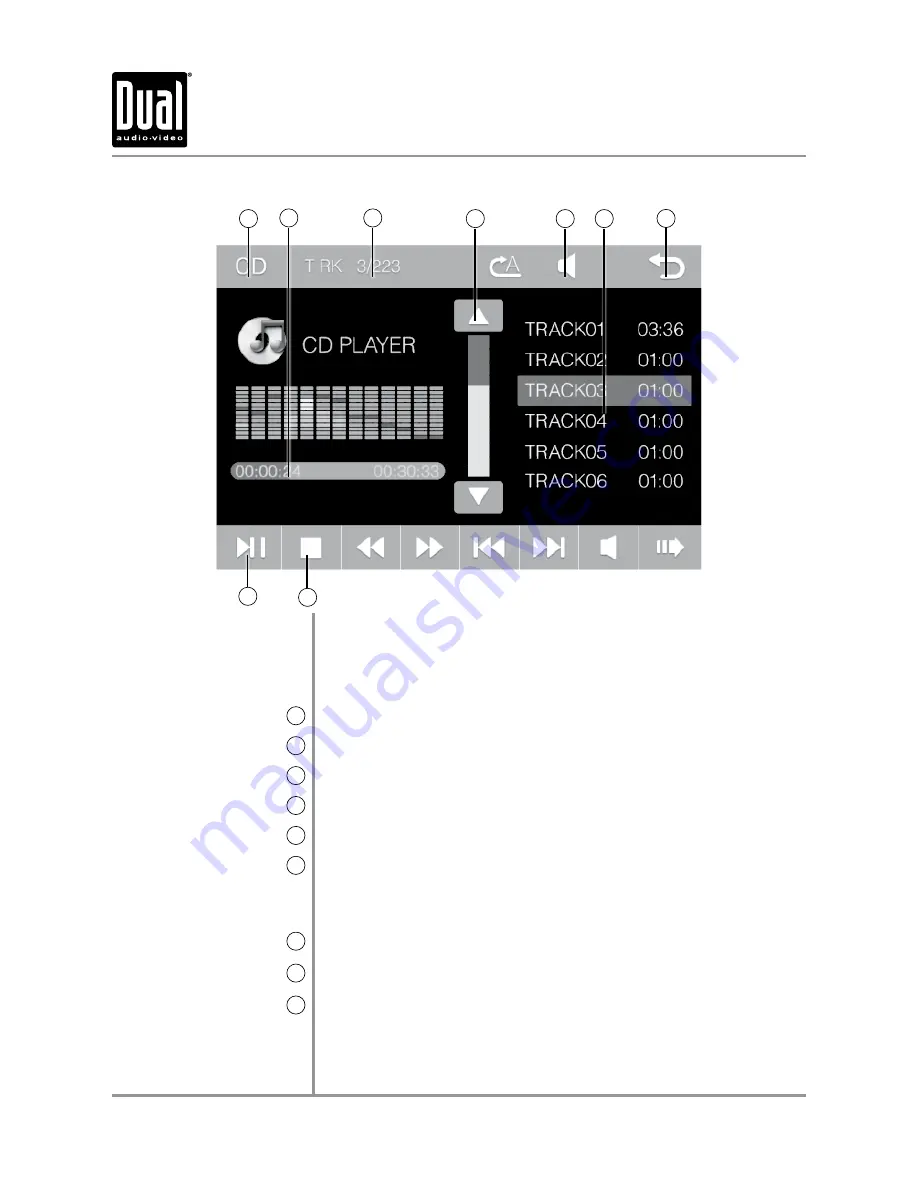
Dual XDVD210 Installation & Owner'S Manual Download Page 14

13

CD Operation 

CD Operation

Current Mode Indicator 

1

Elapsed Time Indicator 

2

Track Indicator 

3

Scroll Up / Down Arrows 

4

Volume Indicator 

5

CD Track List 

6

Main Menu Access 

7

Play / Pause 

8

Stop 

9

1

2

6

7

Insert disc into the slot with the label facing up at a slight upward 

angle, and playback will 

begin automatically. If a disc has previously 

been inserted and the unit has been operating in another mode, resume 

disc playback by selecting the DISC icon from the Main Menu screen, 

pressing 

DVD 

on the front panel or pressing 

MODE

 until DISC is selected.

Displays current mode of operation. 

Displays the elapsed time of the current track.

Displays the current and total number of tracks on the disc.

Press to scroll up or down the pages in the track playlist. 

Displays the current volume setting of the unit. 

Displays the first five tracks on the CD. Use the arrow keys to scroll 

down and up through the entire list, or press any track number to play it 

instantly. Elapsed time of current track will be displayed when playback 

begins.

Press to return to Main Menu screen.

Press to pause CD. Press again to resume CD playback.

Press


to temporarily stop playback. Press play to resume playback 

from the current position. Press 

 a second time to fully stop playback. 

Press play to begin playback from the beginning of the disc. 

XDVD210

 OPERATION

3

4

5

8

9

Summary of Contents for XDVD210

Page 1: ...in dash unit will not operate while the vehicle is moving This is a safety feature to prevent driver distraction In dash DVD video functions will only operate when vehicle is in Park and the parking...

Page 2: ...erwise authorized by Macrovision Corporation Reverse engineering or disassembly is prohibited Manufactured under license from Dolby Laboratories Dolby and the double D symbol are registered trademarks...

Page 3: ...cautions Preparation Mounting Wiring Diagram Control Locations Remote Preparation General Operation AM FM Tuner Operation CD Operation MP3 WMA JPG Operation DVD Operation Operation of iPod Auxiliary I...

Page 4: ...Park and or the parking brake is not fully engaged When installing this unit the installer must connect the parking brake detect wire Pink Lead to the parking brake mechanism in order to make the park...

Page 5: ...tion battery or ground cables make sure to use automotive grade cables or other cables with an area of 0 75mm AWG 18 or more to prevent voltage drops Do not touch the liquid crystal fluid if the LCD i...

Page 6: ...t out of the mounting sleeve Install mounting sleeve into opening bending tabs to secure Connect wiring harness as shown on page 6 Consult a qualified technician if you are unsure Certain vehicles may...

Page 7: ...ed with the Camera input Refer to page 35 for details Connecting an iPod iPhone device To play music from an iPod iPhone device connect the included iPod connection cable to the XDVD210 Once connected...

Page 8: ...Subtitle Arrow Right Setup Angle Slow Volume Up Zoom Select Tune Track Up Volume Down 1 2 3 4 5 6 7 8 9 10 11 12 13 14 15 16 17 18 19 20 21 22 23 24 25 26 27 28 29 30 Audio Number Keys GOTO EQ Loudne...

Page 9: ...and dispose of battery properly Do not store battery with metallic objects or materials Remove battery insulation tape To insert or replace the battery remove the battery holder Remove the battery fro...

Page 10: ...ess MUTE to return to the previous mode of operation or press DVD or TUNER to access those modes directly Press MODE to step through all available input modes Tuner Disc which includes DVD and CD play...

Page 11: ...day to edit then use the up and down arrows to increase or decrease the value Language Language Select desired language this option is available only on certain models Audio Subwoofer Turn the Subwoo...

Page 12: ...n to play it instantly Up to 18 FM and 12 AM stations can be stored in memory Press EQ to step through the following EQ options Pop Rock Classic Jazz or Off Press LOC to select between Local LOC ON an...

Page 13: ...7 to 7 Treble Adjust treble level from 7 to 7 Balance Adjust balance from Left L07 to Right R07 00 represents equal balance Fader Adjust fader from Front F07 to Rear R07 00 represents equal fader Vid...

Page 14: ...t mode of operation Displays the elapsed time of the current track Displays the current and total number of tracks on the disc Press to scroll up or down the pages in the track playlist Displays the c...

Page 15: ...7 to 7 Treble Adjust treble level from 7 to 7 Balance Adjust balance from Left L07 to Right R07 00 represents equal balance Fader Adjust fader from Front F07 to Rear R07 00 represents equal fader Pres...

Page 16: ...n the front of the unit When inserting a microSD card the label faces up Note It is not possible to view JPG files on the in dash monitor while the vehicle is moving This is a safety feature to preven...

Page 17: ...t R07 00 represents equal balance Fader Adjust fader from Front F07 to Rear R07 00 represents equal fader Press to advance to the next file Press to go back to the previous file Press to fast forward...

Page 18: ...mber Input song number press OK and playback of selected song will begin Press to turn off the TFT display Press anywhere on the touch screen to turn the display back on Press to step through the Repe...

Page 19: ...he next image Press to access additional photo options Press to step through the Repeat options RPT ONE repeats current image RPT FOLDER repeats all images in the current folder RPT ALL repeats all im...

Page 20: ...4 1 48kHz X Bitrate MPEG 1 X 32 320kbps MPEG 2 X 8 160kbps MPEG 2 5 X 8 160kbps WMA 32 192kbps X Other Information Directory Depth Unlimited Unlimited File Name Length 32 bytes 32 bytes Total File Num...

Page 21: ...X Sampling Frequency MPEG 1 X 32 44 1 48kHz MPEG 2 X 12 16 22 05 24kHz MPEG 2 5 X 8 11 025 12kHz WMA 32 44 1 48kHz X Bitrate MPEG 1 X 32 320kbps MPEG 2 X 8 160kbps MPEG 2 5 X 8 160kbps WMA 32 192kbps...

Page 22: ...ers A Z all caps numbers 0 9 and _ underscore Some characters may not be displayed correctly depending on the character type This device can play back discs in Joliet and other standards that conform...

Page 23: ...e vehicle is not in Park and or the parking brake is not fully engaged When installing this unit the installer must connect the parking brake detect wire Pink Lead to the parking brake mechanism in or...

Page 24: ...other region areas than the region areas for which it has been designed The XDVD210 will play discs labeled Region 1 or All DVD region codes 1 USA Canada 2 Japan Europe South Africa Middle East 3 Rep...

Page 25: ...er to local laws in your area The vehicle must be in park and the parking brake applied to view video on the in dash monitor As a safety feature a warning message will show on the display when the veh...

Page 26: ...on the DVD Press to access numeric keyboard to select desired chapter number Input chapter number press OK and playback of selected chapter will begin Press to return to main menu screen During DVD p...

Page 27: ...uage options if available Press to return to the previous folder on the DVD if available Press to return to the title menu of the DVD Press to step through the Repeat options CHAPTER TITLE RPT ALL and...

Page 28: ...directly from the iPod This model does not support video photo playback Displays current mode of operation Displays information about current playback functions Displays information about the current...

Page 29: ...ght R07 00 represents equal balance Fader Adjust fader from Front F07 to Rear R07 00 represents equal fader Press to advance to the next song Press to go back to the previous song Press to fast forwar...

Page 30: ...adphone output of the device Connect an optional audio video source to the Auxiliary Input 2 Red White Yellow RCA connectors Refer to page 6 for details Select AV2 from the Main Menu to listen to audi...

Page 31: ...rn shipment of the product Specific license conditions and copyright notices for the software can be found via www dualav com What to do 1 Before you call for service check the troubleshooting guide i...

Page 32: ...ass Mass storage class Compatibility SD memory card SDHC memory card Panel size 6 2 diagonal measurement View angle up down left right 70 70 75 75 Resolution 800 H x 480 V Brightness cd m2 400 Contras...

Page 33: ...t applied Check connections at parking brake Apply parking brake as described on page 24 No video display when in reverse Reverse circuit not connected Vehicle is not in reverse Check connections at r...

Page 34: ...33 Notes XDVD210 OPERATION...

Page 35: ...34 Notes XDVD210 OPERATION...

Page 36: ...Dual Electronics Corp Toll Free 1 866 382 5476 www dualav com 2012 Dual Electronics Corp All rights reserved NSA0912 V01 Printed in China...

Reviews: