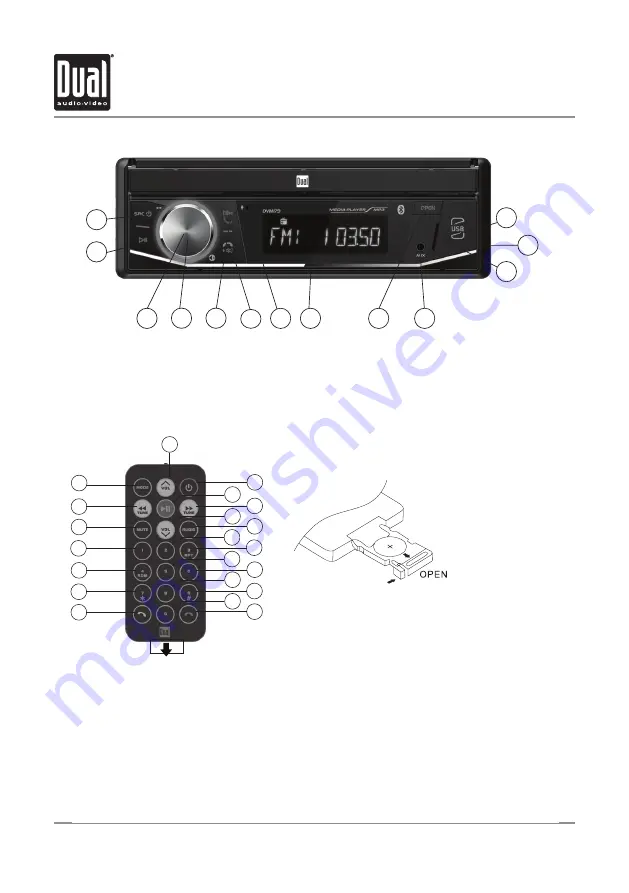
Dual DVM179 Installation & Owner'S Manual Download Page 6

5

DVM179

 OPERATION

Control Locations

1. Power / Source Mode

2. Play / Pause

3. Rotary Volume Up/Down

4. Mute - Short Press Rotary  

5. Tune/Track Up / Answer Call

6. Tune/Track Down / End Call

7. BT Microphone

8. LCD Display 

9. Open TFT - Press to open/close

10. 3.5mm AUX IN

11. USB Media Port / Charging Port

12. microSD Media Port

13. Reset

3

4

6

13

8

5

7

12

11

9

10

BEHIND DOOR

1. Power

2. Play/Pause / Ok

3. Seek Up / Next Track

4. Volume Down

5. Audio

6. Dial 2

7. Dial 3 / Song Repeat

8. Dial 5

9. Dial 6

10. Dial 8

11. Dial 9 #

12. Dial 0 

13. End call

14. Answer Call / Last Number Redial

15. Dial 7 *

16. Dial 4 / Random

17. Dial 1

18. Mute

19. Seek Down / Previous Track

20. Source Mode

21. Volume UP

21

1

20

2

4

6

8

10

3

19

5

18

7

17

9

16

13

14

12

11

15

Use CR2025
Replacement Battery Only

Remove Battery Shipping Protector

How to Replace the Battery

Tips


EN

Nyne ADS15

USB CHARGE

5V 1A

Slide the tray out on back of the remote control 
and insert battery with the (+) and minus (-) poles 
pointing in the proper direction

1

2

Summary of Contents for DVM179

Page 1: ...INSTALLATION OWNER S MANUAL Multimedia Receiver with Bluetooth featuring a 7 Touch Screen Display DVM179...

Page 2: ...Copyright Notes The Bluetooth word mark and logos are owned by the Bluetooth SIG Inc SD Logo is a trademark of SD 3C LLC Other trademarks and trade names are those of their respective owners...

Page 3: ...ion battery or ground cables make sure to use automotive grade cables or other cables with an area of 0 75mm AWG 18 or more to prevent voltage drops Do not touch the liquid crystal fluid if the LCD is...

Page 4: ...ys into the slots as shown and slide the unit out of the mounting sleeve Install mounting sleeve into opening bending tabs to secure Connect wiring harness as shown on page 4 Consult a qualified techn...

Page 5: ...Using an incorrect fuse could cause damage The unit uses 1 10 amp ATC mini style fuse located on the power connector Wiring Notes Subwoofer output The Subwoofer preamp audio output black jacket with...

Page 6: ...ek Up Next Track 4 Volume Down 5 Audio 6 Dial 2 7 Dial 3 Song Repeat 8 Dial 5 9 Dial 6 10 Dial 8 11 Dial 9 12 Dial 0 13 End call 14 Answer Call Last Number Redial 15 Dial 7 16 Dial 4 Random 17 Dial 1...

Page 7: ...the audio Momentarily press the volume knob again to return to the previously selected volume Rotating the volume knob while the volume is muted will also cancel the mute function Press OPEN to open o...

Page 8: ...audio from the rear camera on or off Audio Level Select preset audio levels for the following modes Tuner USB SD Card and Handsfree Bluetooth Bluetooth Turn Bluetooth signal on or off Auto Connect Tu...

Page 9: ...he default EQ settings 6 Press to return to the source screen 7 Select a preset EQ setting or select User for custom settings 8 Press to display and adjust Balance Fader screen Adjust the Balance Fade...

Page 10: ...oth device is paired Press to toggle between Stereo and Mono tuning Press to scan presets and listen to the first 10 seconds of each Press again to stop scanning and listen to the station Press and ho...

Page 11: ...about the current song Displays Station RDS RT information Press to step through and select between 2 AM and 3 FM bands Press to display and adjust Radio RDS settings Press the clock to put the unit...

Page 12: ...the Main Menu Press to return to Main Menu screen Press to directly access media on Bluetooth Music Press to directly access music on USB device Press to directly access music on microSD Card Press t...

Page 13: ...e 18 Press to advance to the next track Displays the total and elapsed time for the current track Displays ID3 metadata for the current track Displays album art for the current track Displays track co...

Page 14: ...bility Playback Order Compatible Recording Formats Notes Media Compatibility USB microSD Card File Type MP3 File System FAT FAT 12 X FAT 16 FAT 32 File Extension mp3 MP3 Mp3 mP3 rmp m4a X MPEG Format...

Page 15: ...e when the unit is powered on If your device was previously paired but does not connect enter the Bluetooth setup menu and turn Auto Connect on To access the phone select Bluetooth Phone from the Main...

Page 16: ...ay a list of paired devices and select desired device to connect Press to begin or answer a call Displays the current phone number Press the clock to put the unit in standby mode Press the clock again...

Page 17: ...CAMERA icon from the Main Menu or from any operational mode when enabled to select camera mode Touch the top left area on the screen to exit camera mode Note The manual mode is for dedicated cameras...

Page 18: ...38dB Frequency response 30Hz 13kHz Tuning range 530kHz 1710kHz Usable sensitivity 24uV Frequency response 30Hz 2 3kHz Compatibility High Speed USB 2 0 USB Class Mass storage class Compatibility microS...

Page 19: ...urn shipment of the product Specific license conditions and copyright notices for the software can be found via www jensenmobile com What to do 1 Before you call for service check the troubleshooting...

Page 20: ...g chassis ground Insulate all bare speaker wires from each other and chassis ground Unit blows fuse s Yellow or red wire touching chassis ground Check for pinched wire Speaker wires touching chassis g...

Page 21: ...20 DVM179 OPERATION Notes...

Page 22: ...888 921 4088 www jensenmobile com 2019 Namsung America Inc All rights reserved The Bluetooth word mark and logos are owned by the Bluetooth SIG Inc Other trademarks and trade names are those of their...

Reviews: