background image

10

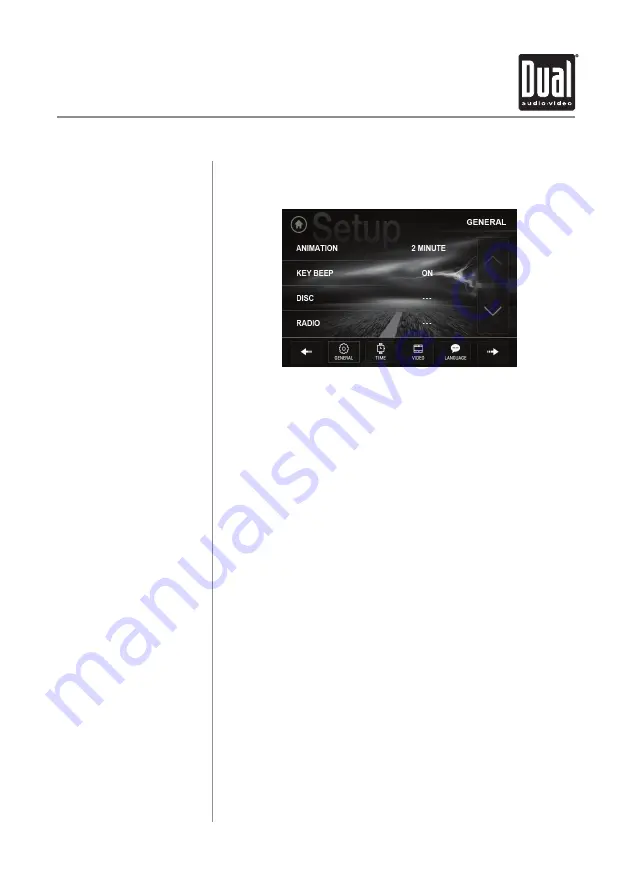
From the Main Menu screen, press 

SETUP

 in the bottom right corner 

to access the Setup menu and select from six categories across the 

bottom: General, Time, Video, Language, Illumination and Calibration.

General:


•  Animation

 - Select 

Off

10 second, 30 second, 1 minute, 90 

second, 2 minute, 3 minute

 or

 4 minute

 to set animation length.

•  Key Beep

 - Select a 

OFF 

or 

ON

 to select whether or not the unit 

beeps each time a key is pressed.

•  Disc

 - Adjust the following disc options:

         - Format 

- Select NTSC, PAL or AUTO.

         - TV Type 

- Select 4:3PS, 4:3 LB or 16:9.

         - Rating 

- Select desired rating.

•  Radio

 - Adjust the following radio options:

         - 

Select between 

STEREO

 or 

MONO

 operation.

         - 

Select between 

LOCAL

 or 

DX

 (distance) tuning.

         - 

Select between the following region settings: E

UROPE, USA,  

           AMERICAN1, AMERICAN2

 and 

OIRT

.

         - Select between RDS Regional 

ON

 or 

OFF

.

         - Select between RDS PI 

MUTE

 or 

SOUND

.

         - Select between RDS TA 

OFF

 or 

ON

.

         - Select between RDS AF 

OFF

 or 

ON

.

•  Wallpaper

 - Select from three different wallpaper options.

•  Camera Icon

 - Turn the camera icon 

ON

 or 

OFF 

on the Source 

Menu.

•  Bluetooth

 - Adjust the following Bluetooth options:

         - 

Turn Bluetooth 

On

 or 

OFF

.

         - 

Turn Auto Answer feature 

On

 or 

OFF 

to determine whether  

            or not the unit will automatically answer incoming calls.

         - 

Turn Auto Connect feature 

On

 or 

OFF

 to determine whether or 

            not the unit will automatically connect to available devices.        

         - Turn Auto Download feature 

On

 or 

OFF

.

•  Dimmer

 - Adjust the dimmer levels between 

1 and 6,

 or turn 

the dimmer 

OFF

. Dimmer can also be adjusted by tapping the 

dimmer icon on the LCD.

•  Demo

 - Turn Demo mode 

OFF 

or 

ON

.

•  About

 - Select to view information about the unit.

General Operation

Setup Menu

DV735MB 

OPERATION

Summary of Contents for DV735MB

Page 1: ...the vehicle is moving This is a safety feature to prevent driver distraction In dash DVD video functions will only operate when vehicle is in Park and the parking brake is engaged It is illegal in most states for the driver to view video while the vehicle is in motion Safety Notes DVD Multimedia Receiver with Bluetooth 2 Way DualMirror ...

Page 2: ...ons Preparation Mounting Wiring Diagram Control Locations Remote Preparation General Operation AM FM Tuner Operation CD USB SD Card Operation DVD Operation DualMirror Operation Bluetooth Operation Auxiliary Inputs Rear Camera Operation Warranty Specifications Troubleshooting Table of Contents DV735MB PREPARATION ...

Page 3: ...ot in Park and or the parking brake is not fully engaged When installing this unit the installer must connect the parking brake detect wire to the parking brake mechanism in order to make the parking brake lock out feature operable DO NOT simply ground the parking brake detect wire to a metal portion of the vehicle Failure to properly install the parking brake lock out feature could lead to driver...

Page 4: ...sure to use automotive grade cables or other cables with an area of 0 75mm AWG 18 or more to prevent voltage drops Do not touch the liquid crystal fluid if the LCD is damaged or broken The liquid crystal fluid may be hazardous to your health or fatal If the liquid crystal fluid from the LCD contacts your body or clothing wash it off with soap immediately FCC Compliance This device complies with Pa...

Page 5: ...he mounting sleeve Install mounting sleeve into opening bending tabs to secure Connect wiring harness as shown on page 6 Consult a qualified technician if you are unsure Certain vehicles may require an installation kit and or wiring harness adapter sold separately Reconnect negative battery terminal and test for correct operation Snap trim ring into place if required Slide unit into mounting sleev...

Page 6: ...ar view camera not included can be used with the Camera input RED YELLOW BLACK BLUE ACC B GROUND POWER ANTENNA FRONT LEFT CHANNEL SPEAKER REAR LEFT CHANNEL SPEAKER WHITE WHITE BLACK GREEN GREEN BLACK SWC GND BLACK SWC 1 BROWN SWC 2 BROWN BLACK REVERSE B PARKING BRAKE ILLUMINATION REMOTE TURN ON FRONT RIGHT CHANNEL SPEAKER REAR RIGHT CHANNEL SPEAKER ORANGE PINK ORANGE BLACK BLUE BLACK GREY GREY BLA...

Page 7: ...y Mute End Reject Clock Select Tune Track Up Channel Up OK Forward Channel Down Stop Play Pause Traffic Announcement 10 Key Alternative Frequencies Release Eject IR Sensor USB Port Microphone Auxiliary Input Mute End Call Tune Track Down 1 2 3 Volume Knob Push Select Mode Power Play Pause Band Tune Track Up Answer Call Open 9 10 11 12 4 5 13 6 7 8 14 15 14 27 28 29 5 1 4 3 2 7 9 8 6 10 11 13 14 12...

Page 8: ... and dispose of battery properly Do not store battery with metallic objects or materials Remove battery insulation tape To insert or replace the battery remove the battery holder Remove the battery from the battery holder Install the new battery Make sure to keep the side up Insert the battery holder Remote Control Preparation DV735MB OPERATION ...

Page 9: ...f operation are indicated on the display and or the monitor Optional USB flash drive or SD card must be connected inserted to appear in the mode selection string Connect external audio video devices to the 3 5mm auxiliary input on the front panel Connect a USB device to the USB port on the front panel to play MP3 WMA files or view AVI MP4 video files or JPG photos Insert an SD card into the SD slo...

Page 10: ... settings EUROPE USA AMERICAN1 AMERICAN2 and OIRT Select between RDS Regional ON or OFF Select between RDS PI MUTE or SOUND Select between RDS TA OFF or ON Select between RDS AF OFF or ON Wallpaper Select from three different wallpaper options Camera Icon Turn the camera icon ON or OFF on the Source Menu Bluetooth Adjust the following Bluetooth options Turn Bluetooth On or OFF Turn Auto Answer fea...

Page 11: ...0 Language English Set the unit language to English RGB Illumination Red Green Blue Drag each level to manually adjust the unit s illumination color Color Selector Use the color selector at the bottom of the screen to select the unit s illumination color Auto Color Select this option to restore automatic color settings Calibration Calibrate the Screen Press YES to calibration the touch screen To r...

Page 12: ...isplay the six preset stations stored in memory in the current band To store a preset station tune unit to desired station then press and hold the desired preset button to store the current station in that preset spot Up to 18 FM and 12 AM stations can be stored in memory Momentarily press any preset station to play it instantly Preset station display is pictured on the following page Press to mut...

Page 13: ...ass Center Frequency 60Hz 80Hz 100Hz or 200Hz Bass Q Value 1 0 1 25 1 5 or 2 0 Middle Center Frequency 500Hz 1 kHz 1 5kHz or 2 5kHz Middle Q Value 0 5 0 75 1 0 or 1 25 Treble Center Frequency 10kHz 12 5kHz 15kHz 17 5kHz Loudness Center Frequency FLAT 400Hz 800Hz 2400Hz Subwoofer Center Frequency FLAT 80Hz 120Hz 160Hz Press to scan preset stations and listen to the first 10 seconds of each Press ag...

Page 14: ... angle down Press to select Program Type Genre Press to turn on off Traffic Announcements Press to select Alternative Frequencies Local Distance 14 Tilt Screen Up 15 Tilt Screen Down 16 Program Type PTY 17 Traffic Announcements 18 Alternative Frequencies 19 DV735MB OPERATION AM FM RDS Tuner Operation 14 16 17 15 18 19 ...

Page 15: ... the top of the unit When inserting an SD card the label should face up Press to return to Main Menu screen Displays current mode of operation Press to select a repeat option Repeat 1 Repeat Folder or Repeat Off Press to enable or disable random playback Press to access the Phone when Bluetooth is enabled If Bluetooth is turned off pressing this button will turn it on Press to access the directory...

Page 16: ... adjusting the volume knob of the front panel Press to go back to the previous file or track Press to adjust Audio options refer to page 13 for details Press to pause or resume playback Press to fast reverse the current track at various speeds FRx2 FRx4 FRx8 or FRx20 Press to advance to the next file or track Press to fast forward the current track at various speeds FRx2 FRx4 FRx8 or FRx20 Press t...

Page 17: ...h Unlimited Unlimited File Name Length 32 bytes 32 bytes Total File Number 2000 files 2000 files Total Folder Number 200 folders 200 folders File Number via Folder 2000 files 2000 files MP3 ID3 TAG ver 1 x X ver 2 x X Title Artist Album X WMA TAG Title Artist X Notes For USB mode it is not possible to view JPG files on the in dash monitor while the vehicle is moving This is a safety feature to pre...

Page 18: ...20kbps MPEG 2 X 8 160kbps MPEG 2 5 X 8 160kbps WMA 32 192kbps X Other Information Directory Depth Unlimited Unlimited File Name Length 32 bytes 32 bytes Total File Number 2000 files 2000 files Total Folder Number 200 folders 200 folders File Number via Folder 2000 files 2000 files MP3 ID3 TAG ver 1 x X ver 2 x X Title Artist Album X WMA TAG Title Artist X Notes It is not possible to view JPG files...

Page 19: ...folder of the disc USB flash drive or SD card Any empty folders or folders that do not include MP3 WMA JPG files are skipped ISO9660 standards Maximum nested folder depth is 8 including the root folder Valid characters for folder file names are letters A Z all caps numbers 0 9 and _ underscore Some characters may not be displayed correctly depending on the character type This device can play back ...

Page 20: ... if the vehicle is not in Park and or the parking brake is not fully engaged When installing this unit the installer must connect the parking brake detect wire to the parking brake mechanism in order to make the parking brake lock out feature operable DO NOT simply ground the parking brake detect wire to a metal portion of the vehicle Failure to properly install the parking brake lock out feature ...

Page 21: ...Menu screen Press to directly select a chapter or title if allowed by current disc Press and use the keypad to directly select a specific chapter Press to return to the DVD menu Press to reveal additional DVD options Subtitles Select between subtitle options English and Off Language Select playback language if allowed by disc Angle Select desired playback angle if allowed by disc Displays elapsed ...

Page 22: ...lay disc in order Press to adjust the screen angle up Press to adjust the screen angle down Press to access the Phone when Bluetooth is enabled If Bluetooth is turned off pressing this button will turn it on Press to turn on off Traffic Announcements Press to select Alternative Frequencies Press to view the previous option screen Next Chapter 10 Fast Reverse 11 Fast Forward 12 Repeat 13 Random 14 ...

Page 23: ... Android device using the instructions below Currently iOS is not compatible with 2 way control Mirror Link 1 Scan DualMirror 2 Way QR code in DualMirror mode or search DualMirror 2 Way B app to download the app from Google Play Android only 2 Download and install the DualMirror 2 Way B app 3 After installation touch the settings icon on the lower right to enter the Bluetooth menu and pair your de...

Page 24: ...MB OPERATION 2 Way DualMirror Operation To HDMI Input ID DualCast Password 12345678 To HDMI Input ID DualCast Password 12345678 DMH25 DMH25 Connecting an Android device Connecting an iPhone iPod or iPad device ...

Page 25: ...port the auto connect feature and will connect automatically if the device is in range when the unit is powered on If your device was previously paired but does not connect enter the Bluetooth setup menu and ensure that Auto Connect is On To access the phone select Bluetooth Phone from the Main Menu or press the phone icon from any operational mode Press to return to the Main Menu screen Displays ...

Page 26: ...oll through the list Press to display contacts Use the icons on the right to search for a specific contact or scroll through the list Press to view active and available Bluetooth connections Use the icons on the right to disconnect and connect search or scroll To use your Bluetooth connection to play music from your device select Bluetooth Music from the Main Menu Press to mute the unit s sound Pr...

Page 27: ...ge parking brake to watch video Connect an optional rear camera to the Camera Input Black RCA connector Refer to the wiring diagram for details Manual selection Touch CAMERA icon from the Main Menu or from any operational mode when enabled to select camera mode Touch the top left area on the screen to exit camera mode Note The manual mode is for dedicated cameras that are ALWAYS on while driving i...

Page 28: ...slight adjustment of any custom controls may save you a service call 2 If you require service during the warranty period you must carefully pack the product preferably in the original package and ship it by prepaid transportation with a copy of the original receipt from the retailer to an authorized service center 3 Please describe your problem in writing and include your name a return UPS shippin...

Page 29: ...ss Mass storage class Output 5VDC 1A Compatibility SD memory card SDHC memory card Panel size 7 diagonal measurement View angle up down left right 50 70 70 70 Resolution 800 H x 480 V Brightness cd m2 250 Contrast ratio 500 1 Pixels 1 152 000 Speaker output impedance 4 ohms Line output voltage 4 volt RMS Line output impedance 200 ohms Chassis dimensions 7 x 7 x 2 W x D x H Design and specification...

Page 30: ...not connected Parking brake not applied Check connections at parking brake Apply parking brake as described on page 26 No video display when in reverse Reverse circuit not connected Vehicle is not in reverse Check connections at reverse lamp Select reverse gear DVD does not start playback Physical defect in media Wrong region Check media for scratches Use discs labeled Region 1 or All only IR remo...

Reviews: