Installation
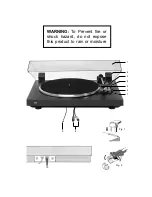
1.
Dust cover
7.
Stylus
2.
Hinge
8.
Audio Cinch Plugs
3.
Cueing lift lever
9.
Earth Wire
4.
Speed Selector
10.
Connection socket for mains set at 12 V / D.C
5.
tonearm support with tonearm lock
6.
Automatic start - stop switch
Preliminary operations
Unpack the unit and all the accessories. Please keep the packaging for future use when transporting the device.
– Insert the hinges
2
in the appropriate recesses (fig. 1)
– Slide the cover
1
parallel to the position of the hinges
2
(opening angle approximately 60º) until it locks in
position. In this position, the cover can be removed any time.
Supply of the mains set (Australia only)
The delivered mains set will be connected to the socket
10.
The mains set, corresponding to the voltage
Indicated on the nameplate has to be plugged in to the power-supply plug (230 V / 50Hz).
Connection to phono stage, amplifier or receiver
– Connect the audio cables
8
to the phono-magnetic inputs of the phonostage, amplifier or receiver
(red RCA-type plug = right channel, white RCA-type plug = left channel).
– Connect earth wire
9
to the earth connector of you amplifier.
Automatic start, speed selection
– The record diameter for the automatic start is also pre-selected when the record speed 33.33 or 45 rpm
4
is selected.
– Remove the stylus guard by pulling it forwards and disengage the tonearm set switch
6
to
Start
– The tonearm is lowered automatically onto the record.
Manual start, cue control
– Select the required platter speed, 33.33 or 45 rpm, by means of the switch
4
, swivel the stylus protection
cap upwards, set the cueing lever
3
to position
– Now position the tonearm over the lead-in groove of the record. The tonearm is now lowered slowly onto
the record using the cueing lever
3
. The tonearm is lowered slowly, thus preventing damage to your records.
– The tonearm can be raised at any position, also for brief interruptions when playing, by means of the cue
control lever (cueing lever in position ). The platter continues to rotate in this case.
Stop
– At the end of record, the tonearm is automatically repositioned back on the tonearm post and unit is
switched off.
– You can also switch off the turntable by setting the cueing lever
3
to position and repositioning the
tonearm on the tonearm post.
Stylus DN 251 S
The stylus is subject to natural wear and tear during normal playing. Therefore, we recommend you occasion-
ally check the stylus and, in the case of the diamond styli, this should be carried out after approximately 300
hours playing hours. Worn or damaged (splintered) styli chisel the modulation from the grooves and destroy
records. Therefore, only use the stylus types recommended in the techical date of the cartridge as replacement
cartridges. Imitated styli result in audible quality losses and increased wear and tear of records.
Pull of the stylus slanting downwards, Insert the stylus in the reverse mode (fig. 2)


