background image

XDVD8285 

OPERATION

76

Bluetooth

®

 - OSD Overview (Optional)

Audio Transfer Button


Press to transfer audio between the head unit and mobile phone.

End button


Press to end a call in progress or to reject an incoming call.

Setup Menu Icon


Press to access Bluetooth setup menu.

Phone book Icon


Press to access the phone book menu.

Keypad Interface Icon


Press to display the keypad interface.

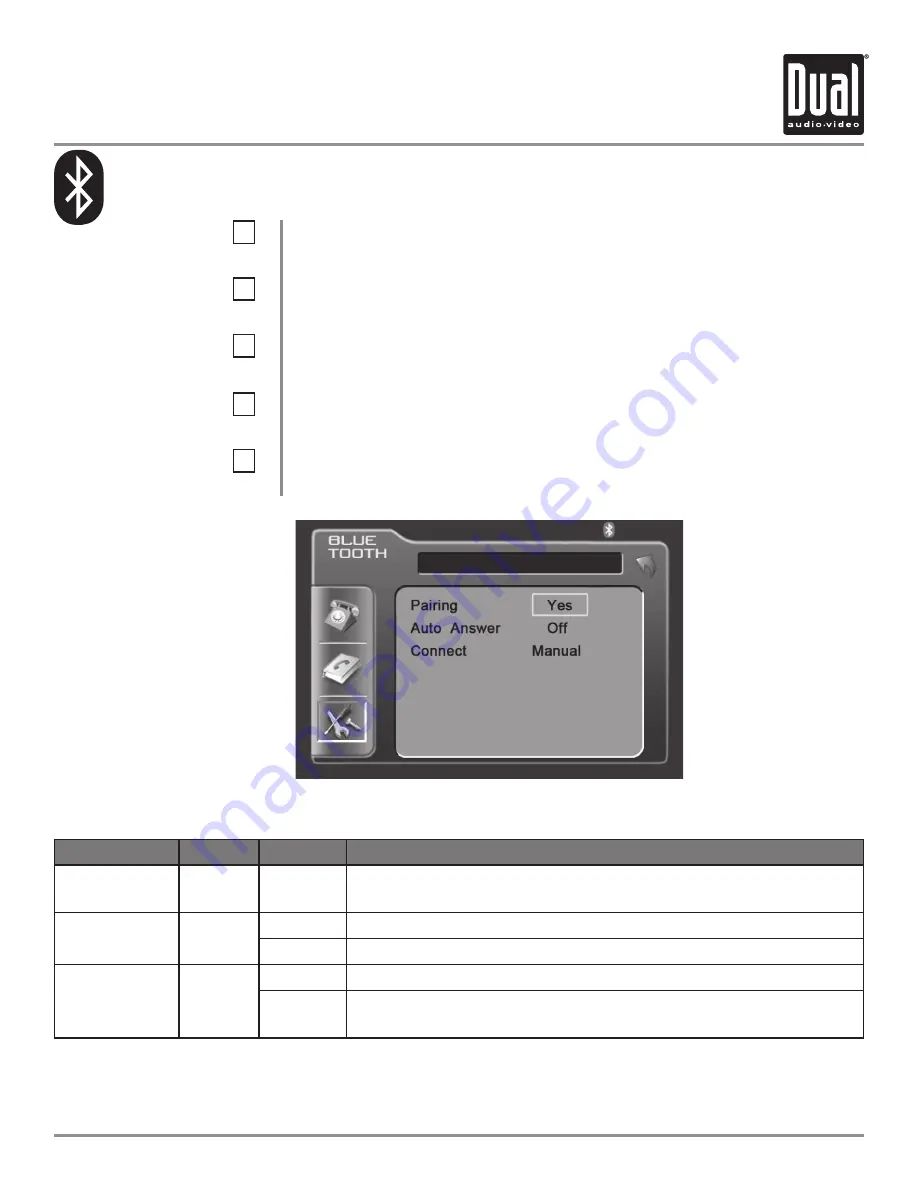
Bluetooth Setup Menu matrix

9

10

7

8

Settings

Default

Options

Function

Pairing

Yes

Yes 

(Pair)

Press Yes to begin the pairing function. Press Yes again to cancel 
the pairing process. See page 77 for more details.

Auto Answer

Off

Off

You must press the Talk button to answer an incoming call.

On

The head unit will automatically answer incoming calls.

Connect

Manual

Manual

You must connect the phone to the head unit manually each time.

Auto

The head unit will automatically connect to a previously paired 
phone. See page 77 for more details.

Bluetooth Setup Menu

11

Notes:

 Some Bluetooth approved devices may not communicate or work properly with this head unit, depending on 

the features or specifications of the device. During hands free operation, some noise may be heard when using a 
mobile device with this head unit, depending on the mobile device and or the communication  environment.

Summary of Contents for XDVD8285

Page 1: ...in dash unit will not operate while the vehicle is moving This is a safety feature to prevent driver distraction In dash DVD video functions will only operate when vehicle is in Park and the parking...

Page 2: ...horized by Macrovision Corporation Reverse engineering or disassembly is prohibited Manufactured under license from Dolby Laboratories Dolby and the double D symbol are trademarks of Dolby Laboratorie...

Page 3: ...Control Locations Monitor Closed Control Locations Monitor Open Control Locations Remotes General Operation General Setup Menu Setting the Clock Anti theft Code Screen Setup ASP Config AM FM Tuner Ope...

Page 4: ...if the vehicle is not in Park and or the parking brake is not fully engaged When installing this unit the installer must connect the parking brake detect wire Yellow Blue Lead to the parking brake mec...

Page 5: ...the vehicle is moving Find a safe place to park and engage the parking brake 9 If you experience problems during installation consult your nearest DUAL dealer 10 If the unit malfunctions reset the uni...

Page 6: ...unting brackets and attach to the left and right sides of the XDVD8285 chassis See diagram below 2 Front load using mounting sleeve Install mounting sleeve into opening bending tabs to secure Connect...

Page 7: ...he CAMERA input NEED HELP Call our Technical Service Hotline 1 866 382 5476 Wiring Notes XDVD8285 INSTALLATION Expanded Wiring Diagram Inputs Outputs The DVD video display of the in dash unit will not...

Page 8: ...7 Wiring Diagram Optional A V Connections XDVD8285 INSTALLATION...

Page 9: ...o first use the IR Remote control you must first pull the battery insulation tape out Insert or replacing the Battery Remove the battery holder Remove the battery from the battery holder Install the n...

Page 10: ...monitor Before final installation make sure the monitor will not obstruct the dash shifter or any other controls Upon installation do not attempt to move the monitor by hand Use the button on the fron...

Page 11: ...Press MENU again to return to the current mode Press to toggle between the Volume and Select functions When idle push and hold for 3 seconds to enter the Audio Setup Menu Normally the rotary controls...

Page 12: ...ottom right corner of the unit After a system reset the unit resets the main processor but not the default settings Notes Use the tip of a pen to access the reset button To restore the factory default...

Page 13: ...functions will only operate when vehicle is in Park and the parking brake is engaged It is illegal in most states for the driver to view video while the vehicle is in motion Safety Notes Control Locat...

Page 14: ...Title Menu JPEG thumbnail view 4 Way Down 16 17 18 19 20 21 22 23 24 25 26 27 28 29 30 Root Repeat Chapter Track Down Chapter Track Up Fast Reverse Fast Forward Zoom Audio Angle Sub Title 31 32 33 34...

Page 15: ...formation Search function in the DVD mode Press to increment BAND or STOP while in DVD MP3 mode Enter AUDIO Setup mode Exit current menu Navigating system and DVD SD JPEG menus Enter the MAIN system m...

Page 16: ...Way Right Chapter Track Down 4 Way Down Chapter Track Up 12 13 14 15 16 17 18 19 20 21 22 Stop Play Pause Zoom Fast Reverse Fast Forward Slow Repeat Audio Sub Title Repeat A B Angle 23 24 25 26 27 28...

Page 17: ...Enters the main menu of the DVD Navigating system and DVD SD JPG menus Starts pauses playback or confirm settings Selects the previous chapter track for playback Selects the next chapter track for pl...

Page 18: ...ntarily to advance to desired parameter to be changed Turn rotary Q or P to adjust to desired level Press rotary to advance to next selection and press and hold to exit Note 6 Channel audio is only ad...

Page 19: ...ux or Camera mode Press and hold PIC for 2 seconds to access PICTURE MENU Press PIC momentarily to step to next selection Press or to adjust the sharpness 0 minimum 20 maximum Press or to adjust the c...

Page 20: ...access SD mode Optional SD card must be inserted Touch to access SCREEN SETUP menu Touch to access GENERAL SETUP menu Touch to access ASP Config menu Touch to access CD DVD SETUP menu CD DVD must be i...

Page 21: ...riate setting for your country S Amer1 S Amer2 Europe Clock adjust AM 00 00 See adjusting the clock on page 23 for more details Clock Mode 12Hr 12Hr PM 6 00 24Hr 18 00 Camera Image Normal Normal Norma...

Page 22: ...Default Options Function Bluetooth Off Off Turns off the Bluetooth functionality On Enables Bluetooth functionality Anti theft Code 0000 Must enter password to turn anti theft on or off Anti theft act...

Page 23: ...adio Frequency Step 1 Step 2 Step 3 Step 4 Step 5 1 Touch top left corner of screen 2 Touch GENERAL icon 3 Touch USA 4 Touch the setting for your region Touch RETURN to exit L GENERAL Setup Adjusting...

Page 24: ...ock Mode 1 Touch top left corner of screen 2 Touch GENERAL icon 3 Touch 00 00 area in the CLOCK row 4 Keypad will appear 5 Enter HOURS touch OK 6 Enter MINUTES touch OK 7 Touch AM or PM to set 8 Touch...

Page 25: ...9 10 1 Touch top left corner of screen 2 Touch GENERAL icon 3 Touch down arrow icon 4 Touch 5 Enter 0000 then press OK 6 Touch Off 7 Touch On 8 Touch again 9 Enter your new 4 digit password then press...

Page 26: ...however all other operations continue to operate Press any button except VOLUME or touch the screen again to return to normal viewing L SCREEN Setup Menu L Settings Default Options Function Brightness...

Page 27: ...play brightness This can also be set by pressing the INFO button on the front TFT panel Step 1 Step 2 Step 3 Step 4 Step 5 1 Touch top left corner of screen 2 Touch SCREEN icon 3 Touch to reduce brigh...

Page 28: ...angle for your vehicle Step 1 Step 2 Step 3 Step 4 Step 5 1 Touch top left corner of screen 2 Touch SCREEN icon 3 Touch a number displayed in SCREEN TILT row 4 Touch desired angle for best viewing an...

Page 29: ...of screen 2 Touch SCREEN icon 3 Touch No in TS Calibration row 4 Then touch Yes 5 Touch and hold the pointers as indicated on the screen for 2 seconds each 6 Screen will automatically return to MAIN M...

Page 30: ...t Choices are 60 80 100 130 150 and 200Hz Sets the treble center frequency for optimal treble effect Choices are 10 12 5 15 and 17KHz Sets the subwoofer crossover frequency which affects the subwoofer...

Page 31: ...ween 7 to 7 with 0 being the reference point default level Adjusts the relative volume in AM FM Tuner mode Adjusts the relative volume in DVD CD MP3 WMA mode Adjusts the relative volume in Bluetooth m...

Page 32: ...Preset Number List Display Shows the preset list by preset number Preset Station List Display Shows the preset station list by frequency Touch frequency to select a preset Touch and hold frequency to...

Page 33: ...band This function can also performed by pressing the AS PS button Holding this button for more than 2 seconds will automatically program the 12 strongest stations available into the presets in the cu...

Page 34: ...d either or on the screen to continue tuning across multiple stations From the remote control Touch or to perform manual tuning Touch to tune to the next higher strong station Touch to tune to the nex...

Page 35: ...highlighted channel Use the up and down arrows on screen to scroll through the presets Once highlighted simply touch the screen at the appropriate preset From the remote control Press or to scroll thr...

Page 36: ...if the vehicle is not in Park and or the parking brake is not fully engaged When installing this unit the installer must connect the parking brake detect wire Yellow Blue Lead to the parking brake mec...

Page 37: ...udio can be heard while the vehicle is in motion without engaging the parking brake Follow these two initialization procedures carefully to allow video playback on on the XDVD8285 TFT There are two si...

Page 38: ...DVD software encoded for other region areas than the region areas for which it has been designed The XDVD8285 will play discs labeled Region 1 or All DVD region codes 1 USA Canada 2 Japan Europe South...

Page 39: ...ic content Read the directions of your specific DVD disc for other features Note If PARENTAL Lock is activated and the disc inserted is not authorized a 4 digit code must be entered and or the disc be...

Page 40: ...SCREEN areas as outlined below A area can be used in any mode to access MAIN menu A F areas can be used in DVD mode to access A Displays MAIN menu B Displays DVD disc information C Selects PREVIOUS c...

Page 41: ...apter E Displays the full DVD transport controls F GOTO search menu L L L L L L AREA A Access MAIN Menu AREA B Displays Disc Information AREA C Selects PREVIOUS Track AREA D Selects NEXT Track AREA E...

Page 42: ...speed Each touch changes speed from 2x to 4x to 8x to 20x then back to 1x play Fast Forward Touch the icon to fast forward at 2x speed Each touch changes speed from 2x to 4x to 8x to 20x then back to...

Page 43: ...area and an on screen keyboard will pop up Use the keyboard to enter a title and chapter and touch OK This can be used to select a specific chapter in the current title a new title or a specific chap...

Page 44: ...te The Repeat Mode can only be changed while the DVD is playing Touch the A B icon once to select a start point Touch it a second time to select and end point The A B icon will illuminate and the DVD...

Page 45: ...D is playing Touch Area B to bring up the DVD Disc Information which includes Current Total Titles and Chapters elapsed time for current title EQ Mode and Loudness setting current time and Multi ZONE...

Page 46: ...ect LANGUAGE setup page Press to select desired disc subtitle language English French Spanish Auto Off DEFAULT Press to select desired disc audio language English DEFAULT French Spanish Press to selec...

Page 47: ...esired channel The pink noise generator is used to set the relative speaker levels for multi channel playback Select On to activate dynamic range control Audio Setup Menu Pink Noise Dynamic Range Cont...

Page 48: ...ed rear channel time delay The distance is defined in milliseconds Select On to activate audio down sampling The DVD audio output will be downsampled to 48kHz The original sampling frequency is preser...

Page 49: ...the following menus Press to select desired TV shape Select On to activate angle mark Press to select desired view mode Video Setup Menu TV Shape Angle Mark View Mode DVD Setup Menu Video Note A DVD...

Page 50: ...o select from the following menus Select desired speaker output mode Select size of front speaker Note Full 6CH mode must be selected to adjust the front speaker size Speaker Setup Menu Speaker Mode F...

Page 51: ...r Note Full 6CH mode must be selected to adjust the surround speaker size subwoofer speaker and center speaker size Surround Speaker Size Subwoofer Speaker Center Speaker Size DVD Setup Menu Speaker N...

Page 52: ...ect desired decode mode Select On to activate panorama mode Activating panorama mode extends the front stereo image to include the surround speakers for a wraparound effect Note PLII Music decode mode...

Page 53: ...f the center image so it may be heard only from the center speaker if equipped only from the Left Right speakers as a phantom center image or various combinations of all three front speakers Note PLII...

Page 54: ...ite the code down 3 Save in a safe place When unlock symbol is displayed select desired rating 1 Kid Safe 2 G 3 PG 4 PG 13 5 PG R 6 R 7 NC 17 8 Adult DEFAULT In the event you forget or loose your PARE...

Page 55: ...al number of tracks on the disc Disc Title Indicator Displays current disc title when available Track Title List Displays up to 6 tracks on the disc in order with track title when available Repeat Tou...

Page 56: ...st reverse at 2x speed Each touch changes speed from 2x to 4x to 8x to 20x then to 1x play Page Up Touch the icon to see the next 6 tracks on the disc Page Down Touch the icon to see the previous 6 tr...

Page 57: ...ack Access Previous Next Page After inserting a CD disc files will play in numerical order in the directory Touch to display keypad Enter desired track number and press OK Touch desired track for DIRE...

Page 58: ...ks Once highlighted simply touch the screen at the appropriate track Press Rapid Dial rotary encoder once Select desired track by rotating clockwise or counter clockwise Press to confirm ENTER From th...

Page 59: ...ote Shuffle and Repeat modes can not be used simultaneously and engaging one mode will cancel the other mode if active Touch SCAN on the screen to listen to all tracks on the CD for 10 seconds at a ti...

Page 60: ...ire disc Folder Displays the name of the currently selected folder Filename List Displays up to 6 songs in the current folder in order with filename File Type Indicator Displays type of song file eith...

Page 61: ...ee the next 6 songs in the folder Page Down Touch the icon to see the previous 6 songs in the folder Information Displays available information for the current song Stop Touch icon to stop the song wh...

Page 62: ...kip to the previous song Note Pressing the or button once will return to the beginning of the current song Pressing it a second time will skip to the previous song To select a desired song from the fi...

Page 63: ...le Previous Song will return to the start of the current song and then a second press will return to the previously played song Touch the Repeat button to repeat either a song or folder The first touc...

Page 64: ...sc Folder Displays the name of the currently selected folder Filename List Displays up to 6 songs in the current folder in order with filename File Type Indicator Displays type of song file either MP3...

Page 65: ...Up Touch the icon to see the next 6 songs in the folder Page Down Touch the icon to see the previous 6 songs in the folder Information Displays available information for the current song Stop Touch t...

Page 66: ...kip to the previous song Note Pressing the or button once will return to the beginning of the current song Pressing it a second time will skip to the previous song To select a desired song from the fi...

Page 67: ...le Previous Song will return to the start of the current song and then a second press will return to the previously played song Touch the Repeat button to repeat either a song or folder The first touc...

Page 68: ...on the screen for 5 seconds unless paused JPEG mode will automatically exit when the next file is not a picture or when STOP is pressed Touching this zone will bring up the Main Menu for the unit Touc...

Page 69: ...current picture If Stop is touched a second time then playback stops completely and will restart from the beginning of the disc card From the remote control Press to stop the viewer Touch or to rotate...

Page 70: ...or folders that do not include MP3 WMA files are skipped This unit may not play files in the order they were recorded in Refer to your recording software s user s manual for more information ISO9660 l...

Page 71: ...A extension 32kHz 48kHz 32kHz 48kHz 40kbps 320kbps constant Variable bit rates 40kbps 192kbps constant Variable bit rates Note Some files may not play or be displayed correctly depending on sampling r...

Page 72: ...Shows a list of the available XM channels Preset mode Shows the preset list by preset number Name Displays the name of the artist of the current song Channel List Preset list Display Standard mode Sho...

Page 73: ...unction can also be performed by pressing Category View Pressing this button will display a list of available categories A channel can then be selected within a specific category Preset Bank Select Pr...

Page 74: ...ch preset bank is selected Each press of the button will change the display from XM to XM 1 to XM 2 to XM 3 and back to XM From the remote control Press the BAND button Touch CH or press to select the...

Page 75: ...e the up and down arrows on screen to scroll through the category list Once highlighted simply touch the screen at the appropriate category Use Rapid Dial rotary encoder to select desired category Sel...

Page 76: ...Indicator Displays source or current mode Talk button Press to answer an incoming call or to place an outgoing call Display Indicator Phone number display and call status indicator Bluetooth status in...

Page 77: ...o cancel the pairing process See page 77 for more details Auto Answer Off Off You must press the Talk button to answer an incoming call On The head unit will automatically answer incoming calls Connec...

Page 78: ...bled devices To search for this head unit from another device when already connected press Yes under the Pairing function The currently connected device will be disconnected and pairing to the new dev...

Page 79: ...oading missed phone book will be displayed during the retrieval process followed by The phone book is done Touch the desired name to call Press the page up down buttons to navigate through the pages I...

Page 80: ...BY Off to active Touch to set AUXILIARY A V INPUT mode as the Multi Zone mode Touch to set SD mode as the Multi Zone mode SD card must be inserted Touch to access SCREEN SETUP menu Touch to access GEN...

Page 81: ...ard is selected as the front zone source DVD is not available for the Multi Zone source Since the multimedia processor is shared between optical disc and SD Card reader only one or the other source ca...

Page 82: ...n touching this icon will tune the radio to a lower frequency by one frequency step Preset scan auto station store touching this icon will scan through all presets in the current band Holding this but...

Page 83: ...vailable channel in the current category Bank indicator shows which XM bank is currently displayed Name displays the name of the artist of the current song Title displays the title of the current song...

Page 84: ...rn shipment of the product Specific license conditions and copyright notices for the software can be found via www dualav com What to do 1 Before you call for service check the troubleshooting guide i...

Page 85: ...skipping Unit is not mounted correctly Check mounting sleeve Physical defect in media Check media for scratches Bad Disc appears on display Focus error or disc is in upside down Press eject or RESET...

Page 86: ...t function is set to Manual When the Connect function is set to Manual the head unit will not connect to any mobile device automatically Set Connect function to Auto as described on page 77 Ring tone...

Page 87: ...0 55 60 60 Resolution 400 W x 234 H Brightness cd m2 350 Contrast ratio 350 1 Elements 280 800 Operating voltage 11 16 VDC negative ground Speaker output impedance 4 8 ohms Line output voltage 2 Volts...

Page 88: ...Dual Electronics Corp Toll Free 1 866 382 5476 www dualav com 2010 Dual Electronics Corp All rights reserved NSA0110 V02 Printed in China...

Reviews: