DSC PowerSeries Neo HS2TCHP Installation Instructions Manual Download Page 3

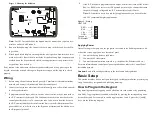
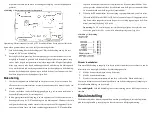
Figure 2 - Mounting the Backplate

mounting hole

mounting hole

mounting hole

wiring slot

mounting hole

hole for 
tamper 
screw

Note:

For ULC fire installations, the keypad must be mounted on top of an elec-

trical box and used with conduit.

5.

Run wire through wiring slot. Connect Corbus wiring to the keypad. See the Wir-

ing section.

6.

Place keypad into backplate, ensuring that the wire is pushed back into the wall as

much as possible. Route the wire inside the keypad ensuring high components are

avoided. Snap the front assembly closed, ensuring that there is no pressure to the

keypad from the wire below.

If any tension is found between the front keypad assembly and wiring, please open the

keypad, re-route the wire and close again. Repeat these steps until the keypad is closed

properly.

Wiring

1.

Before wiring the unit, ensure that all power (AC transformer, telecommunications

network, and battery) is disconnected from the control panel.

2.

Connect the four corbus wires from the control panel (green, yellow, black and red)

to the keypad terminals.

3.

If programmed as an input, a device, such as a door contact - may be connected to

the ‘P/Z’ terminal of the keypad. This eliminates the need to run wires back to the

control panel for the device. To connect the zone, run one wire from the device to

the ‘P/Z’ terminal and the other wire from the device to the B (black) terminal. For

powered devices, run the red wire to the R (positive) terminal and the black wire to

the B (negative) terminal.

4.

If the ‘P/Z’ terminal is programmed as an output, a small relay (such as DSC model

RM-1 or RM-2) or buzzer or other DC operated device may be connected between

the positive supply voltage and the ‘P/Z’ terminal (max.load is 50mA).

Note:

P/Z terminal is not to be used for fire applications but can be used for low

risk ULC commercial burglary applications.
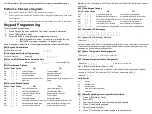
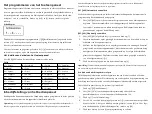
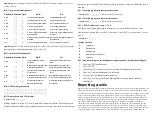
Figure 3 - Wiring

HS2TCHP

       RED           R
       BLK            B
       YEL            Y 
       GRN           G      
To zone or         P/Z
PGM output

____

____
____
____
____

____

Applying Power

Once all wiring is complete, and the equipment is secured to the building structure with

at least two screws, apply power to the control panel.

1.

Connect the battery leads to the battery.

2.

Connect the AC transformer.

3.

Connect telecommunication network (e.g., telephone line, Ethernet cable, etc.)

For more information on control panel power specifications, refer to the Control Panel

installation manual.

Caution:

Route all the wiring according to the local codes and regulations

Basic Setup

This section describes how to configure the keypad, including enrollment, proximity tag

setup, function key assignment and label programming.

How to Program the Keypad

Programming consists of toggling on and off options in each section or by populating

data fields. Toggle options are enabled or disabled by pressing the corresponding num-

ber on the keypad. For example, to enable toggle options 1 and 4, press the [1] and[4]

keys. See the following diagram.

Summary of Contents for PowerSeries Neo HS2TCHP

Page 1: ...en worden gebruikt in combinatie met de systeeminstallatiehandleiding van het centrale waarmee deze apparatuur is bestemd om te worden gebruikt AVVERTENZA Fare riferimento al Manuale di installazione...

Page 2: ...ard 32 x 24 x 2 1 mm If necessary the SD card can be formatted to file system FAT16 or 32 using a PC The maximum size SD card supported is 32 GB l Wiring standard four wire connection l View angle hor...

Page 3: ...o the B black terminal For powered devices run the red wire to the R positive terminal and the black wire to the B negative terminal 4 If the P Z terminal is programmed as an output a small relay such...

Page 4: ...the model type serial number and slot assignment Keypads are assigned to the next available slot 902 001 Manual Enroll 1 Enter 902 001 or use the keys and press 2 When prompted enter the serial number...

Page 5: ...Mode 33 Bypass Recall 34 User Programming 35 User Functions 37 Time Date Program 39 Trouble Display 40 Alarm Memory 61 68 Partition Select 1 8 Programming Labels 1 From the HS2TCHP keypad press Optio...

Page 6: ...larms DisplayedWhileArmed Alarms Not DisplayedWhileArmed OFF I__I 8 Auto ScrollOpenZones ON Auto ScrollOpenZones OFF Note ForUL ULC installations bit 5 PowerLED and bit 6 PowerLED IndicatesAC Present...

Page 7: ...Copy You may make back up copies of the SOFTWARE PRODUCT but You may only have one copy per license installed at any given time You may use the back up copy solely for archival purposes Except as expr...

Page 8: ...hotos Not all products include all features Availability varies by region contact your sales rep resentative This product contains open source components QT Version 4 7 3 and Linux Kernel License Vers...

Page 9: ...re Digital SD kaart 32 x 24 x 2 1 mm Indien nodig kan de SD kaart met gebruikmaking van een PC worden geformatteerd in het bestandssysteem FAT16 of 32 De maximaal ondersteunde omvang voor de SD kaart...

Page 10: ...door is het niet nodig om draden terug naar de centrale te laten lopen vanaf het apparaat Om de zone aan te sluiten laat u n draad vanaf het apparaat naar de P Z aansluitklem lopen en de andere draad...

Page 11: ...nmelden Als deze modus is geselecteerd wordt het totale aantal bedienpanelen dat momenteel is geregistreerd op het bedienpaneel weergegeven 1 Voer 902 000 om met de automatische registratie van nieuwe...

Page 12: ...t 7 knoppen op het scherm Start waarvan er 4 kunnen worden gepro grammeerd door de installateur Functietoets 2 moet altijd zijn ingesteld op Afwezig inge schakeld Om functietoetsen 1 3 4 5 te programm...

Page 13: ...teer de als achtergrondafbeelding te gebruiken afbeelding van de SD kaart 3 Om te verlaten drukt u op de Terug of Start knop Het uitvoeren van een firmware upgrade 1 Steek een SD kaart met de nieuwe f...

Page 14: ...kan worden gewist door op een willekeurige toets te drukken 041 Toewijzingen temperatuurzone binnenshuis Standaard 000 I___I___I___I Geldige waarden zijn 000 128 042 Toewijzingen temperatuurzone buite...

Page 15: ...ING VAN ANDERE RECHTEN EN BEPERKINGEN a Beperking op reverse engineering decompileren en disassembleren U mag het SOFTWAREPRODUCT niet onderwerpen aan reverse engineering decompileren en disassemblere...

Page 16: ...DIENSTEN UITVALTIJD AANKOOPTIJD CLAIMS VAN DERDEN INCLUSIEF KLANTEN EN EIGENDOMSSCHADE WAARSCHUWING DSC raadt aan om het gehele systeem regelmatig volledig te testen Het is echter mogelijk dat dit SO...

Page 17: ...ot per schede SD compatibile con qualsiasi scheda Secure Digital SD 32 x 24 x 2 1 mm Se necessario la scheda SD pu essere formattata per il sistema di file FAT16 o 32 tramite un computer La capacit ma...

Page 18: ...trollo verde giallo nero e rosso ai Terminali della tastiera 3 Se programmato come ingresso un dispositivo come contatto porta pu essere collegato al terminale P Z della tastiera Questo permette di el...

Page 19: ...volta accesa la tastiera visualizzer il messaggio Premere il pulsante di registrazione sul touchscreen Altre tastiere possono essere quindi registrare dalla prima tastiera Utilizzare una delle seguen...

Page 20: ...e un utente per cancellare 3 Selezionare il tag di prossimit quindi cancellare Funzione assegnazione tasti HS2TCHP ha 7 pulsanti sullo schermo Home quattro di essi programmabili dal rivenditore Il tas...

Page 21: ...uscire premere il pulsante Indietro o Home Aggiornamento del firmware 1 Inserire una scheda SD con il nuovo firmware nel HS2TCHP 2 Premere Opzioni Menu Installatore Codice Installatore Programmazione...

Page 22: ...lizzazione temperaturalocale Nessunavisualizzazione temperaturalocale Disabilitato I__I 8 Avvisobassatemperatura abilitato Avvisobassatemperatura disabilitato 030 Messaggio LCD scaricato I___I___I___I...

Page 23: ...dere e utilizzare il PRODOTTO SOFTWARE in concomitanza su e da altri computer incluse stazioni di lavoro terminali e altro dispositivo elettronico digitale Dispositivo In altre parole se l Utente disp...

Page 24: ...LUSIVO E LIMITAZIONE DELLA GARANZIA IN NESSUN CASO LA DSC SAR RESPONSABILE NEI CONFRONTI DI TERZI PER ALCUN DANNO SPECIALE INCIDENTALE CONSEQUENZIALE O INDIRETTO BASATO SU VIOLAZIONE DI GARANZIE PRODO...

Page 25: ...mm grubo l Wymiary wy wietlacza 155 mm wysoko x 86mm szeroko l Slot kart SD kompatybilny z ka da kart SD o wymiarach 32 x 24 x 2 1 mm l Je eli wymagane za pomoc komputera kart mo na sformatowa do plik...

Page 26: ...adzenia przewod w z centrali do urz dzenia Linie pod cza si do zacisk w P Z i B Black W przypadku urz dze wymagaj cych zasiania przewody zasilaj ce urz dzenie nale y pod czy do zacisk w R 12V i B Blac...

Page 27: ...p urz dzenia numer seryjny oraz przydzielony adres Klawiatury zostan przypisane do kolejnych wolnych adres w 902 001 R czne przypisywanie 1 Wprowadzi numer sekcji 902 001 lub u y przycisk w kursor w b...

Page 28: ...1 3 4 5 nale y 1 Wybra w opcjach Tryb klawiatury wprowadzi 8 kod instalatora 2 Wybra sekcje 861 876 dla programowania danej klawiatury adresy klawiatur 1 16 3 Wybra sekcje 001 005 dla przycisk w funkc...

Page 29: ...owania klawiatury 1 W o y kart SD z nowym oprogramowaniem do slotu klawiatury HS2TCHP 2 Z poziomu menu klawiatury wybra Opcje Menu Instalatora Kod instalatora Programowanie klawiatury a nast pnie wybr...

Page 30: ...I I___I___I___I___I___I___I___I___I___I___I___I___I___I ___I 031 Liczba wy wietle komunikatu na klawiaturze Fabrycznie Dane z zakresu 000 255 000 I___I___I___I 000 Nieograniczony czas wy wietlania wia...

Page 31: ...ka da nabyta licencja udziela U ytkownikowi prawa do jednej zainstalowanej kopii OPROGRAMOWANIA b Przechowywanie U ytkowanie w sieci OPROGRAMOWANIA nie mo na instalowa udost pnia wy wietla uruchamia w...

Page 32: ...JAKIEGOKOLWIEK ZAPISU NINIEJSZEJ UMOWY LICENCYJNEJ B DZIE OGRANICZONA DO WI KSZEJ Z DW CH KWOT KWOTY ZAP ACONEJ PRZEZ U YTKOWNIKA ZA OPROGRAMOWANIE LUB KWOTY 5 00 DOLAR W KANADYJSKICH 5 00 CAD ZE WZG...

Reviews: