background image

Apply AC Power

CAUTION: The socket-outlet in which the
direct plug-in adaptor is inserted must be
close to the keypad, easily accessible, and
have unobstructed access. The plug of the
adaptor serves as a means of disconnection
from the supply mains.
1. Slide the keypad up and out from the
mounting plate/desk stand.
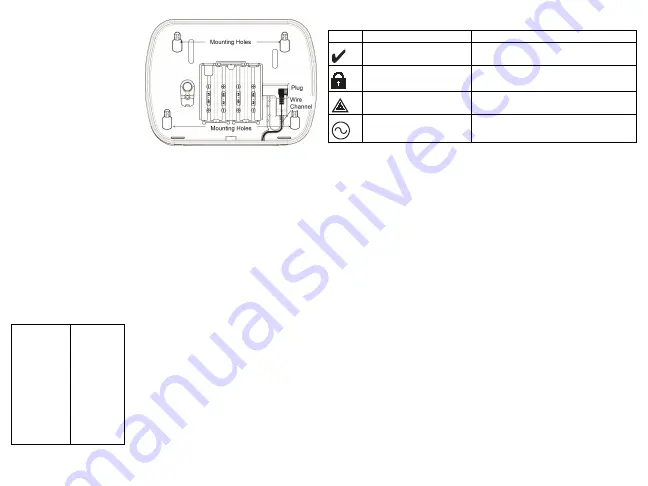
2. Locate the power adaptor jack at the
back of the keypad housing.
3. Place the adaptor plug in the housing
indentation, perpendicular to the keypad.
Insert the adaptor plug firmly into the jack.
4. Pivot the adaptor plug downwards so that
it fits flush with the housing. Guide the AC
wire along the channel provided in the keypad housing; the wire will extend through the bottom of the
housing.
5. Replace the keypad on the mounting plate/desk stand (in the latter case, a further channel is
provided in the bottom of the desk stand. Guide the AC wire along this channel; the wire will extend
through an opening in the back of the stand).
6. Plug the adaptor into a wall outlet.
Only use the power adaptor (9.0VDC, @1.25A, 2.25W, limited power supply for models: HK-XX11-
U09N (UL) and HK-XX11-U09NC (ULC).

Program the Keypad

There are several programming options available for the keypad (see the following table). Programming
the keypad is similar to programming the rest of the system. The installer menu is a text driven flow.
For information on programming the rest of your security system, refer to your system’s installation
manual.
1. Press [*][8][Installer Code].
2. Use the [<][>] keys to navigate through the menus or jump directly to a specific section by entering
the section number.

Language Programming

To enter language programming, enter [000]>[000], then enter the two-digit number that corresponds to
the language desired:

01 = English (def)
02 = Spanish
03 = Portuguese
04 = French
05 = Italian
06 = Dutch
07 = Polish
08 = Czech
09 = Finnish
10 = German
11 = Swedish
12 = Norwegian
13 = Danish
14 = Hebrew
15 = Greek

16 = Turkish
17 = Future Use
18 = Croatian
19 = Hungarian
20 = Romanian
21 = Russian
22 = Bulgarian
23 = Latvian
24 = Lithuanian
25 = Ukrainian
26 = Slovakian
27 = Serbian
28 = Estonian
29 = Slovenian

Keypad Symbols

Symbol

Description

Ready Light (Green)

If Ready light is ON, the system is ready to arm.

Armed Light (Red)

If Armed light is ON/Flashing, the system has been
armed successfully.

System Trouble (Yellow)

ON - Indicates that a system trouble is active..
Flashing - Keypad low battery.

AC (Green)

ON - Indicates that AC is present at the keypad

Enroll HSM2HOST

The HSM2HOST wireless transceiver or HS2LCDRF/HS2ICNRF keypad must be enrolled onto the
alarm panel before any wireless devices can be enrolled. When the alarm system is powered up for the
first time, the first keypad or the HSM2HOST (if using a wireless keypad as the first keypad) can be
enrolled. To do this:
1. Once the HSM2HOST is wired to the alarm panel and power has been applied, power up a wire-
less keypad.
2. Press any button on the keypad to enroll it on the HSM2HOST. The HSM2HOST is then auto-
matically enrolled on the alarm panel.

Enroll Keypad

1. Press [*][8][Installer Code] and then [804][000].
2. When prompted, either activate the device to enroll immediately or enter a device serial number. Do
the latter to pre-enroll devices then enroll them later at the customer site.
3. Use the [<][>] keys or enter the corresponding number to select an option.
4. Scroll through the available selections and enter a number or enter text as appropriate.
5. Press [*] to accept and move to the next option.
6. Once all options are configured, the system prompts you to enroll the next device.
7. Repeat this process until all wireless devices are enrolled.
For UL/ULC Residential Fire applications, HS2LCDWF9, HS2LCDWFP9, HS2LCDWFPV9
keypads must be set up for 200 seconds wireless supervision, by enabling toggle option 4 (200s Fire
Supv), in section [804][810].

Delete Keypad

1. Press [*][8][Installer Code] and then [804][905].
2. Use the [<][>] keys to select the keypad or press [#] to exit.
3. Press [*] to delete. The screen will read “Keypad deleted”.

Summary of Contents for PowerSeries Neo HS2LCDWF

Page 1: ...Informationen zu den Haftungsbeschr nkungen des Herstellers HINWEIS Diese Installationsanleitung muss zusammen mit der Installationsanleitung der Alarmzentrale benutzt werden an welcher das Ger t ange...

Page 2: ...Tag w verbal annunciation 1 HS2LCDWF wall bracket 1 installation manual 1 inner door sticker 4 AA batteries 1 hardware pack 1 prox tag Mount the Keypad Mount the keypad where it is accessible from des...

Page 3: ...Danish 14 Hebrew 15 Greek 16 Turkish 17 Future Use 18 Croatian 19 Hungarian 20 Romanian 21 Russian 22 Bulgarian 23 Latvian 24 Lithuanian 25 Ukrainian 26 Slovakian 27 Serbian 28 Estonian 29 Slovenian...

Page 4: ...d to change the keypad voice chime volume level Use the scroll keys to increase or decrease the volume from levels 0 10 Selecting 00 turns off voice chime Change Brightness Contrast Buzzer LCD Keypads...

Page 5: ..._ 3 Panic Key Enabled Panic Key Disabled ON ______ 4 Display Access Code When Programming Display X s When Programming Access Codes OFF ______ 5 For Future Use For Future Use OFF ______ 6 For Future U...

Page 6: ...ond duration 05 Zone Name 991 Reset Keypad Programming to Factory Defaults 1 Press 8 Installer Code 2 Enter 991 3 Use the keys to scroll to the applicable keypad 4 Press to select the keypad 5 Re ente...

Page 7: ...Saver 195 1 231 016 Baby 052 Disarmed 088 Gym 124 Mother s 160 Schedule 196 2 232 017 Back 053 Door 089 Hallway 125 Motion 161 Screen 197 3 233 _ Underscore 018 Bar 054 Down 090 Heat 126 No 162 Second...

Page 8: ...ouwill not exportor re export theSOFTWARE PRODUCT toany country person orentity subjecttoCanadianexportrestrictions 5 CHOICE OF LAW This SoftwareLicenseAgreement is governedby thelaws of theProvinceof...

Page 9: ...s Bedienteils 4 AA Batterien 4 AA Batterien 1 Packung Befestigungsmaterialien 1 Packung Befestigungsmaterialien 1 Transponder HS2LCDWFPV Transponder mit Ansage 1 HS2LCDWF Wandhalterung 1 Installations...

Page 10: ...5 Griechisch 16 T rkisch 17 FFU 18 Kroatisch 19 Ungarisch 20 Rum nisch 21 Russisch 22 Bulgarisch 23 Lettisch 24 Litauisch 25 Ukrainisch 26 Slowakisch 27 Serbisch 28 Estnisch 29 Slowenisch Bedienfeldsy...

Page 11: ...Funk Bedienteile Men 6 Zugangscode Aufforderungsansage Diese Funktion dient zur Lautst rkeregelung der Aufforderungsansagen des Bedienfelds zum Beispiel Benutzerscharfschaltung im Gang Die Aufforderu...

Page 12: ...scharfschalten 34 Benutzer Programmierung 68 Bereich Auswahl 8 14 Global unscharf schalten 35 Benutzer Funktionen 16 Schnell verlassen 37 Uhrzeit und Datum einstellen Bedienteilprogrammierung Dr cken...

Page 13: ...hl der L schungen der heruntergeladenen Mitteilung bevor sie permanent entfernt ist Dr cken Sie eine beliebige Taste um diese Nachricht zu l schen 041 Innentemperatur Zonenzuordnung Standard 000 _____...

Page 14: ...9 Bereich 061 Geringer 103 Nein 145 Special 187 Zugang 229 020 Bericht 062 Geschlossen 104 Nicht 146 Speicher 188 Zur ck 230 021 Bewegung 063 Gewalt 105 Nord 147 Sportstudio 189 Zusatz 231 Leerzeichen...

Page 15: ...________ ______________________________________________________________________________________________________________________________________________________________________________________ ________...

Page 16: ...verwendetwerden wie in dieser EULAbeschrieben d Vermietung Sie d rfen diesesSOFTWAREPRODUKT nichtvermieten lea sen oder ausleihen Sie d rfen esanderen nichtzur Verf gung stellen oder es aufeinen Serve...

Page 17: ...samolepka s popisem na dv ka kl vesnice 4x baterie AA 1x materi l pro mont Mont kl vesnice Namontujte kl vesnici na m sto kter je p i p chodu a odchodu snadno p stupn Jakmile m te vybr no such a bezp...

Page 18: ...Popis P ipraveno zelen Pokud kontrolka sv t je syst m p ipraven na zapnut Zapnuto erven Kontrolka sv t blik pokud je syst m sp n zapnut Porucha lut Sv t signalizuje poruchu v syst mu Blik slab baterie...

Page 19: ...ch zm n te n zvy tak po ulo en zm n dojde k automatick mu odesl n zm n n ch n zv do ostatn ch kl vesnic Hlasov n pov da Hlasov zvonkohra Nastaven hlasov n pov dy pouze na bezdr tov kl vesnici Menu 6 p...

Page 20: ...Ovl dac v stup 1 Programov n kl vesnice Stiskn te 8 Instala n k d 860 Slot kl vesnice Sekce nen ur ena pro programov n dvou m stn slo slotu je zobrazeno pouze pro informa n ely 861 876 Sekce pro progr...

Page 21: ...ou 000 128 042 P i azen z ny pro venkovn teplotu V choz nastaven 000 ___ ___ ___ platn hodnoty jsou 000 128 101 228 Programov n dve n zvonkohry V choz nastaven 01 ___ ___ T n zvonkohry na kl vesnici l...

Page 22: ...ter 100 pokojik 142 syna 184 zprava 226 Mezera 017 chodba 059 matky 101 policie 143 system 185 zruseno 227 Apostrof 018 chyba 060 mazlicek 102 pomocny 144 tamper 186 zvonkohra 228 Poml ka 019 cislo 06...

Page 23: ...________ ______________________________________________________________________________________________________________________________________________________________________________________ ________...

Page 24: ...jeden Integrovan produkt V tomto p pad sm b t Softwarov produkt pou v n pouze s dodan m Hardware tak jak je ur eno d le v t to EULA d Pron jem U ivatel nesm pronaj mat ani p j ovat Softwarov produkt...

Page 25: ...Yak nl k Etiketi W s zl duyuru 1 HS2LCDWF duvar deste i 1 kurulum k lavuzu 1 i kap yap kan sticker 4 AA pil 1 donan m paketi 1 yak nl k etiketi Tu tak m n monte edin Tu tak m n belirlenen giri ve k no...

Page 26: ...etonya dili 24 Litvanya dili 25 Ukraynaca 26 Slovakyaca 27 S rp a 28 Estonyaca 29 Slovence Tu tak m Sembolleri Sembol Tan m Haz r I Ye il Haz r A IK ise sistem kuruluma haz rd r Kurulu I K rm z Kurulu...

Page 27: ...n 00 se mek tu tak m sesli uyar s n kapat r Sesli Zil Kontrol Men 6 eri im kodu Zil Kontrol Bu fonksiyon tu tak m sesli zil ses seviyesini de i tirmek i in kullan l r Sesi 0 10 aras nda art rmak veya...

Page 28: ...lan 01 dir NOT HS2LCDWF tu tak m global bir tu tak m olarak atanamaz 001 005 1 5 numaralar aras Fonksiyon Tu u Atamas 011 Tu tak m Giri k Programlamas Zone veya PGM Numaras 00 _____ _____ _____ 012 Y...

Page 29: ...erli giri ler 000 128 dir 101 228 1 128 aras ndaki Zone lar i in Kap Zil Sesi Tu tak m ayr zone lar i in d rt farkl zil sesi olu turmaya programlanabilir rn Zone 1 i in K s m 101 e girin Zone 2 i in K...

Page 30: ...ersiz 098 I klar 138 Paspas 178 Yukar 218 V 019 Banyo 059 Ekran 099 lemde 139 Pencere 179 Y kle 219 W 020 Bar 060 Enerji 100 zinsiz 140 Pil 180 Y kleme 220 X 021 Baraka 061 Ev 101 Kamera 141 PM 181 Y...

Page 31: ...________ ______________________________________________________________________________________________________________________________________________________________________________________ ________...

Page 32: ...n artlar na ve ko ullar na uyulmas n sa lamakhususundagerekli nlemlerialman z gerekmektedir b Bile enlerin Ayr lmas Yaz l m r n tek bir r n olarak lisansland r lmaktad r Bile enpar alar birden fazla...

Reviews: