

Page 9
For technical questions, please call 1-800-444-3353.
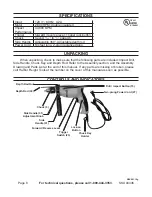
SKU 94436
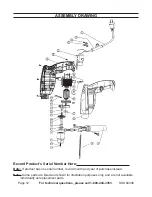
aSSemBLY InStructIOnS
Side Handle assembly
Slide the Side Handle (31) over the front housing until it rests behind the Chuck (3).
1.
When required for exact depth drilling, insert the Depth Rod (30) into the Side Handle.
2.
Adjust distance as necessary using the Depth Rod Nut.
Turn the Side Handle (31) to the desired position for operation, then securely tighten the
3.
Handle Adjusting Knob.
Inserting Drill Bits
Locate the Chuck Key (32) and place the end into the Chuck (3). Turn counterclockwise
1.
until the Chuck opening is sufficient to place the bit.
With the drill or impact bit in place, turn the Chuck Key clockwise until the Chuck tightens
2.
securely over the bit.
Remove the Chuck Key (32) and place it in the Chuck Key holder on the Power Cord.
3.
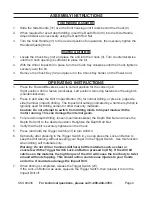
OperatIng InStructIOnS
Press the Forward/Reverse Lever to correct position for the current job.
1.
Right position
: drill or fasten (clockwise).
Left position
: removing fasteners or freeing bits
(counterclockwise).
Press in (left side) the Drill / Impact Button (15) for normal drilling, or press in (opposite
2.
side) hammer (impact) drilling. The impact drill setting (indicated by a hammer symbol) is
typically used for drilling cement or other masonry materials.
caution: Do not attempt to switch from drilling mode to Impact mode with the
motor running. this can damage the internal gears.
For precision depth drilling, loosen (counterclockwise) the Depth Rod Nut and move the
3.
Depth Rod (30) to the desired position. Retighten the Depth Rod Nut.
Verify that the bit is securely tightened in the Chuck.
4.
Press (and hold) the Trigger Switch (23) to turn drill On.
5.
Optionally, after pressing in the Trigger Switch in, you can press the Lock-on Button to
6.
keep the drill running without keeping your finger on the Trigger Switch. Use this function
when drilling soft materials only.
Warning: Do not drill or hammer-drill hard, brittle materials such as steel or
concrete with the trigger Switch Lock-on Button pressed in (On). If the drill bit
catches on the material, the high torque of the drill will cause the tool body to twist
around without stopping. this violent action could cause injuries to your hands
and arms. It could also damage the Impact Drill.
When drilling is completed, release the Trigger Switch (23).
7.
If the Lock-on Button was used, squeeze the Trigger Switch, then release it to turn the
Impact Drill off.


