


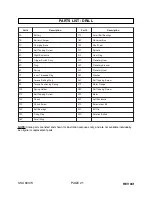
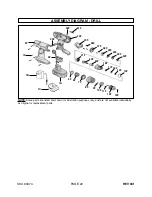

SKU 90374
PAGE 12
3.
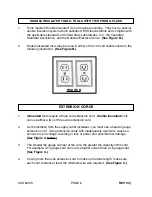
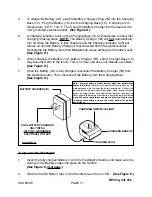
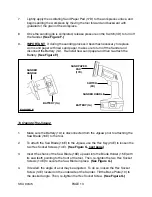
To turn off the Flashlight, slide the Switch Button (4C) to its OFF position.
(See Figure E.)
4.
To change the Bulb (7C), unscrew the Light Head Cap (9C) and remove the Lens
(8C). Remove the old Bulb by pushing in on the Bulb while turning it clockwise.
Insert a new Bulb by aligning the tabs on the Bulb with the slots in the Bulb
socket. Push in on the new Bulb while turning it counterclockwise. Re-attach the
Lens and Light Head Cap. (See Figure E.)
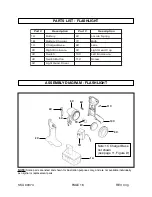
FIGURE E
FLASHLIGHT
HANDLE
BATTERY (1A)
SWITCH
BUTTON
(4C)
LIGHT
HEAD
CAP
(9C)
LENS
(8C)
BULB
(7C)
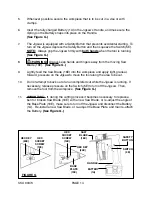
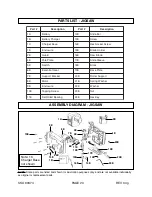
To Operate The Sander:
1.
WARNING! The Cordless Sander is not designed for
wet sanding.
2.
Make sure the Battery (1A) is disconnected from the Sander prior to attaching
sand paper (not included) to the tool.
3.
To attach sand paper to the Sander, use the
hook and loop mechanism on its
Sand Paper Pad (17D). (See Figure F, next page.)
4.
Whenever possible, secure the workpiece that is to be sanded in a vise or with
clamps.
5.
Insert the fully charged Battery (1A) in the Sander’s Handle, and make sure the
Spring on the Battery snaps into place on the Handle. (See Figure F.)
6.
To turn on the Sander, squeeze the Switch (3D). NOTE: Always grip the Sander
firmly with both hands when the tool is running.


